Category: fresh & simple recipes

  • Super Tasty Mexican Slow Cooker Pulled Pork

    Super Tasty Mexican Slow Cooker Pulled Pork

    This Mexican Slow Cooker Pulled Pork is the definition of a set-it-and-forget-it meal that still manages to blow everyone away. Smoky guajillo and ancho peppers, red wine, apple, and cumin slow-cook together with a pork shoulder for 5 hours until the meat falls apart and drinks up every drop of that incredible sauce. It is one of our most-made dinner recipes — at least twice a month on the rotation.

    This post may contain affiliate links. If you purchase through these links, I may earn a small commission at no extra cost to you. Thank you for supporting Love & Harvest!

    slow cooker pulled pork

    This post is all about slow cooker Mexican pulled pork.

    Ingredients for This Mexican Slow Cooker Pulled Pork Recipe

    Ingredients

    Pork Shoulder

    The cut we are looking for in this recipe is the pork shoulder. The shoulder has enough meat and fat mixed in together — it is not the tough part of the pork and using the slow cook method, the meal always comes out juicy, tender, and incredibly delicious.

    • Why it matters: Fat content in the shoulder bastes the meat from the inside as it slow-cooks, creating that signature pull-apart texture you cannot get from leaner cuts like loin.

    Guajillo Peppers

    The Guajillo dried peppers are not spicy when the seeds are removed. They give the sauce a nice thick texture and a distinct citrus-smoke flavour.

    • Why it matters: Guajillos are the backbone of many Mexican red sauces. Their fruity, slightly tannic flavour is what makes this sauce taste authentically Mexican rather than generic chili pork.

    Ancho Peppers

    Ancho peppers give the sauce its deep red color. They are not spicy and don’t have a sharp taste — they are dried poblanos with a mild, chocolatey undertone.

    • Why it matters: Anchors are responsible for the sauce’s gorgeous color and the earthy depth that rounds out the guajillo’s brightness. Together they are a classic Mexican pairing.

    Cumin

    Always a great partner with pork. Use powder form, not seeds — it marinates into the meat more evenly and the flavour is more evenly distributed throughout the roast.

    • Why it matters: Cumin is the warm spice foundation of the rub. Without it the pork tastes flat. Don’t be shy with it — this recipe leans into the cumin intentionally.

    Red Wine

    A great way to tenderize the pork — it penetrates into the meat and adds a fall-and-winter depth of flavour. A Malbec or any full-bodied red wine works perfectly here.

    • Why it matters: The alcohol in the wine breaks down muscle fibers during the long cook, resulting in a more tender final product. It also adds complexity to the sauce that water or stock alone cannot achieve.

    Apple

    Three apples, peeled and shredded. Adding apples is a great way to include fibre and natural sweetness that offsets the wine’s acidity and tartness.

    • Why it matters: The natural sugars in the apple caramelize during cooking and help balance the smokiness of the peppers. The apple also adds another layer of tenderization — the malic acid breaks down protein similarly to how a citrus marinade works.

    Slow Cooker

    I use an Crock-Pot Slow Cooker or the slow cook setting on my Instant Pot 7-in-1. Both work perfectly. The slow cook method is what makes this recipe so hands-off — 90% of the time you’re just waiting for the cooker to do its magic.

    • Why it matters: Slow cooking at low temperature for a long time breaks down the tough collagen in the pork shoulder into gelatin, which gives the sauce its body and the meat its silky, fall-apart texture.

    How to Serve Pulled Pork

    There are many ways to serve this slow cooker pulled pork:

    • Bread — any bread works. Make a pulled pork burger, a torta, or sliders with small buns.
    • Burrito — wrap in a large flour tortilla.
    • Taco — serve on top of a corn tortilla for a pulled pork taco.
    • Mash potato — serve with mashed potato and veggies, drizzled with the sauce.
    • Poutine — deep fry fries, add pulled pork, black beans, cheese, and sour cream.
    • Appetizer — bake thin baguette slices and serve the pulled pork with pickled onions.

    For more Mexican-inspired recipes, try our Green Pozole (Pozole Verde) or our Easy Mexican Salsa Verde — both pair beautifully with this pulled pork.

    easy slow cooker pulled pork

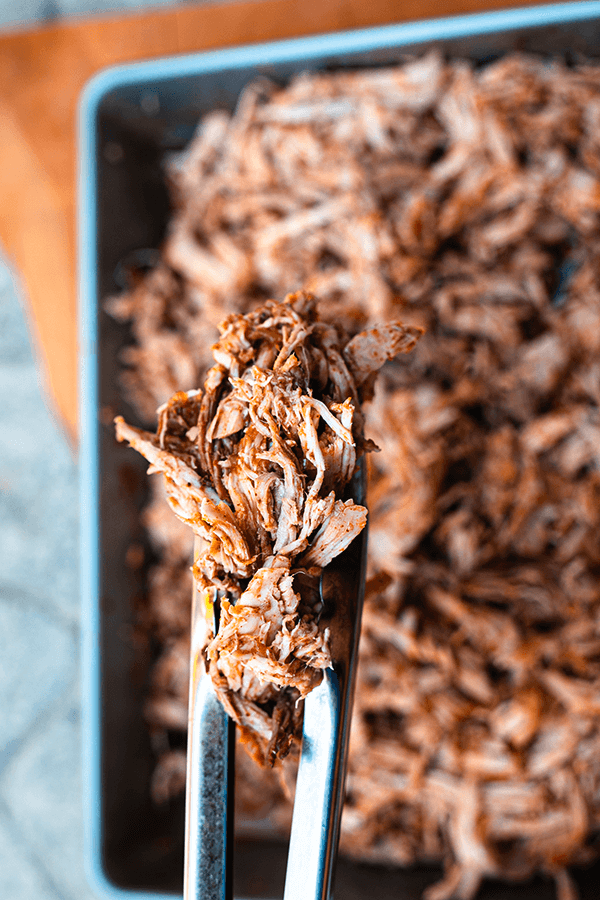
    Mexican pulled pork being shredded with forks in a dark sauce

    Mexican Slow Cooker Pulled Pork

    Easy tender and delicious pork with a Mexican sauce soaked and slow-cooked in an Instant Pot. I love serving this with tortilla, rice, or over mashed potatoes.
    Print Recipe
    Pin Recipe
    Prep Time:10 minsCook Time:5 hrsServings: 6 people

    Equipment

    • Instant Pot or Slow Cooker

    Ingredients

    Pork Marinate

    • 1 kg pork shoulder whole
    • 3 tsp sea salt
    • 1 tbsp paprika
    • 1 tbsp cumin powder
    • 1 tsp black pepper
    • 3 tbsp canola oil

    Mexican Peppers

    • 2 guajillo peppers
    • 3 ancho peppers

    Liquid

    • 1 cup red wine
    • 3 apples peeled and shredded
    • 1 white onion shredded
    • 1 cup orange juice
    • 2 tbsp vinegar
    • 3 bay leaf
    • salt to taste

    Instructions

    • Rinse and pat dry the pork shoulder with a paper towel.
    • Mix the spices and salt together for the pork marinade. Rub the spice all over the meat. Let it sit for 15–30 minutes.
    • Soak the Mexican peppers in hot boiling water. Place a plate or something heavy on top to keep the peppers fully submerged for 10 minutes.
    • Break the top off the peppers and scrape the inside clean. Add all the peppers to a blender with 1/2 cup of water. Blend until smooth.
    • Heat a pan with oil on medium-high heat. Place the pork shoulder in the pan and brown all sides.
    • Set your slow cooker or Instant Pot to the slow cook setting on high for 5 hours. Place the browned pork shoulder inside and add all the liquids and Mexican pepper puree on top.
    • Close the lid and open the valve (if using Instant Pot).
    • After 5 hours, open the lid and use two forks to shred the meat apart. This allows the sides to soak up all the juices. Add salt to taste.

    Frequently Asked Questions

    Can I make this pulled pork without a slow cooker?

    Yes. You can braise it in a Dutch oven in the oven at 300°F (150°C) for 4–5 hours with the lid on. The result is essentially the same — low heat for a long time is what does the work, regardless of the vessel. A Lodge Dutch Oven works beautifully for this.

    What cut of pork is best for pulled pork?

    Pork shoulder (also called pork butt or Boston butt) is the best cut for pulled pork. It has the right fat-to-meat ratio so the meat stays moist during the long cook. Avoid pork loin — it is too lean and will dry out.

    How spicy is this Mexican pulled pork?

    Not spicy at all, as long as you remove the seeds from the guajillo and ancho peppers before blending. Both peppers are mild when deseeded. The sauce is smoky, earthy, and slightly sweet from the apple and orange juice — not hot.

    Can I use an Instant Pot instead of a Crock-Pot?

    Yes. Use the slow cook function on your Instant Pot, set to high for 5 hours with the lid closed and the valve open. Alternatively, use the pressure cook function for 60–75 minutes on high pressure followed by a natural release — the texture will be slightly different but equally tender.

    How do I store and reheat leftover pulled pork?

    Store pulled pork in an airtight container with its juices in the refrigerator for up to 4 days, or freeze for up to 3 months. Reheat gently in a pan on low heat with a splash of water or orange juice to revive the sauce. Avoid microwaving on high as it can dry the meat out.

    What do I do if the sauce is too thin after cooking?

    Remove the pork from the slow cooker after shredding and pour the remaining liquid into a saucepan. Simmer on medium-high heat for 10–15 minutes until the sauce reduces and thickens. Pour it back over the shredded pork before serving.
  • Homemade Chinese Food Classic: Hainanese Chicken

    Homemade Chinese Food Classic: Hainanese Chicken

    Hainanese Chicken is one of those dishes that sounds deceptively simple — poached chicken, ginger scallion sauce, rice cooked in the broth — but the result is a deeply comforting bowl that makes you understand immediately why it has been a beloved dish across generations of Cantonese and Southeast Asian families. This is authentic homemade Chinese food at its most honest: few ingredients, careful technique, profound flavour.

    This post may contain affiliate links. If you purchase through these links, I may earn a small commission at no extra cost to you. Thank you for supporting Love & Harvest!

    Hainanese chicken on a platter with a spoon drizzling sauce, next to fresh herbs

    Chicken is always served during Chinese New Year because it is the symbol of unity and family. Usually, steamed or poached chicken with head and feet is served during our traditional dinner to further emphasize the concept of union and rebirth. Although Hainanese Chicken is from the Hainan province in China, it is said to have been popularized in Singapore by Hainanese immigrants, and it is still well-loved among Cantonese families everywhere.

    This post is all about a delicious Homemade Chinese Food Classic: Hainanese Chicken.

    Why You’ll Love This Recipe

    • Easy — it is a slow-poached chicken in a stock pot, lightly seasoned. Mostly hands-off once it is in the pot.
    • Poached, not fried — the chicken cooks gently in water.
    • Delicious — ginger and chicken go hand in hand, and it is a soul-soothing taste. Try it once and you will understand the obsession.
    • Authentic Cantonese dish — if you want a popular homemade Cantonese recipe, this is the one. All Cantonese moms know it.

    Hainanese Chicken Rice

    The same broth used to cook the chicken is also used to make the rice. When it finishes cooking, you open the lid to a luscious and glossy pot of rice that is infused with the chicken’s essence. In restaurants, they often add a lot of oil and chicken fat to make it extra tasty. For a less oily version, skim the soup of its fat by removing the skin and defatting the top layer of oil. If flavour is your priority, pour on all that glory and work a little harder the next day.

    easy chinese food recipes

    Cooking Methods

    There are two known ways of making Hainanese Chicken. First, the chicken and rice are steamed together. Second, the chicken is poached in water, and the rice is cooked separately using the chicken broth. We use the second method — a little more work, but the result is better presentation and more control over each component.

    top 12 easy chinese recipes

    Ingredients Deep-Dive

    Ingredients

    Free-Range Chicken

    The most important ingredient. Try to find a fresh, free-range chicken — it has a far better flavour and texture compared to caged varieties.

    • Why it matters: Free-range chickens have more developed muscles from movement, which means more flavour in the meat and a better-tasting broth. The difference is noticeable in a delicate dish like this where the chicken is the only star.

    Ginger

    Ginger goes into the poaching liquid, the scallion sauce, and the rice. Use fresh ginger — not powder.

    • Why it matters: Ginger neutralizes the gamey notes in chicken and infuses every component with a clean, warming flavour. It is the defining aromatic of this dish. A ginger grater makes it easy to get fine, fibrous shreds perfect for the sauce.

    Sesame Oil

    Used in the chicken marinade — just 1 teaspoon brushed over the bird before and after cooking.

    • Why it matters: Sesame oil adds a toasted, nutty aroma that is unmistakably Chinese. Use it as a finishing touch — it is not a cooking oil and should never be added to high heat.

    Chinese Cooking Wine

    Shaoxing rice wine is used in the marinade. Two great options: Qian Hu Chinese Shaohsing Rice Cooking Wine and Premium Shaoxing Rice Cooking Wine.

    • Why it matters: Shaoxing wine removes any residual odour from raw chicken and adds a subtle complexity to the marinade that cannot be replicated with any substitute.

    Whole chicken poaching in a pot of broth with onion pieces

    Pro Tips for Perfect Hainanese Chicken

    Pro Tip 1 — Choice of Chicken and Exfoliation

    Before cooking, exfoliate your chicken with large sea salt or kosher salt — rub it all over the skin for a good 10 minutes, including under the wings and inside the cavity. Initially the skin is wrinkly, but after 10 minutes of salt rubbing it should appear smooth and glowing. Wear gloves to protect your hands.

    Pro Tip 2 — Cooking Temperature

    It is important to bring the water to a full boil before dipping the chicken in. This causes the skin to contract immediately, helping it adhere to the flesh. Once the chicken is in, reduce to a very low simmer — a hard boil will make the skin tough. A low, steady simmer produces juicy, bouncy flesh.

    secret chinese restaurant recipes

    Pro Tip 3 — Ice Bath

    The ice bath is essential for bouncy chicken meat. When the hot chicken meets instant cold water, the meat contracts immediately so all the juices stay inside. Do not skip this step. Fill a large bowl with 2L water and 1L of ice, and transfer the chicken immediately when it comes out of the pot.

    Pro Tip 4 — Chopping the Chicken

    In Cantonese whole chicken dishes, we always chop through the bones. Two factors matter: knife sharpness and commitment. Sharpen your knife well and use a heavy butcher’s knife. When you raise the knife, do not hesitate — a clean, decisive hit goes through the bone cleanly. A tentative hit shatters the bone into small pieces. Practice makes perfect.

    top 20 chinese dishes

    If you enjoy this recipe, try our Steam Preserved Vegetables with Pork for another classic Cantonese comfort dish.

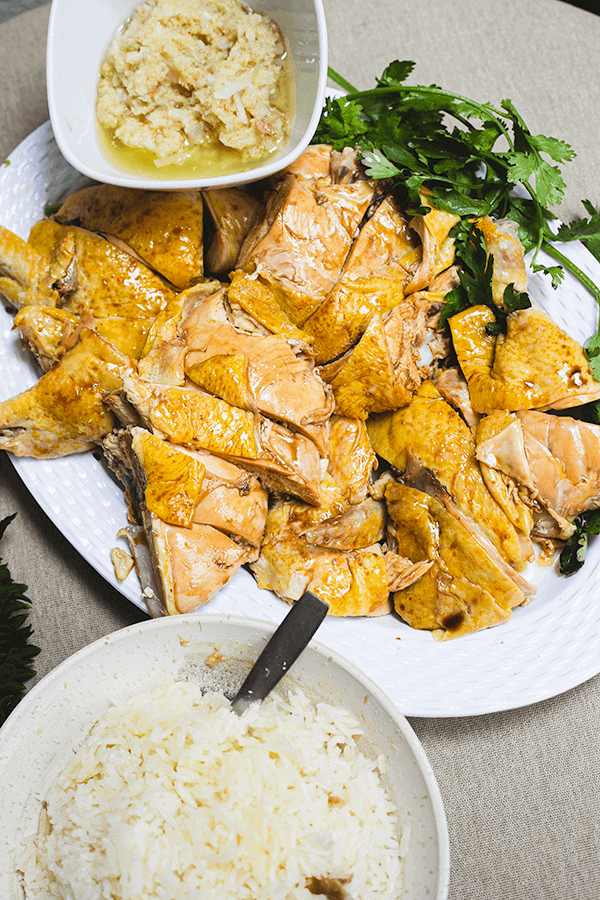
    Chopped Hainanese poached chicken on a platter with rice and greens

    Hainanese Chicken with Ginger Scallion

    Authentic warm and cozy Hainanese Chicken recipe with ginger scallion sauce. A great family meal to share. Whether you’re preparing for Chinese New Year or a regular family dinner, this traditional Chinese meal will leave everyone full and happy!
    Print Recipe
    Pin Recipe
    Prep Time:1 hrCook Time:60 minTotal Time:2 hrsServings: 6 people

    Ingredients

    Poached Chicken

    • 1.3 kg free range and hormone free chicken
    • 4 Litre water until water slightly covers the chicken in the pot
    • 1.5 tbsp kosher salt or salt rock
    • 2 scallion
    • 7 slices of ginger
    • 2 garlic clove smashed

    Chicken Marinade

    • 1 tsp sesame oil
    • 1 tsp light soy sauce
    • 1 tsp Chinese rice cooking wine

    Ginger Scallion Sauce

    • 4 tbsp ginger grated
    • 2 scallion washed and chopped
    • ¼ cup canola oil
    • 1 tsp sea salt

    Hainanese Rice

    • 2 tbsp canola oil or 2 tbsp chicken rendered fat
    • 2 cm ginger grated
    • 1 garlic clove grated
    • 1 tsp sea salt
    • 2 cups jasmine rice
    • 2 cups chicken broth from the poaching liquid

    Garnish

    • 1 cucumber sliced thinly

    Instructions

    Cleaning the Chicken

    • Take the whole chicken and give it a good wash. Pat dry with a paper towel.
    • Exfoliation: wearing gloves, take 1 tsp of kosher salt and rub the chicken evenly — including under the wings and inside the cavity. Rub for a good 10 minutes. The skin should go from wrinkly to smooth and glowing.
    • Chicken marinade: combine soy sauce, sesame oil, and Chinese cooking wine. Using a pastry brush, brush the chicken with the marinade and let it sit.

    Cooking the Chicken

    • Bring a large stock pot with 4L of water to a boil. Add scallion, ginger, and garlic. Grabbing the chicken by the neck, dip it into the boiling water and pull it back out. Repeat 4 times. On the 4th time, place the whole chicken (breast submerged first) into the pot with the lid on. Reduce to a very low simmer for 35 minutes. After 35 minutes, turn off the heat and let the chicken rest in the broth for an additional 15 minutes.
    • Fill a large bowl with 2L of water and 1L of ice. Once the chicken is done, immediately transfer it to the ice bath.
    • Leave the chicken in the ice bath until the meat is firm and cool, about 10 minutes. Remove and drain excess liquid.

    Ginger Scallion Sauce

    • In a deep heatproof bowl, place the grated ginger, chopped scallion, and salt. Mix well.
    • In a pan, heat the canola oil until it just starts to smoke. Turn off the heat and carefully pour it over the ginger and scallion. Hold the bowl over a sink as it will splatter. Mix well.

    Hainanese Rice

    • In a pan or pot with a lid, heat up the chicken fat or oil. Add ginger and garlic. Cook, stirring, until fragrant. Stir in the rice and fry gently until glossy. Add chicken stock, place the lid on, and cook on low for 17 minutes. Let rest for 10 minutes before serving.

    Serving

    • Using a sturdy knife, chop the chicken into bite-size pieces, chopping through the bones. Lay all pieces on a large plate.
    • Brush the chicken marinade over the chicken pieces again.
    • Fluff up the rice and serve with thinly sliced cucumbers and the ginger scallion sauce on the side.

    Frequently Asked Questions

    What is Hainanese Chicken?

    Hainanese Chicken is a dish of poached whole chicken served with rice cooked in the poaching broth, ginger scallion sauce, and often cucumber slices. While it originates from the Hainan province in China, it was popularized in Singapore by Hainanese immigrants and is deeply beloved across Cantonese and Southeast Asian communities.

    Why do you dip the chicken in and out of boiling water four times?

    This technique, called “dipping,” causes the skin to contract four times in rapid succession. It seals the skin tightly to the flesh so it does not slip off during the long poach. It also helps the skin develop a beautiful, tight texture. Do not skip this step.

    Can I use chicken pieces instead of a whole chicken?

    You can, but the result will not be the same. A whole chicken produces a richer, more complex broth that makes the rice shine. If you do use pieces, choose bone-in skin-on thighs — they are closest to the whole chicken in terms of flavour output.

    What is the correct temperature to poach the chicken?

    You want a very low simmer — just barely bubbling. In temperature terms, around 160–180°F (71–82°C). A hard boil will make the skin tough and the meat dry. A gentle simmer keeps the flesh juicy and the skin supple.

    What can I substitute for Shaoxing cooking wine?

    Dry sherry is the most common substitute and works well. Mirin can also work but it is sweeter, so use half the amount. If you cannot find any of these, simply omit the cooking wine from the marinade — the dish will still be delicious.

    How do I store and reheat Hainanese Chicken?

    Store the chicken and rice separately in the refrigerator. Keep the remaining broth and use it to reheat the rice by adding a splash when reheating in a pan. The chicken is best eaten cold or at room temperature the next day — many Cantonese prefer it this way. Reheat gently to avoid toughening the skin.

  • Blender Oatmeal Pancakes

    Blender Oatmeal Pancakes

    These blender oatmeal pancakes have become our family’s most-requested breakfast — and they have replaced buttermilk pancakes in our household for good. Made from just bananas, oats, eggs, and baking powder, everything goes straight into the blender and onto the griddle. The cleanup is one blender. The result is a soft, fluffy, naturally sweet pancake that keeps you full until lunch. My IHOP-loving husband is the proof of concept.

    This post may contain affiliate links. If you purchase through these links, I may earn a small commission at no extra cost to you. Thank you for supporting Love & Harvest!

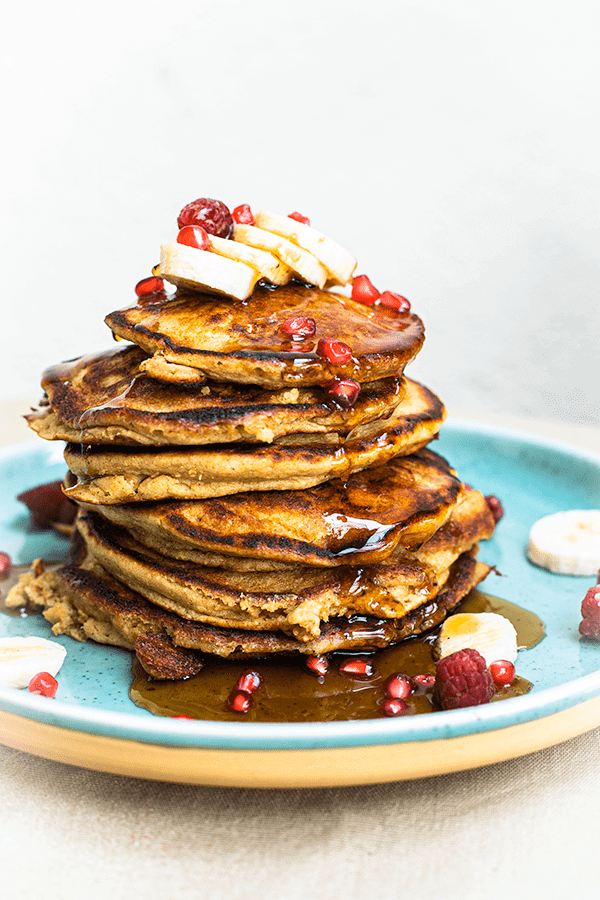
    Stack of oat banana pancakes with syrup, banana slices and pomegranate

    This post features a blender oatmeal pancake recipe using banana, oatmeal, vanilla, and eggs, all blended together.

    Why Make This Recipe?

    Pancakes for breakfast is probably one of the most popular breakfasts around the world. But can you make a version that’s easy and comes together in a blender? Yes. These oatmeal pancakes do. They are packed with whole grains from the oatmeal and natural sweetness from the bananas. Just 2 tablespoons of maple syrup in the whole batch. No flour. No special skills required.

    Mornings can be hectic. This recipe respects that — all the ingredients go into a blender, and cleanup is just the blender. That is it. It has been tested and approved by my IHOP-pancake-loving husband, who is not going back to buttermilk pancakes.

    Tall stack of pancakes topped with banana and pomegranate seeds

    Can These Pancakes Be Gluten-Free?

    I make these with regular oatmeal at home — not certified gluten-free oats — so as written they are not a gluten-free recipe. If you need them gluten-free, use certified gluten-free oats (and know that cross-contact can still happen in some kitchens and facilities). The only added sweetener is 2 tablespoons of maple syrup. They come out soft, fluffy, and full of flavour — perfect with maple syrup or any topping you love.

    Ingredients Deep-Dive

    Ingredients

    Oatmeal

    Either old-fashioned oats or quick-cooked oats both work. The oatmeal is the base of these pancakes — it replaces flour entirely.

    • Why it matters: Oats give these pancakes their hearty texture, no flour needed. I use regular rolled or quick oats. If you need a gluten-free version, choose certified gluten-free rolled oats or oat flour — oats are naturally gluten-free but can pick up wheat in processing, and cross-contact is still possible.

    Bananas

    Use overripe bananas — the riper, the better. The spots on the peel are your best friends here. Riper bananas are sweeter and blend more smoothly.

    • Why it matters: Bananas serve as both the natural sweetener and the binding agent in this recipe. They replace both sugar and part of the fat you would find in a traditional pancake recipe. Overripe bananas have higher natural sugar content and a more intense banana flavour.

    Eggs

    Eggs help the pancake rise and give it a fluffy texture. They are also the primary structural ingredient that binds the oats and banana together.

    • Why it matters: Without eggs, the batter would be too loose to hold together on the griddle. The protein in eggs sets when heated, creating the structure that gives these pancakes their lift.

    Baking Powder

    Baking powder creates the bubbles and air pockets inside the pancake that give it that light and fluffy texture. It is essential in all pancake recipes.

    • Why it matters: Without baking powder, these pancakes will come out flat and dense. The reaction between baking powder and the moisture in the batter produces CO2 bubbles that make the pancakes puff up on the griddle.

    Stack of pancakes with a forkful cut out to show the fluffy inside

    Pro Tips for Perfect Oatmeal Pancakes

    Pro Tip 1 — Use a Griddle

    A cast iron griddle has a larger surface area than regular pans, letting you cook more pancakes at once. It also creates an even surface of heat so every pancake cooks consistently.

    Pro Tip 2 — Cook the Pancakes with Butter

    Always add a thin layer of butter on the griddle before adding the batter. This prevents sticking and adds flavour. Butter tastes better than regular cooking oil for pancakes.

    Pro Tip 3 — When to Flip the Pancakes

    Flip when you see little air pockets forming in the middle of the pancake and the edges stop looking wet — they will have a soft, matte texture. This is the signal that the bottom is set and the pancake is ready to flip without breaking.

    Pancake stack in a pool of syrup with banana slices on a blue plate

    Looking for more breakfast ideas? Try our Mixed Berry Smoothie with Pomegranate and Nopal or our Celery Juice to pair alongside these pancakes for a complete morning meal.

    Tall stack of pancakes topped with banana and pomegranate seeds

    Blender Oatmeal Pancakes

    Delicious pancakes made with oatmeal and banana. All made with just a blender. Gluten-free when made with certified gluten-free oats.
    Prep Time 7 minutes
    Cook Time 15 minutes
    Total Time 22 minutes
    Servings: 4 people
    Course: Breakfast
    Cuisine: American
    Calories: 295

    Ingredients
      

    • 2 cups royal oats or quick oats
    • 1 cup water
    • 1 medium riped banana
    • 2 eggs
    • 2 tbsp melted butter
    • 2 tbsp maple syrup
    • 1 tbsp baking powder
    • ½ tsp baking soda
    • ½ tsp salt
    • ½ tsp ground cinnamon
    • 2 tsp vanilla extract

    Equipment

    • high speed blender

    Method
     

    1. Preheat your griddle on the stovetop and set it on medium low heat.
    2. In the blender put all the ingredients together and blend on high for 30 seconds. Batter should be smooth with no lump.
    3. lightly brush the surface of your griddle with butter.
    4. With your ⅓ measuring cup, scoop the batter with the mesuring cup, and slowly drop the batter on the griddle. Leave enough space between pancakes so they are not touching each other.
    5. Cook until small bubbles start to form in the middle of the pancake the sides have turned into a matte texture. Flip the pancake and cook for another 1-2 minutes.
    6. Serve right away with a small slice of butter on top and maple syrup.

    Frequently Asked Questions

    Do these oatmeal pancakes taste like banana?

    Yes, mildly. The banana flavour is present but not overwhelming. The more overripe your bananas are, the stronger the banana flavour. If you want to reduce it, use one banana instead of two and add a tablespoon of nut butter for binding. The oat flavour balances out the banana very well.

    Can I make this recipe without a blender?

    Yes, but the texture will be coarser. Mash the bananas very well with a fork, then mix in the eggs, and finally stir in the oats and baking powder. For a smoother texture without a blender, use certified gluten-free oat flour instead of whole rolled oats — it blends into the batter without the blender step.

    Are these pancakes suitable for toddlers?

    Yes. They have no refined flour, and the only sweetener is the banana plus 2 tablespoons of maple syrup in the whole batch. They do contain butter and eggs. They are soft, easy to chew, and naturally sweet from the banana. Cut them into small pieces or serve as finger food for younger toddlers. They are also an easy way to serve oats and eggs at a toddler breakfast.

    How do I store leftover oatmeal pancakes?

    Let the pancakes cool completely, then store in an airtight container in the refrigerator for up to 3 days. For longer storage, freeze with parchment paper between each pancake and reheat directly from frozen in a toaster or non-stick pan. They reheat very well and taste just as good the next day.

    Can I add protein powder to this recipe?

    Yes. Add one scoop of plant-based protein powder to the blender along with the other ingredients. The batter may thicken slightly — if it does, add a tablespoon of water to reach the right consistency. A vanilla or unflavored protein powder works best so it does not compete with the banana.

    Why are my pancakes coming out flat?

    The most common reason is old baking powder. Baking powder loses its potency over time — test yours by dropping a teaspoon into hot water. If it bubbles vigorously, it is still good. If not, replace it. Also make sure you are not overmixing the batter after adding the baking powder — stir just until combined to keep the air pockets intact.

  • Sweet Watermelon Salad with Mint

    Sweet Watermelon Salad with Mint

    Imagine biting into a cold, sweet cube of watermelon on a blazing summer afternoon — then hitting a burst of fresh mint and a squeeze of lime. That one-two punch of sweet and refreshing is exactly what this sweet watermelon salad with mint delivers. It comes together in 10 minutes, requires zero cooking, and disappears from the table even faster.

    This post may contain affiliate links. If you purchase through these links, I may earn a small commission at no extra cost to you. Thank you for supporting Love & Harvest!

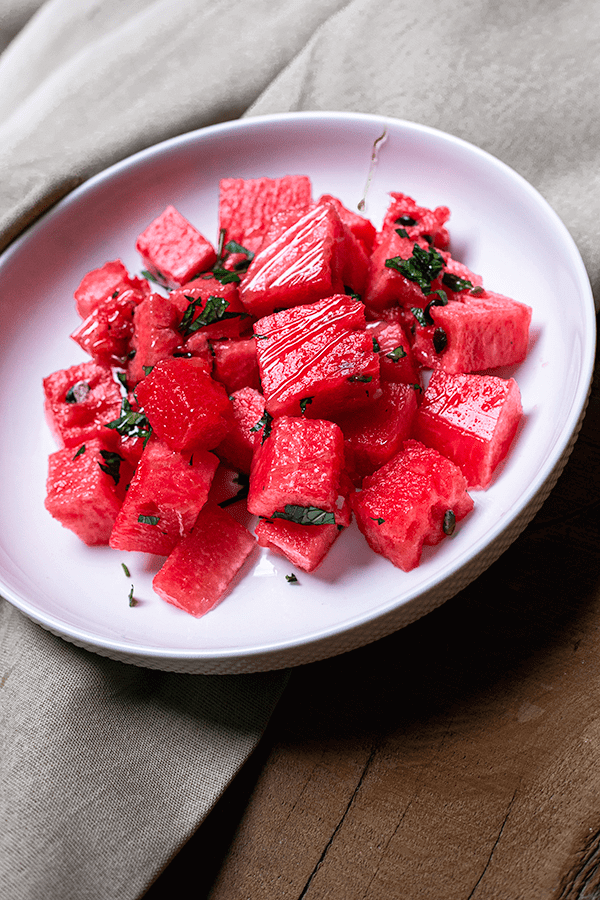
    watermelon salad with mint

    Why You Will Love This Watermelon Salad

    When watermelon season is in full bloom, it is great to find another way of eating it. This watermelon salad with mint is light and zesty — made with mint, lime juice, and honey. Sweet watermelon is great on its own, but it is even better when turned into a cold refreshing salad. Do you have mint in your garden and do not know how to use it? You can definitely add it here.

    How to Pick a Great Watermelon

    I was taught to give the watermelon a good hit to hear the echo — a deep hollow sound usually means a lot of water inside. But sound alone does not guarantee sweetness.

    First, look at the variety. Most sweet watermelon varieties will give you a cold, sweet slice. Beyond variety, look for an even oval shape, a creamy yellow field spot on the bottom (where it rested on the ground while ripening), and a watermelon that feels heavy for its size. Color should be deep and consistent. If you want kids to help prepare it, try the Watermelon Cutter Knife — it makes slicing safe and fun.

    Ingredients Deep-Dive

    Watermelon

    • Why it matters: The star of the dish — choose a ripe, sweet variety for maximum flavor and hydration. Cold watermelon makes the salad extra refreshing.

    Fresh Mint

    • Why it matters: Mint provides a cooling contrast to the sweetness. Use garden-fresh mint if possible — the oils in fresh leaves are incomparably more vibrant than dried.

    Lime Juice

    • Why it matters: The acidity brightens the flavor and keeps the watermelon from tasting flat. Always use fresh-squeezed. A lime juicer makes this effortless.

    Honey

    • Why it matters: A light drizzle of honey rounds out the tartness of the lime. Use raw honey if you have it — the floral notes complement mint beautifully.

    watermelon salad with mint and lime

    Watermelon Salad with Balsamic

    The recipe for this sweet watermelon salad with mint calls for lime and mint — tangy, sweet, and cooling. If your palate wants a stronger punch of flavor, you can make a watermelon salad with balsamic dressing instead.

    Balsamic works very well with watermelon. In a bowl, mix balsamic vinegar, olive oil, thyme, and a pinch of salt. Whisk until emulsified and drizzle over cold cubed watermelon. Adding basil alongside mint also works beautifully — basil and balsamic is magic. The balsamic I love using is the Kirkland Signature Balsamic Vinegar.

    Salad with Protein

    If the salad feels too light, add feta cheese for more protein. Watermelon salad with feta and balsamic dressing is heartier and great as summer winds down when watermelon season is closing. Red onion adds a slight bite that works well — watermelon salad with red onion and feta is a popular variation for onion lovers.

    watermelon salad with mint and basil

    Serving and Pairing Suggestions

    This salad is an amazing side for heavy summer meals. It is light and sweet — a perfect companion to BBQ, grilled meat, and fried chicken. Serve it cold, straight from the fridge, so the mint stays crisp and the watermelon stays firm. For more fresh salads, try the Vegetarian Caesar Salad or the Thai Chicken Salad to keep variety on your summer table.

    Frequently Asked Questions

    Can I make this watermelon salad ahead of time?

    Yes, but with one important step: keep the dressing (lime juice and honey) separate until just before serving. If you dress the watermelon too early, it draws out the juice and the salad becomes watery. Cube the watermelon and refrigerate it, then toss with mint, lime, and honey right before serving.
    How long does watermelon salad with mint last?

    It is best eaten the day it is made. Leftovers can be stored in the fridge for up to 24 hours, though the texture softens. Keep it in a sealed container and pour off any excess liquid before serving again.

    Can I use dried mint instead of fresh?

    Fresh mint is strongly preferred here. Dried mint has a more concentrated, slightly musty flavor that does not work as well in a raw salad. If you absolutely cannot find fresh mint, use just a small pinch of dried and supplement with fresh basil.

    What other fruits can I add to this salad?

    Cucumber is a natural companion — it is also hydrating and adds a satisfying crunch. Strawberries, blueberries, and kiwi also work well. Keep the fruit cold and cut it into similar-sized pieces so the salad is easy to eat.

    Why is watermelon salad so refreshing?

    Watermelon is over 90% water, so it’s super refreshing on hot days. Mint and lime keep it bright, and 2 tablespoons of honey balance the lime.

    Can I make this for a crowd?

    Yes — this recipe scales easily. For a large group, buy a whole seedless watermelon and cube it the morning of. Keep everything chilled separately, then toss together just before serving. A mandoline slicer can speed up prep if you are working with large quantities — a mandoline slicer gives you even cuts quickly.

    watermelon salad with mint

    Sweet Watermelon Salad with Mint

    Prep Time 10 minutes
    Total Time 10 minutes
    Course: Salad
    Calories: 100

    Ingredients
      

    • ½ sweet watermelon cubed
    • 2 tsp lime juice 1 – 2 lime
    • ¼ cup mint chopped
    • 2 tbsp honey

    Method
     

    1. In a large mixing bowl, cut and cubed half a medium size watermelon.
    2. toss the watermelon with the lime juice and mint. Plate it on the final presentation dish.
    3. Slowly and methodically drizzle honey on top of the watermelon. Serve immediately
  • Mango and Coconut Smoothie Bowl

    Mango and Coconut Smoothie Bowl

    This smoothie bowl mango and coconut is the kind of breakfast that makes you feel like you are eating at a beach resort — and it takes only 5 minutes to make. Thick, creamy, naturally sweet, and loaded with tropical flavor, it is as delicious as it is beautiful.

    This post may contain affiliate links. If you purchase through these links, I may earn a small commission at no extra cost to you. Thank you for supporting Love & Harvest!

    smoothie bowl mango

    Why Coconut and Mango Work So Well

    Coconut water and coconut cream make this bowl creamy and refreshing, and the mango and pineapple keep it sweet and tropical. For more drinks, try the Homemade Soy Milk or the Mixed Berry Smoothie with Pomegranate and Nopal.

    mango smoothie bowl without banana

    Ingredients Deep-Dive

    Fresh Mango

    • Why it matters: Ripe manila mango provides natural sweetness and a buttery base. The riper the mango, the sweeter and more aromatic the bowl.

    Coconut Cream and Fresh Coconut Water

    • Why it matters: Coconut cream thickens the smoothie. Fresh coconut water keeps the bowl light and refreshing.

    Frozen Pineapple

    • Why it matters: Frozen pineapple chills the bowl to a thick, almost ice-cream-like consistency without needing ice (which would dilute the flavor). Pineapple also adds a bright, tangy sweetness.

    Toppings That Make the Bowl

    Presentation is everything with smoothie bowls — and the toppings are not just visual. Here I use fresh strawberries, semi-sweet chocolate chips, and dried coconut shreds. Each spoonful has freshness, sweetness, and crunch. Other great toppings: guava, blueberries, passion fruit, lychee, sunflower seeds, or crushed walnuts. The options are endless — just keep them fresh and colorful. To serve in a coconut shell for a stunning presentation, check out these natural coconut shell bowls. For blending, a Vitamix high-speed blender gives the smoothest, thickest result.

    How to Split a Fresh Coconut

    If you want to serve the bowl inside a real coconut half, here is how. Using a large heavy cleaver, tap all around the equator of the coconut with the back of the blade to loosen the membrane from the shell. Place a large bowl underneath to catch the water that starts to escape. Then, with the sharp edge, strike firmly along the latitude of the coconut until you establish a clear crack. Insert the blade into the crack and twist to split it open. The water will drain out fully. Once split, clean the inside and fill with your smoothie.

    How to Sweeten Your Smoothie Bowl

    Always try natural fruit sweeteners first. Banana adds sweetness and helps thicken the consistency. Pitted Medjool dates blend in beautifully. If you need extra sweetness beyond the fruit, use a drizzle of raw honey, maple syrup, or agave nectar.

    Mango and coconut smoothie bowl with toppings

    Frequently Asked Questions

    Can I make this smoothie bowl without fresh coconut?

    Absolutely. If a fresh coconut is not available, use full-fat canned coconut cream and a splash of store-bought coconut water. The flavor will be nearly identical. Serve in any regular bowl — or pick up a set of coconut shell bowls for the same aesthetic.

    How do I make the smoothie bowl thick enough to eat with a spoon?

    The key is using frozen fruit. Frozen pineapple and a small amount of coconut cream create the thick, scoopable texture that makes a smoothie bowl different from a drinkable smoothie. Use as little liquid as possible during blending — add coconut water only a splash at a time until the blender moves. More liquid means a thinner bowl.

    Is this smoothie bowl good after a workout?

    It’s cold, sweet and refreshing after a workout. Pair it with eggs or yogurt if you want more protein.

    What is the difference between a smoothie bowl and a regular smoothie?

    A smoothie is drinkable and typically contains more liquid. A smoothie bowl is blended thicker so it holds toppings and is eaten with a spoon. The toppings add texture, crunch, and extra nutrients that you cannot get in a drinkable smoothie. The experience is much more satisfying as a meal.

    Can I use a regular blender for this recipe?

    A standard blender will work, but you may need to add more liquid to get it moving — which makes the bowl thinner. A high-speed blender like the Vitamix can handle frozen fruit with minimal liquid, giving you that signature thick texture. If you only have a regular blender, blend in smaller batches and be patient.

    Can I make this the night before?

    The blended base can be made and frozen overnight, then thawed for 5 to 10 minutes in the morning before eating. However, for the best texture and the freshest toppings, making it the morning of is recommended. Toppings should always be added right before serving.

    A hand holding a coconut shell filled with a mango coconut smoothie bowl and fruit

    Mango and Coconut Smoothie Bowl

    Prep Time 5 minutes
    Total Time 5 minutes
    Course: Breakfast
    Calories: 420

    Ingredients
      

    • 1 fresh and large coconut water split in half
    • 1 ripe manila mango
    • ½ cup frozen pineapples cubed
    • ½ cup coconut cream
    Garnish
    • 3 fresh strawberries cubed
    • 3 tbsp semi sweet chocolate chips
    • 3 tbsp dried shredded coconut non sweet

    Equipment

    • high speed blender

    Method
     

    1. Split the coconut in half and clean the inside. If a coconut shell is not obtainable, a regular medium size bowl will do.
    2. In a high speed blender, add the mango pineapple and coconut cream. Blend until smooth and thick.
    3. Use a spoon and scoop out the thick smoothie on to the bowl and garnish the top bowl with cubed strawberries, semi sweet chocolate and finally shredded dry coconut. Serve immediately.
  • Spicy Corn Dip With Manzano Pepper

    Spicy Corn Dip With Manzano Pepper

    Sweet, crunchy corn kernels coated in a creamy lime-spiked mayonnaise, studded with charred onion and the distinctive fruity heat of Manzano peppers — this dip disappears from the table faster than you can set it down. It is bold, fresh, and takes less than 30 minutes to make with only five ingredients.

    This post may contain affiliate links. If you purchase through these links, I may earn a small commission at no extra cost to you. Thank you for supporting Love & Harvest!

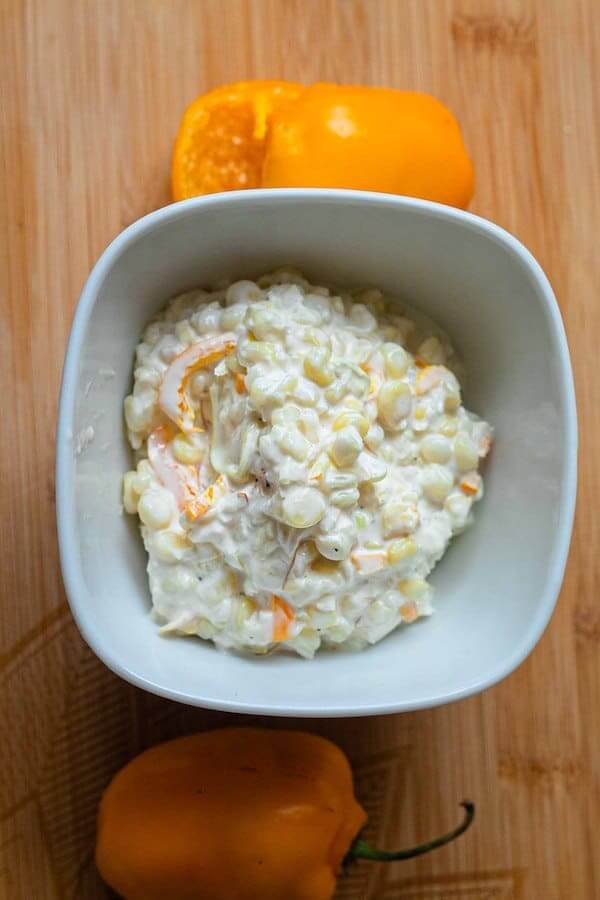
    Spicy Corn Dip with Manzano Pepper Recipe

    It is corn season and there are more ways to eat corn than BBQ corn on the cob with butter. This delicious spicy corn dip is so easy to make it will take you less than 30 minutes to prepare — and it only asks for five ingredients.

    This is a must-make for your next party or family gathering. Anyone who loves spicy food will fall in love with this recipe. After making it, corn just might become your new favourite seasonal vegetable.

    If you love spicy food, try our Easy Hummus Recipe or our Vegetarian Mango Soy Ceviche for more crowd-pleasing dips and sides.

    Ingredients

    Corn

    • Why use fresh seasonal corn: Summer corn is at peak sweetness and starch content. The kernels have a satisfying crunch and natural juiciness that frozen or canned corn cannot replicate. Any variety works — sweet corn, rainbow corn, or the starchy white corn common in Mexico. Whatever is local and fresh is the right choice.

    Manzano Peppers

    • Why Manzano over jalapeño: Manzano peppers have a unique fruity citrus character with a moderate-to-hot heat level — roughly twice as hot as jalapeños. Their black seeds and thick flesh hold up perfectly in a cooked dip. The flavour does not overwhelm the corn; it accents it. If you cannot find Manzano, jalapeño is an excellent substitute.

    White Onion

    • Why cook it first: Raw onion has a sharp, aggressive flavour that competes with the other ingredients. Sautéing the onion in oil first softens its bite, releases its natural sweetness, and creates a gentle fragrance that blends into the dip instead of fighting it.

    Mayonnaise

    • Why mayo works here: Mayonnaise binds all the flavours together with a creamy, slightly tangy base. For a lower-calorie option, swap it for full-fat or low-fat plain yogurt — the result is tangier and lighter but still delicious.

    Lime

    • Why fresh lime: Lime adds brightness and acidity that cuts through the richness of the mayo. For a stronger lime flavour, zest the skin directly into the dip. Bottled lime juice will work in a pinch but lacks the aromatic oils of fresh.

    Why You Will Love This Recipe

    • Easy recipe — cook the corn, cut the kernels off the cob, mix everything together. Done in under 30 minutes.
    • Crowd-pleaser — sweet corn is universally loved. Skip the Manzano peppers for a kid-friendly version.
    • Goes with everything — a great side dish for backyard BBQs, summer parties, and family gatherings. The best potluck food to bring.
    • Low cost — most ingredients are already in your fridge. Only the corn and Manzano peppers require a special trip.

    Frequently Asked Questions

    Can I use frozen or canned corn instead of fresh?

    Yes. Frozen corn works well — thaw it first and pat it dry so it does not water down the dip. Canned corn also works in a pinch; drain and rinse it thoroughly. Neither will have the same natural sweetness or texture as fresh peak-season corn, but both are perfectly acceptable shortcut options.

    How spicy is this dip?

    With Manzano peppers it has a genuine kick — moderate to hot. Manzano peppers are roughly twice as hot as jalapeños. For a milder dip, use only half a pepper, remove all the seeds carefully, or substitute with a small amount of jalapeño. For a non-spicy version, skip the peppers entirely and add a pinch of sweet smoked paprika for colour instead.

    Can I make this dip ahead of time?

    Yes. You can prepare the corn and the sautéed onion and peppers up to a day ahead and store them separately in the refrigerator. Mix everything together with the mayonnaise and lime just before serving for the freshest result. Once fully assembled, it keeps well for up to two days covered in the fridge.

    Can I serve this dip warm or cold?

    Both work. Served warm right after cooking, the dip is comforting and rich. Served cold after an hour in the refrigerator, it is refreshing and bright. For a summer outdoor party, cold is the way to go. For a cosy winter side dish, serve it warm.

    What is a good substitute for Manzano peppers?

    Jalapeño is the closest in texture and heat profile. For something fruitier and hotter, habanero works but use much less — habaneros are three to five times hotter than Manzano. Serrano peppers are also a good middle-ground option: hotter than jalapeño with a crisp, green flavour.

    spicy corn and Manzana Pepper Dip

    Spicy Corn and Manzano Pepper Dip

    Prep Time 15 minutes
    Cook Time 15 minutes
    Total Time 30 minutes
    Servings: 6 people
    Course: Side Dish
    Calories: 170

    Ingredients
      

    • 6 corn or sweet corn
    • 1-2 manzano peppers or jalapeno peppers
    • ¼ white onion
    • ½ cup mayonnaise or yogurt (fat free option)
    • 1 large lime juiced
    • 1 tsp salt to taste
    • black pepper to taste

    Method
     

    1. Wash and tear off the leaf of the corn if it has any. Cook the corn in their hot boiling water or steam it in an Instant Pot.
      Boiling water: Boil the corn for 10 minutes.
      Steam with Instant Pot: 10 minutes.
    2. Meanwhile, sliced the onions in thick slices, and thinly sliced the manzano peppers. In a pan, heat 2 tsp of oil and fry the onion and manzano peppers until soft and fragrance. Place them in a heat proof medium size bowl.
    3. Take out the corn and let it cool until it is ready to be handled. Use a sharp knife and cut the kernel off the corn. Place them in the same bowl with the onion and peppers.
    4. Mix the rest of the ingredient together: mayonnaise, lime juice, salt and pepper. Can be serve hot or cold.
  • Crusty Artisan Purple Yam Bread Recipe

    Crusty Artisan Purple Yam Bread Recipe

    There is something almost magical about pulling a purple loaf out of the oven — the color alone stops people in their tracks. This no-knead artisan purple yam bread is strikingly beautiful, but the flavor is what keeps you coming back: a subtle floral sweetness from the yam, a shattering crispy crust, and a cloud-soft interior. And the whole thing comes together with five ingredients and zero elbow grease.

    This post may contain affiliate links. If you purchase through these links, I may earn a small commission at no extra cost to you. Thank you for supporting Love & Harvest!

    fresh baked purple yam bread

    In its most essential form, bread is just flour, water, salt, and yeast. But why go basic when you can jazz it up? This purple yam bread recipe is a perfect beginner project. The results are so impressive you will want to make it again and again.

    A Note to First-Time Bakers

    Have you been browsing Pinterest dreaming about no-knead artisan loaves? That day is today. This recipe is so easy that no one will believe it is your first time. The technique requires almost no active work — just some stretch-and-fold, an overnight fridge rest, and a hot Dutch oven. When you break this loaf open, the colors and textures will genuinely delight you.

    Why You Will Love This Recipe

    • No-knead, easy technique — simple stretch and fold, then the fridge does the rest overnight.
    • Only 5 ingredients — you likely have most of them in your pantry right now.
    • Gorgeous to look at — the natural purple color makes this the most impressive bread at any table.
    • Unique flavor — the yam adds a subtle floral taste you have to experience to understand.
    • Soft and chewy texture — crispy crust, moist interior — the dream loaf.

    purple yam bread sliced

    Ingredients

    All-Purpose Flour

    • Why it works: All-purpose flour is accessible and forgiving — proof that you do not need specialty ingredients for outstanding results. If you have bread flour, use it; the higher protein content produces a chewier, slightly more structured crumb. King Arthur’s organic bread flour is a good option. The quality difference is noticeable.

    Purple Yam (Ube)

    • Why it works: Purple yam is a starchy root vegetable with a subtle floral, vanilla-like flavor. It adds moisture that clings to the gluten network, so the crumb stays soft long after baking. It also provides the stunning violet color — no food coloring needed. Find it fresh at Asian grocery stores or as purple yam powder (ube) online for convenience.

    Steam the yam for 15–20 minutes, let it cool on a plate to release extra moisture, then peel and mash smooth with a fork before adding to the dough.

    Instant Yeast

    • Why it works: Instant yeast activates without pre-dissolving and works reliably even in slightly cooler water. It is what gives the dough its lift and those beautiful air bubbles in the crumb. Anthony’s instant dry yeast packets come in 42 individual pouches — perfect for keeping freshness across multiple bakes.

    Sea Salt

    • Why it matters: Salt controls fermentation speed, strengthens gluten, and is the single biggest contributor to flavor in a lean dough. Use sea salt, not table salt — iodized table salt can slightly inhibit yeast activity. Celtic Sea Salt’s gourmet kosher grain is a great choice for both inside the dough and as a finishing sprinkle.

    Lukewarm Water

    • Why temperature matters: Warmer water (around 80–90°F / 27–32°C) activates yeast faster and speeds the initial rise. Too hot and you kill the yeast; too cold and the dough takes much longer to develop. Slightly warmer than your wrist is the right feel.

    purple yam bread dough fermented

    Professional Tips for a No-Fail Loaf

    Pro Tip 1 — Read the Full Recipe Before You Begin

    This bread is a two-day affair. Prepare the dough before bed, let it ferment in the fridge overnight, then bake the next morning. It requires very little active time but rewards readers who plan ahead.

    Pro Tip 2 — Use a Stand Mixer

    The stand mixer does all the mixing work so you truly do not need to knead. Use the dough hook at medium-low for 20 minutes. A KitchenAid stand mixer is a long-term kitchen investment that pays for itself across hundreds of bakes.

    Pro Tip 3 — Measure by Weight, Not Volume

    Bread baking is precise. Cup measurements vary widely depending on how loosely or tightly you pack the flour. A kitchen scale eliminates guesswork and guarantees consistent results every time. All measurements in this recipe are given in grams — follow them.

    Pro Tip 4 — Use a Dutch Oven

    A home oven cannot inject steam the way a professional bread oven can. A Dutch oven solves this by trapping the moisture released from the dough during the first 20 minutes of baking, which is what creates that shattering crust. The Lodge 5 qt cast iron Dutch oven is the one I recommend — it holds heat evenly and lasts a lifetime.

    Pro Tip 5 — Bake at Full Temperature

    Preheat to 475°F (245°C) with the Dutch oven inside. Bake covered for 20 minutes, then uncover for 30 minutes. The high heat is non-negotiable for a proper crust. Do not lower the temperature.

    Pro Tip 6 — Master the Stretch and Fold

    After the 3-hour bulk rise, gently deflate the dough and fold it: pull the two sides out and fold to center (like folding a letter), then pull the top and bottom and fold to center. Flip seam-side down and rotate the ball on the counter under your palms to build surface tension. Repeat three times total. This is what creates structure and the open crumb.

    purple yam artisan bread baked

    Frequently Asked Questions

    Can I use purple yam powder instead of fresh yam?

    Yes. Use about 2–3 tablespoons of ube powder mixed into the water before adding to the dough. The flavor will be slightly more intense and the color equally vivid.

    What if I do not have a Dutch oven?

    You can bake in a deep oven-safe pot with a lid, or place a metal bowl over the loaf for the first 20 minutes to trap steam. The crust will not be quite as dramatic but the bread will still be delicious.

    How do I know when the dough has proofed enough?

    After the 3-hour bulk rise at room temperature, the dough should have tripled in size and look bubbly. After the overnight fridge proof, it should have grown noticeably and feel cold and slightly domed in the container.

    Can I add seeds or grains to this loaf?

    Absolutely. Sprinkle seeds (sesame, poppy, sunflower) into the proofing basket before adding the dough. They will adhere to the crust during baking and add texture and flavor.

    Why did my bread come out flat?

    The most common causes are dead yeast (check the expiry date and water temperature), insufficient proofing time, or over-handling the dough during shaping (which pops the gas bubbles). Weigh your ingredients and follow the timing carefully.

    Can I make this with sourdough starter instead of instant yeast?

    Yes — this recipe adapts well to a sourdough approach. Check the how to make sourdough bread and how to make sourdough starter guides for reference. You will need to extend the fermentation time and adjust hydration slightly.

    Purple yam bread loaf cut in half to show the purple crumb

    Rustic Purple Bread

    Easy and beautiful loaf of bread made with purple yam. Crunchy and chewy on the outside and super moist on the inside. An fairly easy bread to make to impress anyone at the dinner table, and the best bread to wipe and clean off any sauces on the plates.
    Prep Time 30 minutes
    Cook Time 50 minutes
    Total Time 13 hours 20 minutes
    Course: Bread
    Calories: 175

    Ingredients
      

    • 400 g all purpose flour (3 cups of all purpose flour)
    • 310 g Luke warm water (307ml of Luke warm water)
    • 160 g steamed and cooked purple yam (3/4 cup of cooked purple yam)
    • 10 g sea salt (1 1/2 tsp sea salt)
    • 2 g instant yeast (1/2 tsp instant yeast)

    Equipment

    • stand mixer

    Method
     

    1. Wash and peel the purple yam. Put it in your steamer and steam for about 20 minutes until soft. Test it by poking it with a fork. If it goes in without effort it is done. If it requires force, then give it another 5-10 minutes.
    2. In a stand mixer, attach the dough hook. Add the flour and water together and combine until a light crumble appears. Put a towel or plastic wrap over the top and let it rest for 30 minutes. This allow the flour to fully hydrate.
    3. Meanwhile, put the fork in another bowl and mash it. Make sure all the big clumps are broken into smaller pieces. Don't worry if its not smooth, once it is in the stand mixer, it will break and smooth everything together. I sometimes like small chunks showing and are in the dough, so when it is baked, you can also see the purple yam pieces in the bread.
    4. Remove the towel or plastic wrap from the bowl, and add the mashed purple yam, sea salt, and instant yeast. Adjust speed to medium low for 20 minutes. The dough afterwards will look sticky and very elastic like. Let it sit for 3 hours until it has tripled in size.
    5. Dust the clean counter top with some flour, and carefully remove the dough on to the table. Gently deflate the dough, and give the dough the fold and stretch method. You're going to take the sides of the dough (imagine the dough is a face and you're going to pull the two ears of the face) stretch it out, and fold it where the nose is (the centre of the dough). Don't over stretch where you see the dough is tearing. Now you're going to take the top and bottom (top of the head and the chin of the face) and fold it again to the centre of the dough (the nose). Do this 3 times. Now flip it outside down (now the face is slapped onto the counter top) seaside down, and roll the dough around. You need to put some pressure at the bottom of the dough and pull the dough at the centre. You're going to feel some pressure and stretching of the dough (its honestly the best feeling when I do this part), and you're going to do this a few times until the dough becomes a beautiful ball. Do this 3 times.
    6. Now you need to find a vessel to put the dough in the fridge. If you have a bread proofing basket – use it. If not, just a regular bowl but find one that fits the dough but also some space for it to grow slightly. Add a piece of parchment paper and pat it down to the shape of the bowl. Gently flour the bowl and place the dough seaside down (wrinkly face down). Put plastic wrap at the top of the bowl and let it sit in the fridge overnight: at least 12 hours.
    7. When you're ready to bake, preheat oven to 475F/245C with the rack at the lower third. Insert the dutch oven with the lid on while it preheats. When the oven reaches the desire temperature, let the dutch oven sit there for an additional 20 minutes.
    8. Gently lift the dough out of the bowl by lifting on the sides of the parchment paper, and place it on the counter top. Place another new parchment paper beside the dough, and gently flip the dough on to the new parchment paper. The seaside should be facing up now.
      The goal here is to preserve and not disturb the air gas that can been developing in the fridge for 12 hours. the Less movement we can create when we place the dough into the oven, the better gas bubbles you'll get when you bake the bread. When the dough has been sitting in the fridge, all the gas built up is at the bottom of the dough which is the seaside is located. When we flip the bread upside down, the gas is invertiley at the top, so when we bake it at a high temperature, it will expand and get the beautiful air bubbles in the bread.
    9. Carefully take the dutch oven out, and carefully by lifting the parchment paper place the dough inside the oven with the lid on top. Bake for 20 minutes.
    10. After the first 20 minutes finished, lift the lid off and bake for an additional 30 minutes.
    11. Lift the bread out and let it cool completely on a drying rack. You need complete air circulation around the bread, including the bottom. Let the bread cool off completely before indulging.

    Notes

    You can easily add seeds and grains to the top of the bread easily by placing the desire seed and grain to the proofing basket before you add the dough inside.

    Love baking with fermentation? Try the Easy Homemade Focaccia Bread or the Savoury Rosemary Beer Bread next.

  • Goji Berry, Red Date and Chinese Yam Tea

    Goji Berry, Red Date and Chinese Yam Tea

    This simple three-ingredient herbal tea has been part of my own routine for years, including through my pregnancies, with my doctor’s okay. Made with goji berries, Chinese red dates, and Chinese yam, it is warming and naturally sweet, and I drink it most days.

    This post may contain affiliate links. If you purchase through these links, I may earn a small commission at no extra cost to you. Thank you for supporting Love & Harvest!

    tea with goji berries and red dates

    This recipe came to me from my own Chinese medicine doctor. I drank it during and after my pregnancies, and these days I carry a full liter with me and sip it instead of coffee. That’s just my routine and what worked for me, not advice for anyone else.

    goji berry and red date tea

    Why This Tea Is Amazing

    • My coffee swap: When I’d usually reach for a coffee, I make this instead.
    • Not just for me: My husband drinks it too.

    Important: Always consult your doctor or midwife before adding any herbal preparation to your routine during pregnancy or breastfeeding, or if you take any medication, including blood thinners.

    Ingredients

    Goji Berries

    • Why they matter: The flavor is mild and slightly sweet — like a gentle raisin. A small handful is plenty; too many can overpower the tea.

    Buy dried goji berries at any Asian grocery store or online: organic dried goji berries are easy to keep on hand for daily use.

    Chinese Red Dates (Jujube / Hong Zao)

    • Why they matter: They provide natural sweetness to the tea — no added sugar needed.

    Look for them at Chinese medicine shops or Asian grocery stores. You can also find them on Amazon: dried Chinese red dates are available in resealable bags.

    Chinese Yam (Shan Yao / Rhizoma Dioscoreae)

    • Why it matters: The taste is neutral — almost imperceptible — which is exactly what you want in a tea you plan to drink every day.

    Find it dried at Chinese medicine stores or online: dried Chinese yam (Shan Yao Huai Shan) is widely available.

    Rooted in tradition: These ingredients have been used in Chinese home cooking and traditional remedies for centuries.

    goji berry date tea served in glass jar

    How to Serve and Store

    I always recommend drinking this tea warm, never cold. Warm drinks are the tradition in Chinese medicine.

    The longer the herbs steep in the bottle, the more flavor they release. That golden color deepens beautifully over the course of the day. I love using a 1L glass jar — it is large enough to hold a full day’s worth and elegant enough to bring anywhere.

    Sweetener Options

    I do not add sugar — the Chinese red dates provide enough natural sweetness. If you prefer a sweeter tea, add raw honey after brewing (never during boiling). A honey varietal set is a great way to explore different flavor profiles.

    Where to Buy the Ingredients

    Your best source is a Chinese medicine shop or Asian grocery store — the ingredients are common and affordable. If you do not have one nearby, all three herbs are available online. The links above connect you directly to reputable options.

    ***DISCLAIMER: I am not a doctor nor a healthcare provider. The information provided here is for educational purposes only and does not substitute for professional medical advice. Please consult your doctor or midwife before making any changes to your diet during pregnancy.***

    Frequently Asked Questions

    Can I drink this tea while pregnant?

    Every pregnancy is different. Please consult your doctor or midwife before adding any herbal preparation to your routine.

    Can men and non-pregnant women drink this tea?

    Yes. My husband drinks it regularly.

    How long can I store this tea?

    Brewed and stored in a sealed glass jar in the fridge, this tea keeps for 2–3 days. I prefer to brew a fresh liter daily and carry it through the day warm in a thermos.

    Can I add other herbs to this tea?

    Yes. Common additions in Chinese medicine include dried longan fruit, lotus seeds, and wolfberry leaves. Start with the base recipe and experiment from there.

    Does the tea taste bitter?

    Not at all. The red dates provide gentle sweetness, the goji berries add a mild fruity note, and the Chinese yam is essentially tasteless. The overall flavor is light, slightly sweet, and warming — nothing like a bitter herbal medicine.

    Can I use a loose-leaf tea infuser for this?

    You can use a tea infuser to hold the ingredients if you prefer not to strain at the end, though the traditional method is simply to simmer everything loose in the pot and ladle it into your jar — the herbs sink to the bottom on their own.

    A person holding a glass bottle of goji berry and red date tea

    Goji Berry, Red Date and Chinese Yam Tea

    A warm tea of goji berries, Chinese red dates and Chinese yam, simmered for 10 minutes and sipped through the day.
    Prep Time 5 minutes
    Cook Time 10 minutes
    Total Time 15 minutes
    Servings: 1 litre
    Course: Drinks
    Cuisine: Chinese
    Calories: 30

    Ingredients
      

    • 10-15 dried goji berries
    • 2 dried Chinese yam
    • 2-3 dried Chinese red dates
    • 1 litre of filtered water

    Method
     

    1. Give the goji berries, Chinese yam and red dates a rinse in cold water.
    2. Bring a pot and boil the 1 litre of water. Add the ingredients into the water in medium heat. cook for 10 minutes with lid on.
    3. Serve into a heat proof bottle (I recommend glass), and enjoy through out the day. Serve warm.

    Looking for more drinks from my kitchen? Try the Mixed Berry Smoothie with Pomegranate and Nopal or the Celery Juice.

  • Cantonese Steamed Chicken with Goji Berries

    Cantonese Steamed Chicken with Goji Berries

    Three simple ingredients — chicken, goji berries, and black fungus — steamed together until the flavors meld. It is a classical Cantonese dish that has been in Chinese families for generations, and once you taste it you will understand why. Clean and genuinely delicious.

    This post may contain affiliate links. If you purchase through these links, I may earn a small commission at no extra cost to you. Thank you for supporting Love & Harvest!

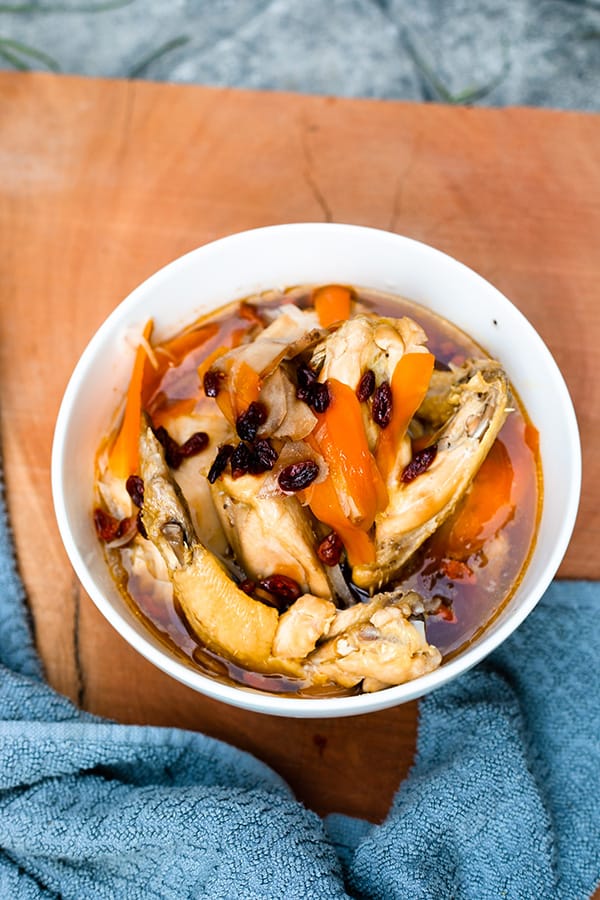
    Steamed chicken with goji berries, carrot and onion in a white bowl

    Goji berries have been in my kitchen for as long as I can remember. I grew up in a Chinese household.

    Goji Berries and Black Fungus

    Goji berries are sweet and mild. When autumn comes, goji berries go straight into the chicken noodle soup.

    The black fungus in this recipe has a satisfying chewy texture that my kids somehow love more than the chicken itself.

    Ingredients

    Goji Berries

    • Why they are essential: In this dish they soften during steaming into tender, subtly sweet morsels that absorb the savory chicken juices — the combination is genuinely beautiful.

    Buy dried goji berries at any Asian supermarket. Online, organic dried goji berries are reliable and easy to keep on hand.

    Chicken Breast (or Any Cut)

    • Why breast works well: It steams quickly, stays moist with the goji berry juices, and keeps this dish clean and light. You can substitute legs, drumsticks, or a mix of cuts — they all work and all come out delicious. The longer cook time for bone-in pieces (around 30–35 minutes) actually intensifies the flavor.

    steamed chicken goji berries with black fungus

    Professional Tips for a No-Fail Dish

    Pro Tip 1 — Steam in a Pot or Instant Pot

    You can use a stovetop bamboo steamer or a steamer basket over a pot of boiling water. A bamboo steamer is the traditional tool and imparts a very subtle woody fragrance. For modern convenience, an Instant Pot works equally well: fill with water, place the steamer basket inside, set the dish on top, seal, and steam for 25 minutes on the Steam setting. I have the Instant Pot Duo 7-in-1 and use it for this dish regularly.

    Pro Tip 2 — Keep the Marinade Simple

    The marinade is just salt and sesame oil. That is all you need. The simplicity is intentional — this dish is about the natural flavors of the chicken and goji berries, not masking them. Sesame oil adds a nutty depth that anchors the whole dish. Toss, let sit 10 minutes, then steam.

    Pro Tip 3 — Skim the Fat

    After steaming you will see a thin layer of chicken fat floating on the surface of the cooking liquid. Skim it off with a slotted spoon before serving. Removing it lets the goji berry sweetness shine through more clearly.

    Pro Tip 4 — Serve Warm, Always

    In Chinese tradition, everything is served warm — not hot, not cold. Serve this with a bowl of plain steamed rice and a cup of hot tea.

    Frequently Asked Questions

    How do I know when the chicken is fully cooked?

    Chicken breast steamed for 20–25 minutes at medium-high heat will be cooked through. Use a meat thermometer — the internal temperature should reach 165°F (74°C). Bone-in pieces may need 30–35 minutes. The flesh should be opaque white throughout with no pink near the bone.

    Can I use fresh goji berries instead of dried?

    Dried goji berries are preferred in this recipe. They rehydrate during steaming and release their flavor into the cooking liquid. Fresh goji berries are rarely available outside of China, but if you find them, use the same quantity.

    What is black fungus and where do I find it?

    Black fungus (wood ear mushroom / Auricularia auricula) is a dried edible mushroom used widely in Chinese cooking. It has a satisfying chewy texture and mild flavor. Find it dried at any Asian supermarket. Soak in warm water for 20 minutes before use.

    Can I make this dish for children?

    Yes. The flavor is gentle, and the goji berries are sweet enough for kids to enjoy. My children love the black fungus in particular.

    Can I add other herbs to the steam?

    Yes. Common additions include Chinese red dates (2–3 pieces), dried longan fruit, and wolfberries. These are the same herbs used in the goji berry, red date and Chinese yam tea.

    Steam Chicken Goji Berries

    Steamed Chicken with Goji Berries

    Easy steamed chicken with goji berries. A classical Cantonese dish.
    Prep Time 15 minutes
    Cook Time 25 minutes
    Total Time 40 minutes
    Course: Main Course
    Cuisine: Chinese
    Calories: 240

    Ingredients
      

    Chicken Marinate
    • 2 organic chicken breast skinned and cubbed
    • 1 tbsp canola oil
    • 1 tsp sea salt
    • 2 tsp corn starch
    The rest
    • 1 carrot sliced thinly
    • ½ white onion sliced thinly
    • 7-10 dried goji berries
    • 1 tsp sea salt
    • 1 tsp sesame oil
    • 1 tbsp soya sauce

    Equipment

    • steamer / Instant Pot

    Method
     

    To Marinate the Chicken
    1. Combine all the ingredients together well, and set aside to marinate on the counter top for 10-15 minutes.
    Putting Everything Together
    1. Sliced the carrots and onions, and add it with the chicken in the vessel you want to steam the dish in. I suggest a bowl that can hold liquid. After steaming, you'll notice the steam water has dropped some in the bowl and makes a delicious sauce on top.
    2. Add the remaining seasoning: salt and sesame oil. Add the goji berries on top. Mix and combine everything well.
    3. Using a regular steam:
      Wait until the steamer is ready and the water is boiling. Put the dish in and the lid on top. Steam on medium heat for 30-35 minutes.
    4. Using an Instant Pot:
      Set machine to 'Steam' on high heat for 25 minutes. Place the steamer basket and add the dish in. Make sure you use a round high bowl as the regular flat round plates don't fit. You want to have gaps between the bowls so the steam can come up and easy access for you to lift the plate out when it is done. Put the lid on and set to 'Seal'.
    5. When the time is up, you can release the vale. Lift the plate up, and drizzle the soy sauce on top. Serve with white rice.

    If you enjoy Chinese-inspired recipes, explore the Goji Berry, Red Date and Chinese Yam Tea and Steam Preserved Vegetables with Pork.

  • Easy Homemade Focaccia Bread

    Easy Homemade Focaccia Bread

    There is something deeply satisfying about making your own focaccia. The moment you poke those dimples in the dough, drizzle on the olive oil, and pull that golden, crackling sheet from the oven — it is an experience that no store-bought bread can replicate. This easy focaccia recipe is soft, airy, gloriously fluffy, and requires almost no skill. If you have a stand mixer and a little patience, you can make this tonight.

    This post may contain affiliate links. If you purchase through these links, I may earn a small commission at no extra cost to you. Thank you for supporting Love & Harvest!

    easy homemade focaccia bread golden crust

    Bread making has been part of human civilization for thousands of years. There is a reason it feels so deeply satisfying to bake your own loaf — it connects you to something ancestral and primal. I find real solace in baking bread for my family. The aroma fills the house, the kids want to help poke the dough, and the act of breaking into a fresh loaf together is a small ritual worth protecting.
    Why You Will Love This Focaccia

    • Easiest bread recipe — soft, easy to cut, with a crunchy salt-and-rosemary top that delivers incredible texture and flavor.
    • Flexible schedule — prepare the dough in the morning and bake at night, or let it ferment overnight and bake fresh the next day.
    • Fully customizable toppings — the sea salt blend is my favorite, but you can go savory with olives and sun-dried tomatoes, or keep it simple with just olive oil and herbs.
    • Kids love making it — poking the dimples in the dough before it bakes is genuinely fun for children of any age.

    focaccia bread dimples olive oil

    Topping Options

    The standard sea salt blend (salt, black pepper, rosemary, chili flakes) is my go-to and the base recipe below. But focaccia is one of the most creative-friendly breads you can make. Other options that work beautifully:

    • Olives, sun-dried tomatoes, rosemary, and olive oil
    • Capers, red onions, and olive oil
    • Oregano, thyme, cherry tomatoes, and olive oil
    • Fresh rosemary and flaky sea salt only (classic and elegant)

    focaccia bread topping options

    Ingredients

    Flour (All-Purpose and Whole Wheat Blend)

    • Why the blend works: All-purpose flour creates the open, airy structure while whole wheat adds fiber, density, and a nutty flavor complexity that plain white focaccia lacks. The higher protein in whole wheat also contributes to a slightly chewier, more satisfying bite. The ratio (815g white to 160g whole wheat) keeps the bread accessible without making it heavy.

    A kitchen scale is essential for this recipe — weighing your flour removes all the variability from cup measurements and ensures a consistent dough every time.

    Olive Oil

    • Why only olive oil: Focaccia is an Italian bread built on olive oil — both inside the dough and generously drizzled on top before baking. Olive oil contributes a distinctive fruity, slightly peppery flavor that is irreplaceable. Do not substitute canola, sunflower, or any neutral oil. The olive oil on top also creates the crispy, golden crust that defines great focaccia.

    Sea Salt

    • Why quality matters: The salt inside the dough controls fermentation and develops gluten. The salt on top — preferably a flaky, crunchy sea salt — creates the addictive textural contrast that makes you tear off just one more piece. The Celtic Sea Salt ground variety is excellent inside the dough; use a flaky finishing salt on top if you have one.

    Instant Yeast

    • Why instant yeast: Instant yeast activates immediately when it contacts the water and flour — no pre-dissolving required. It works reliably across a wide temperature range and gives you a predictable, consistent rise. The small amount (7g) in this recipe is intentional — less yeast means a slower, longer fermentation that builds far more complex flavor.

    focaccia bread sandwich made at home

    Professional Tips for a No-Fail Focaccia

    Pro Tip 1 — Patience Is Everything

    This recipe rewards patience above all else. There is almost no active work — the stand mixer kneads, the yeast rises, time does the fermentation. The more time you give the dough (especially the overnight fridge fermentation), the more complex and flavorful the final bread will be.

    Pro Tip 2 — Use a Stand Mixer

    The dough hook does all the kneading. This is what makes the recipe truly hands-off. Use the hook attachment only — not the paddle, not the whisk. Mix on medium speed: first 10 minutes with water and yeast, then 5 minutes after adding salt, then 5 more minutes after adding olive oil. A KitchenAid 7 Qt Pro Line stand mixer is a good option.

    Pro Tip 3 — Fermentation Container

    For the full-day counter fermentation, leave the dough in the stand mixer bowl covered with plastic wrap. For overnight fridge fermentation, transfer to a large clear container with a lid so you can monitor the rise without disturbing the dough. A 6 qt clear storage container works perfectly.

    Frequently Asked Questions

    Can I make this focaccia without a stand mixer?

    Yes, but be prepared for a workout. The dough is quite wet and sticky — that high hydration is what makes the bread so airy. If mixing by hand, work the dough for at least 15–20 minutes until smooth and elastic. Wet hands help prevent sticking.

    How do I know the focaccia is fully baked?

    The top should be deep golden brown and the edges should be pulling away from the pan slightly. The bottom (lift a corner with a spatula) should also be golden, not pale. The internal temperature should reach 200–210°F (93–99°C).

    Why does my focaccia come out dense instead of airy?

    The most common causes are: not giving the dough enough time to rise, using water that is too hot (kills the yeast), not measuring ingredients precisely (use a scale), or pressing the dough too hard when dimpling (be gentle — you want to preserve the gas bubbles).

    Can I freeze focaccia?

    Yes. Cool completely, slice, wrap individual pieces in parchment, then freeze in a zip-lock bag for up to 2 months. Reheat directly from frozen in a 375°F oven for 8–10 minutes.

    What is the best way to serve focaccia?

    Tear it and dip it into extra virgin olive oil mixed with balsamic vinegar. Use it as sandwich bread for picnics. Serve alongside soups and stews for dipping. It is also excellent with fresh mozzarella and roasted tomatoes.

    Can I make this recipe with sourdough starter?

    Absolutely. Replace the instant yeast with 150g active sourdough starter, reduce water slightly, and extend the bulk fermentation to 6–8 hours at room temperature or 12–16 hours in the fridge. See the sourdough bread guide for reference on starter ratios and timing.

    Golden homemade focaccia bread with herbs on a baking tray

    Easy Focaccia Bread

    Easy homemade focaccia bread that is soft, airy, and delicious with every bite. Great to use as a dipping bread with your favourite sauce or to make your favourite sandwich. It’s perfectly soft and fluffy and satisfyingly chewy. It’s sprinkled with lots of flaky sea salt herbs, and spice. Drizzled with extra olive oil, and soaks perfectly into all of those little classic holes that you have poked in the bread.
    Prep Time 15 minutes
    Cook Time 25 minutes
    Total Time 5 hours 40 minutes
    Course: Bread
    Cuisine: Italian
    Calories: 210

    Ingredients
      

    • 815 g white flour
    • 160 g whole wheat flour
    • 830 g warm water
    • 5 g sugar
    • 7 g instant dry yeast
    • 20 g sea salt blend (see below)
    • 20 g olive oil
    Sea Salt Blend (1 serving)
    • 1 tbsp sea salt
    • 1 tsp black pepper
    • 1 tbsp dried rosemary
    • 1 tbsp dried chili flakes
    Sea Salt Blend (small jar)
    • ¼ cup sea salt
    • 1 tbsp black pepper
    • 3 tbsp dried rosemary
    • 3 tbsp dried chili flakes

    Equipment

    • stand mixer
    • large 13 x 18" baking sheet

    Method
     

    1. in a stand mixer, add the flour and whole wheat flour together.
    2. Using a dough hook attachment, slowly add the warm water, yeast, and sugar together with the flour. Mix on medium speed for 10 minutes. Occasionally use a scraper and scrape down the sides so all the flour is well incorporated in the dough.
    3. Add the salt and mix for another 5 minutes.
    4. Add the olive oil and mix for another 5 minutes.
    5. In a large container, put the dough inside and drizzle some oil on top and on the side. Close the lid or wrap the top with plastic.
    To bake at night on the same day
    1. Start your process at 10am. Leave the dough on the counter top and let it rise for 3 hours. After punch the gas out of the dough and fold the dough. Let it rise again for another 2 hours.
    2. After the last rise, spray the baking sheet with oil, and fold the dough inside. stretch the dough until it is even and has stretch to all sides of the baking sheet. Wrap it in plastic and let it ferment on it's last rise for 2 hours.
    To bake in the morning for the next day
    1. Start your process anytime at night: In a 3-4qt container, generously spray with oil along with a drizzle of olive oil. Toss the dough and cover with a greased lid.
    2. Place in the fridge for 8-12 hours
    3. Spray oil in the large baking tray and fold the dough into the baking sheet. Stretch the dough until its even at the top and stretch the dough to all sides of the baking sheet. Wrap it in plastic and let it ferment on it's last rise for 3 hours.
    Baking
    1. Once the dough has finished the last rise. Preheat oven 500-550F.
    2. Once ready to go in the oven, drizzle generously with 20g of olive oil at the top and sprinkle the sea salt blend. Poke some holes using your fingers on the top of the bread evenly.
    3. Bake for 20-25 minutes.

    If you love baking your own bread, try the Crusty Artisan Purple Yam Bread or the Savoury Rosemary Beer Bread — two more recipes where simple ingredients and a little patience produce extraordinary results.