Tag: vegetarian

  • Vegetarian Mango Soy Ceviche

    Vegetarian Mango Soy Ceviche

    This Vegetarian Mango Soy Ceviche is proof that plant-based food can be just as vibrant and satisfying as anything from the sea. Juicy mango, tangy lime, jalapeño heat, and tender soy protein come together in a refreshing dish that is perfect for warm summer days — and ready in under 40 minutes.

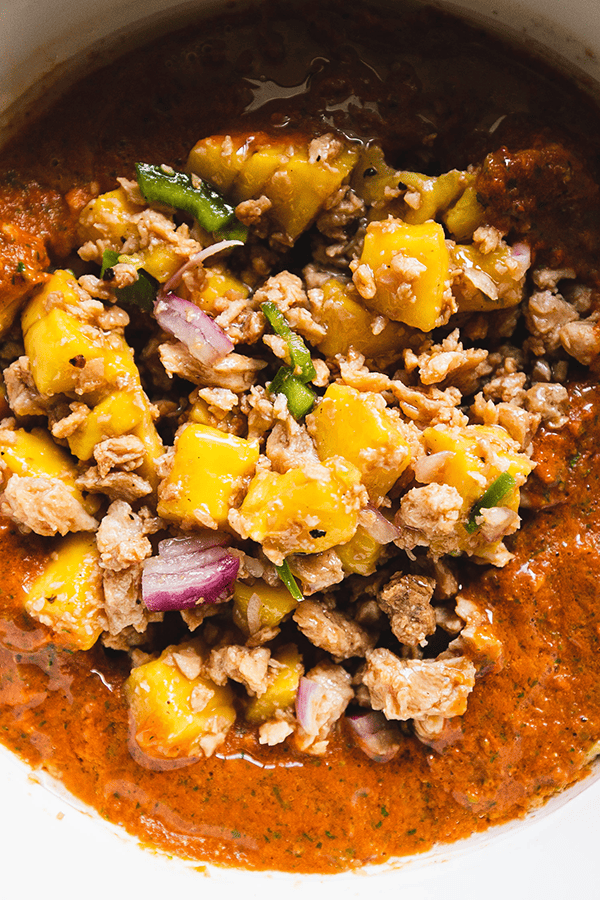
    Vegetarian Mango Soy Ceviche plated with red salsa

    This post may contain affiliate links. If you purchase through these links, I may earn a small commission at no extra cost to you. Thank you for supporting Love & Harvest!

    What Is Ceviche?

    Ceviche is a vibrant and refreshing dish that hails from the coastal regions of Latin America. Traditionally it is made by marinating raw fish or shellfish in citrus juice — the acid “cooks” the seafood, denaturing the proteins and giving it a firm texture. The result is a zesty and flavourful dish enjoyed as an appetizer or a light meal.

    Here in Mexico, ceviche is a celebration of fresh ingredients and bold flavours. It features an array of complementary components such as onions, tomatoes, herbs like cilantro, and a touch of heat from jalapeños. The beauty of ceviche lies in its versatility — vegetarian versions like this Mango Soy Ceviche use vegetables and fruits as the base, marinated in citrusy goodness to create a refreshing and tangy medley of flavours.

    Vegetarian Mango Soy Ceviche ingredients laid out

    My Vegetarian Journey in Mexico

    In my culinary journey through Mexico, I noticed the abundance of fresh vegetables and fruits in the markets, and also that vegetarian dishes did not always take the spotlight in traditional Mexican cuisine. As someone passionate about vegetarian food, I was inspired to create a dish that proves vegetarian cuisine is anything but mundane.

    With each bite of the Mango Soy Vegetarian Ceviche, I am transported to the bustling streets of Mexico, where the lively atmosphere and rich culinary heritage come alive. The succulent mangoes bring a burst of sweetness, the tangy lime juice adds a refreshing kick, and the dried soy protein creates a satisfying hearty texture that makes this dish a complete meal.

    Ingredients for Vegetarian Mango Soy Ceviche

    Dried Soy Protein

    • Why it matters: Dried soy protein (also called textured vegetable protein or TVP) is the meat substitute that gives this ceviche its hearty, chewy texture. Once boiled and cooled, it absorbs the lime, Maggie sauce, and spices beautifully, mimicking the texture of seafood without any fish. Look for it in health food stores or order it online.

    Ripe Mango

    • Why it matters: The mango delivers natural sweetness and tropical flavour that balances the acidity of the lime and the savoury depth of the sauces. Choose a mango that yields slightly to pressure — too firm and it won’t have enough flavour, too soft and it turns mushy in the dish.

    Fresh Lime Juice

    • Why it matters: Lime is the soul of any ceviche. The citric acid brightens every ingredient and ties the flavours together. Use freshly squeezed lime juice — two small limes — for the best results.

    Maggie Sauce

    • Why it matters: Maggie sauce adds a savoury, umami depth that makes this vegetarian ceviche taste complex and restaurant-worthy. It is a beloved Mexican condiment found in almost every kitchen in Mexico. A little goes a long way.

    Jalapeño

    • Why it matters: The jalapeño brings the heat that makes ceviche addictive. Finely chop it for even distribution. Remove the seeds for a milder version or keep them for full heat.

    Plated mango soy ceviche with red salsa base

    Why Try This Mango Soy Vegetarian Ceviche?

    1. Bursting with vibrant flavours: The combination of ripe mangoes, zesty lime juice, and the umami richness of Maggie sauce creates a harmonious balance that dances on your palate.
    2. Refreshing and light: The citrusy marinade paired with juicy mangoes provides a delightful burst of freshness, making it perfect for warm weather indulgence.
    3. Vegetarian delight: This ceviche showcases the beauty and versatility of vegetarian cuisine — you can enjoy the essence of a traditional ceviche while staying fully plant-based.
    4. Texture experience: The soy protein, juicy mango, and crisp jalapeño add layers of texture to every bite.
    5. Easy and quick: With straightforward instructions, you can have this on the table in under 40 minutes.
    6. Sustainable choice: Overfishing and unsustainable fishing practices have depleted marine resources worldwide. Choosing plant-based alternatives like this ceviche lets you enjoy a delicious meal with a lighter impact on the planet.

    Vegetarian ceviche close-up showing texture

    Vegetarian Ceviche Flavour Profile

    The flavour of Mango Soy Vegetarian Ceviche can be described as a tantalizing combination of sweet, tangy, savoury, and refreshing notes in perfect harmony. The ripe mangoes bring natural sweetness, the lime juice provides a bright citrusy kick that balances that sweetness, and the Maggie sauce and vegan fish sauce layer in a complex, savoury depth that makes this dish genuinely surprising for first-time tasters.

    Love fresh and vibrant Mexican-inspired dishes? Try these others from Love & Harvest:

    Frequently Asked Questions

    What is dried soy protein and where do I find it?

    Dried soy protein (also called TVP — textured vegetable protein) is a high-protein meat substitute made from defatted soy flour. It comes in small granules or chunks, is shelf-stable, and doubles in size when rehydrated. Find it at health food stores, Latin markets, or order a bag of dried soy protein on Amazon.

    Can I make this ceviche ahead of time?

    Yes. The red salsa and the soy protein can be prepared up to a day in advance and stored separately in the refrigerator. Combine everything and add the fresh mango just before serving to keep the texture and colour at their best.

    How do I make this dish spicier or milder?

    For more heat, keep the jalapeño seeds and add a second jalapeño. For a milder version, remove all seeds and membrane from the jalapeño before chopping, or substitute a milder pepper like poblano.

    Can I use fresh soy protein instead of dried?

    The recipe calls for dried soy protein specifically because its texture after rehydration mimics seafood. Fresh tofu can be substituted — press it dry, cube it, and use it directly without boiling. The flavour absorption will be different but still delicious.

    What can I serve this ceviche with?

    Serve with tostadas, corn tortilla chips, or slices of avocado. The red salsa base is also wonderful on its own as a dip. A squeeze of extra lime over the top just before serving brings out all the flavours.

    Is this ceviche gluten-free?

    The base ingredients are naturally gluten-free, but check your brand of dried soy protein and Maggie sauce — some brands add wheat-based ingredients. Substitute coconut aminos for the Maggie sauce if you need a certified gluten-free alternative.

    Vegetarian Mango Soy Ceviche

    Vegetarian Mango Soy Ceviche

    A delightful twist on the traditional seafood-based ceviche. Our Mango Soy Ceviche is bursting with vibrant colours and flavours, which offer a refreshing and tangy taste, perfect for warm summer days. Print Recipe Pin RecipePrep Time:20 minutes Cook Time:15 minutes Course: AppetizerCuisine: MexicanKeyword: ceviche, soy, vegetarianServings: 6 people

    Equipment

    • high speed blender
    • colander

    Ingredients

    • 2 cups dried soy protein
    • 1 ripe mango cubed
    • 1 jalapeno finely chopped
    • 1 tbsp red onion finely chopped
    • 2 small lime juiced
    • 1 tsp Maggie sauce
    • 2 tsp vegan fish sauce
    • 1 tsp salt
    • 1 tbsp olive oil garnish

    Red Salsa

    • 1-2 tsp olive oil
    • 4 small roman tomatoes
    • 3 branches of cilantro
    • 1 tsp apple cider vinegar
    • pinch of salt

    Instructions

    Red Sauce

    • In a saucepan, turn the heat to medium-high. Slice the tomatoes into quarter-inch slices. Add the oil to the pan and sear the sides of all the tomatoes until slightly browned. Remove from heat.
    • In a high-speed blender, add the grilled tomatoes, cilantro, vinegar, and salt. Blend until smooth. Set aside.

    Mango Soy Ceviche

    • Add the dried soy proteins to a colander. Rinse under the faucet to remove any dust particles. Set aside.
    • Bring 1 litre of water to a boil, then add the rinsed soy protein. Cook on medium heat for about 10 to 15 minutes. Watch the pot carefully as it can foam up. Drain through a colander and let the cooked soy protein cool to room temperature.
    • In a large bowl, combine the cubed mango, jalapeño, red onion, lime juice, Maggie sauce, vegan fish sauce, and salt. Add the cooled soy proteins and mix well.
    • On the serving dish, spread the red salsa as the base. Place the mango soy ceviche on top in the centre. Drizzle the olive oil evenly over the top. Serve cold.
  • Delicious Meatless Spicy Peanut Noodle

    Delicious Meatless Spicy Peanut Noodle

    This vegetarian peanut noodle is so easy to make and RIDICULOUSLY delicious. The perfect umami slurp that’s meatless.

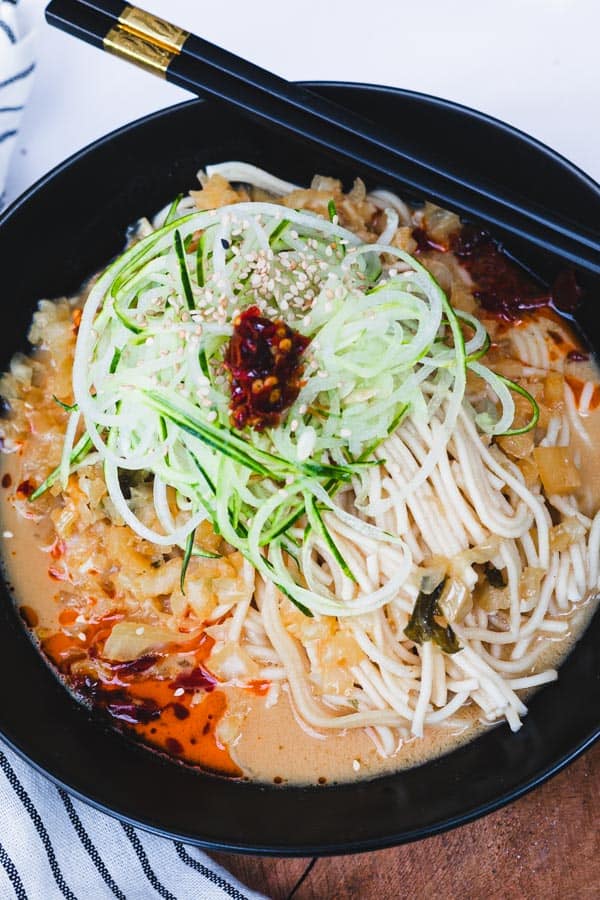
    veggie peanut butter noodles

    This post may contain affiliate links. If you purchase through these links, I may earn a small commission at no extra cost to you. Thank you for supporting Love & Harvest!

    My summer is never complete without making this vegetarian spicy peanut noodle with cooling cucumber. Imagine a nutty and tangy peanut noodle pasta served with a refreshing cucumber and sesame oil salad on top. This dish is the epiphany of what life is all about!

    Back a few years ago when I was teaching cooking classes in Mexico, this vegetarian Spicy Peanut Noodle with cooling cucumber recipe was one of my students’ favourite recipes. Till this day I have past students of mine messaging me and telling me this recipe had stuck with them for a long time and they are now feeding their children with the exact same recipe.

    It’s a humble experience knowing I’ve gifted them something that is now being passed down as a family meal. And now I want everyone to have the same experience as all my students once had.

    This recipe is easy and very good for a fast-paced family who are always on the go. It’s also a kid-friendly meal, minus the spice. My kids love this a lot and occasionally request it. If you know a child who loves peanut butter sandwiches and you can’t get them to eat anything else, this is what they need in their life. You will not struggle with time using this recipe!

    peanut noodles

    How Does It Taste?

    It is spicy, tangy, nutty, and thick. You can serve it hot or cold — the options are yours. In the summer I make it with less sauce so it just lightly coats the noodle. I bring it to picnic trips and road trips. Then I top it off with some cold cucumber sesame oil salad.

    In the winter I like it more hot and with more of the sauce to warm around the noodle, almost like a noodle soup. Sometimes I ladle a hot cup of chicken stock into the sauce so it thins out and turns it into a noodle soup. The recipe is super versatile.

    What Noodles Should I Use?

    Original Chinese noodles will do. DragonMall Wu Mu Noodles are a good option. They cook very easily and coat the peanut sauce well. They remind me a lot of how Shandong noodles are made and taste.

    If you don’t have access to these noodles you can make your own! I have my 3 minute homemade ramen noodle recipe here if you’re interested in going the extra mile. Regular spaghetti noodles also work if neither option is available — not the authentic style, but we do what we have to do. You could also try pairing this sauce with a simple noodle base like this spinach pasta for a creative variation.

    peanut noodle recipe

    Why You Will Love This Meatless Recipe

    • Easy Meal – it takes only 30 minutes to make this meal! You make your sauce all in the blender, toss it with some hot noodles, and lay the cucumber sesame oil salad on top.
    • Vegetarian and Vegan – Looking for a meatless meal that’s still delicious and cooling for summer and into fall? This recipe is perfect for something cooling to eat in the summer.
    • Have it hot or cold – yes, you can make it cold for summer days or hot for colder weather. There is no season preference.
    • It’s super tasty – in the sauce there’s soy sauce, garlic, peanut butter, and black vinegar. It has a super umami taste and a slurp of this bad boy is unreal.
    • The best slurp experience – who doesn’t love noodles? You’re going to get the best slurp experience with these noodles because they’re packed with flavour and spiciness you’ll truly enjoy. Then we add the cucumber salad to cool your tongue.

    vegan spicy peanut noodles

    How to Make the Spicy Peanut Noodle Sauce

    The sauce is made purposefully easy because we want to make it hassle free. Here are the simple steps:

    • In your blender add: soy sauce, peanut butter, garlic, ginger, sesame oil, peppers, vinegar, dark soy sauce, and chicken stock.
    • Cook the noodles as instructed. You do not need to rinse the noodles in water. The starch from the cooked noodles will help make the sauce thicker and coat it better.
    • Toss the sauce and noodle together.

    vegan thai peanut noodles

    How to Make the Cucumber Salad

    Easy and delicious cucumber salad. I use it to garnish the top of the noodles. Once you make it make sure to serve it immediately.

    • Wash the cucumbers, and slice off the ends. Using a vegetable peeler, start to slice it lengthwise to get these thin beautiful slices. Put them in a strainer to let the excess water run off.
    • Give them a good pat with a paper towel and soak up any excess water.
    • Toss the cucumber ribbons with sesame oil, salt, and sesame seeds.
    • Garnish on top of the noodles and try to build and fluff it up as high as possible on the noodle.

    To thinly cut the cucumber I am using the Vegetable Spiralizer to cut my cucumber perfectly.

    vegan peanut noodle bowl

    Ingredients

    Your Favourite Chili Oil

    If you have a favourite Asian chilli oil and don’t have much opportunity to use it, this is the time! This meatless peanut noodle goes well with any Asian chilli oil. Slather it in the soup or just add a small spoon on top. Whatever portion is perfect here.

    Peanut Butter

    I like to use smooth peanut butter. Chunky peanut butter is fine too. We are adding everything to the blender so the texture of peanut butter doesn’t matter here. For a sesame-forward variation, try tahini as a substitute — it gives the sauce a slightly nuttier depth.

    Salted Mustard

    This is a must for this dish. Do not skip it. Lots of the unknown umami flavour is from here. Pickled mustard is a bit strange in flavour on its own, but when added to other things like soup, it adds lots of dimensions of flavour!

    cold thai peanut noodles

    Soy Sauce

    To give this sauce the umami flavour, we are adding soy sauce. Uncooked soy sauce has a strong and special umami flavour that’s going to lift this sauce into its glorious taste.

    Ginger

    A small finger-tip size ginger helps round out the flavour of the sauce. We are using fresh ginger, not the dry powder form.

    Garlic

    Adding a couple cloves of garlic makes this sauce very tasty. If two is too much for your taste, just add one.

    Sesame Oil

    The toasty taste of sesame oil tells you right away this is an Asian dish! You have the option to add it in the blender or when you toss the noodle and sauce together.

    Vegetable Stock / Chicken Stock

    I give these two options because we all have different dietary restrictions. I love the taste of vegetable stock whether it is store-bought or homemade — I’d much prefer homemade if you ask me. When it is winter and I need to add more protein or bone-brothy goodness for the kids, I will add my homemade chicken stock. Store-bought chicken stock or chicken powder also works.

    Chinese Black Vinegar

    This is a common ingredient in Chinese cooking. We are adding a little bit of vinegar to get that tangy flavour. Black vinegar is a good option here.

    Cabbage

    To thicken and add texture to the sauce, we are adding some pre-boiled chopped cabbage. A pure liquid sauce to coat the noodles is not enough. To add some elegance and texture, we are adding cabbage and salted mustard.

    thai peanut noodles recipe

    Love noodle dishes? Try our homemade pesto gnocchi for another satisfying pasta night.

    Frequently Asked Questions

    Can I make this peanut noodle gluten-free?

    Yes! Swap regular soy sauce for tamari or a certified gluten-free soy sauce, and use rice noodles instead of wheat noodles. The flavour profile stays the same.

    Can I add protein to this meatless noodle?

    Absolutely. Tofu, edamame, or a soft-boiled egg all work beautifully. For non-vegetarians, shredded rotisserie chicken or sauteed shrimp are great additions.

    How long does the peanut sauce keep?

    Store leftover peanut sauce in a sealed jar in the refrigerator for up to 5 days. It will thicken as it chills — thin it back out with a splash of warm water or vegetable stock before using.

    Can I make this dish ahead of time?

    Make the peanut sauce and cucumber salad up to one day ahead and store them separately. Cook the noodles fresh when ready to serve for the best texture.

    What is Chinese black vinegar and can I substitute it?

    Chinese black vinegar (Chinkiang vinegar) has a deep, malty-sweet tang. The closest substitute is a mix of balsamic vinegar and a splash of rice vinegar. Regular rice vinegar on its own also works but the flavour will be lighter.

    Is this recipe suitable for kids?

    Yes, with adjustments. Simply omit or reduce the chilli oil and peppers for the kids’ portion. The base peanut sauce is kid-friendly and many children love the nutty noodle flavour.

    Spicy peanut noodles topped with cucumber ribbons and chili oil

    Meatless Spicy Peanut Noodle

    This Meatless Spicy Peanut Noodle recipe is a delicious bowl of slurp! Spicy, nutty, and tangy. A favourite among kids and adults. Print Recipe Pin RecipePrep Time:25 minsCook Time:15 minsCourse: Main CourseCuisine: ChineseKeyword: Spicy Meatless Peanut NoodleServings: 5 people

    Ingredients

    Peanut Sauce

    • 3 tbsp smooth peanut butter or tahini
    • ½ cup soy sauce
    • 2 cups vegetable stock
    • 2 garlic clove
    • ¼ inch fresh ginger
    • 1 tbsp chinese black vinegar
    • 500g Dried Asian noodles
    • 2 tbsp minced pickled mustard do not blend with the sauce
    • 1 tsp sesame oil
    • 1 tsp chilli oil

    Cucumber Salad

    • 2 medium size cucumber
    • 1 tsp sesame oil
    • 1 tsp sesame seed
    • ½ tsp sea salt add only when you're ready to serve

    Cabbage Side

    • ¼ small cabbage
    • 1 tsp salt
    • ½ litre water

    Instructions

    To Make Peanut Sauce

    • In a blender add the peanut sauce, soy sauce, vegetable stock, garlic, ginger, and black vinegar. Blend until smooth.

    To Make Cucumber Salad

    • Using the vegetable spiralizer, attach the cucumber and spiralize the cucumber into ribbons. Toss it with some sesame oil. Salt: do not add the salt until you're ready to serve. Salt will quickly turn the cucumber into mush.

    To Make the Cabbage Side

    • Take the food processor and add roughly cut cabbage into the machine. Pulse it a few times and turn it completely "on" to finely chop the cabbage. Add the chopped cabbage to boiling water with salt for 5 minutes. Strain the water and set it aside.

    Assemble the Noodle Soup

    • Meanwhile, cook the asian noodles you like. See package for instructions. Set the noodle aside in the bowl.
    • In a pot, add the peanut sauce and bring it to a boil. Add the minced pickled mustard, and cabbage. Cook for about 5 minutes. Test the soup for saltiness. If you think it's too salty, add some water to dilute it. Alternatively you can add non-salted vegetable broth as well.
    • Ladle the hot soup on to the noodles and add the cucumber salad on top.
    • Garnish with some salt on top of the cucumber salad (if desired), sesame seeds, sesame oil, and chili oil. Serve immediately.
  • Perfect Make-Ahead Cold Appetizers With Avocado & Beet

    Perfect Make-Ahead Cold Appetizers With Avocado & Beet

    This post may contain affiliate links. If you purchase through these links, I may earn a small commission at no extra cost to you. Thank you for supporting Love & Harvest!

    This appetizer looks like it belongs on the table of a fine dining restaurant. Sliced paper-thin and fanned out on the plate, with a light soy-sesame dressing drizzled on top — it’s one of those dishes that earns genuine reactions when people see it. The best part? It takes about 20 minutes, costs almost nothing, and can be prepared entirely ahead of time. The beet keeps for days in the fridge. The avocado is sliced at serving time. Done.

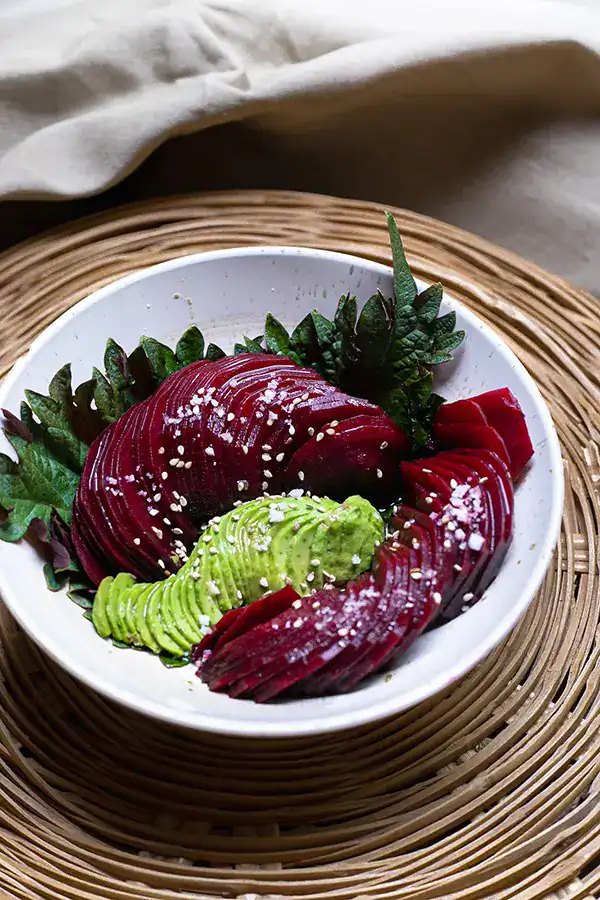
    Beet sashimi slices with a fanned avocado on a bed of greens

    Why You Should Try This

    The taste is fresh and packed with flavour. It’s a beautiful presentation dish — elegant without effort. For vegetarians and anyone who can’t eat salmon sashimi, this is the showstopper appetizer that replaces it. The paper-thin slices create the visual of sashimi without the fish, and the beet and avocado together provide a combination of earthy depth and creamy richness that works surprisingly well.

    It’s also one of the most make-ahead-friendly dishes you’ll find. Cooked beet keeps in the fridge for up to a week. Prep the beet on Sunday, and this appetizer can be on the table in 5 minutes on any night of the week.

    sliced avocado appetizer

    Ingredients Deep-Dive

    Ingredients

    Beets — Colour and Flavour

    It took me a while to fully appreciate beets. The earthy, slightly sweet flavour is distinctive and takes some getting used to. Now I love them — the colour they bring to a plate is unmatched. For this appetizer, use large red beets — they produce the most dramatic colour and hold their shape well after cooking.

    Avocado — Creamy Texture

    Avocado brings a creamy richness without being heavy, and its mild, buttery flavour is the perfect counterpoint to the earthy beet. Select avocados that are just ripe — they should yield slightly to gentle pressure but not feel mushy. Overripe avocados won’t hold their shape when sliced thin. An interesting fact: the avocado was first domesticated in Puebla, Mexico — the city where I currently live.

    The Soy Sauce Dressing

    Simple and versatile. Soy sauce provides the salt and umami backbone; sesame oil adds a toasted nuttiness; white vinegar brings brightness; olive oil adds body; sugar balances. Together they produce a dressing that tastes specifically right with this dish — neither heavy nor watery, and it soaks into the thinly sliced beet and avocado beautifully. Use Kikkoman soy sauce as the benchmark — it’s consistently balanced and available everywhere.

    The dressing recipe comes in two sizes: a small serving for 2–4 people, and a larger ±1 cup batch for parties. Both are included in the recipe card below.

    easy cold appetizers to make ahead

    Pro Tips for Perfect Results

    Pro Tip 1: How to Cook the Beets

    Peel the beet with a vegetable peeler, cut off the ends, and halve. Place in a pot, cover with water, and boil for 10 minutes. Then drain and let the beets cool inside the covered pot — this way the residual steam keeps the beet moist rather than drying it out. You want it fully cooked but still juicy and firm enough to slice paper-thin. A good stainless saucepan with a tight lid makes this step easy. Refrigerate the cooked beet covered until needed — it keeps for up to a week.

    Pro Tip 2: How to Slice Paper-Thin

    Place the beet or avocado flat-side down on the cutting board. Use a long, sharp knife and slice as thin as you possibly can, keeping the slices in order as you cut. When you lift the knife, the slices will try to stick to the blade — use a finger to guide them back down onto the cutting board. Once the whole vegetable is sliced, gently squeeze the sides to fan the slices out into a cascading shape. From here you can arrange them in a long line, a wave, or roll sections into a rose. Wash the knife and board between the beet and avocado so beet colour doesn’t transfer.

    Serving Ideas

    This appetizer is extraordinarily versatile at the table. It works beautifully alongside our Fresh Beet Pasta for a beet-themed dinner that looks deliberately styled. For BBQ parties, pair it with our Fall-Off-the-Bone Ribs — the fresh, cold appetizer contrasts wonderfully against warm, smoky meat. Place on a bed of lettuce or micro-greens to elevate the presentation further.

    Frequently Asked Questions

    How far ahead can I prepare this?

    The beet can be cooked and refrigerated up to a week in advance. The dressing can be made 3–4 days ahead. Slice the avocado only when you know serving time is close — avocado browns quickly once cut. To preserve sliced avocado for a few hours, squeeze lime juice over it immediately after slicing and keep covered in the fridge. Don’t slice the avocado the night before; it won’t look as fresh.

    How do I keep the avocado from browning?

    Squeeze fresh lime juice over every cut surface immediately. This slows oxidation significantly. Keep the sliced avocado covered with plastic wrap pressed directly against the surface — minimising air contact is the key. Even with lime juice, sliced avocado is best used within 2–3 hours of cutting.

    Can I serve this as a main dish?

    As an appetizer it serves 4–6 people generously. As a light main for 2, it works beautifully alongside a bowl of soup or a slice of crusty bread. Add a soft-boiled egg on top and it becomes a more substantial vegetarian plate.

    What if I can’t slice the vegetables thin enough?

    A mandoline slicer will produce perfectly uniform paper-thin slices with minimal effort. Set it to 1–2mm thickness. Exercise caution with the finger guard — mandolines are notoriously sharp. If you’re slicing by hand, a thin-bladed knife (a Japanese-style gyuto or slicing knife) works much better than a thick chef’s knife for this task.

    Can I make the dressing without sugar?

    Yes. For the dressing, omit the sugar and use a low-sodium soy sauce or tamari. The resulting dish is still flavourful and satisfying.

    Can I add other vegetables to the sashimi plate?

    Yes. Thinly sliced cucumber, radish, or yellow beet all work beautifully alongside red beet and avocado. Cucumber adds crunch and freshness; radish adds a peppery bite; yellow beet provides a softer flavour than red while maintaining the visual contrast. A plate with all four becomes a genuine centrepiece.

    Bowl of thin beet slices and avocado on a woven placemat

    Delicious Make-ahead Beet and Avocado Sashimi Appetizer

    Print Recipe Pin RecipePrep Time:10 minsCook Time:10 mins

    Ingredients

    • 2 large beets
    • 2 ripe avocado

    Small Serving Soy Sauce Dressing

    • 1 tbsp soy sauce
    • 2 tsp sesame oil
    • 1 tbsp white vinegar
    • 1 tbsp olive oil
    • 1 tbsp white sugar

    ± 1 Cup Serving Soy Sauce Dressing

    • ¼ cup soy sauce
    • 2 tsp sesame oil
    • ¼ cup white vinegar
    • ¼ cup olive oil
    • ¼ cup white sugar

    Instructions

    To Cook the Beet

    • Using a vegetable peeler, take out the skin of the beet and cut the ends off. Split it in half.
    • Place the beets inside a pot and fill it up with water until the beets are covered. Place the lid on top. Boil for 10 minutes. Drain and let the beets cool inside the pot with the lid on.

    Arranging the Salad

    • Use a paper towel to dry the beets, and place the beet flat side down on the cutting board. With a very sharp and thin knife, carefully slice the beet. When you lift the knife, the thinly sliced beet will try to stick to the knife. Use a finger to stop the sheet from falling out and place it back in the beet in the same arrangement. Slice the following slice and try to keep it has thin as possible. Repeat until the whole beet is thinly sliced.
    • Using the same methodology, slice the avocados. Remember to wash the board and knife so the beet colour doesn't stick to the avocado.
    • Fan out beet and avocado slices so that they form a long line with the slices overlapping each other. I usually remove the small slices from the ends because they are difficult to shape. Starting from one end, curl avocado slices toward the center, until I get a wave.
    • Use a piece of leaf or anything decorative to place it on the plate. Then place the beet and avocado sashimi on top.

    Dressing

    • Combine all the ingredients together and place it in a cup. When you're about to add it to the salad, give it a good shake or stir and drizzle it on top of the avocado and beet.

    Notes

    • to keep the avocado from browning, squeeze the juice of the lime on top of the avocado to preserve it from browning. Still, cut the avocado when you know serving time is almost there. Try not to cut it the day before like the beets. They don’t preserve the same.
    • No-sugar option: leave the sugar out of the soy sauce dressing.
  • Blender Oatmeal Pancakes

    Blender Oatmeal Pancakes

    These blender oatmeal pancakes have become our family’s most-requested breakfast — and they have replaced buttermilk pancakes in our household for good. Made from just bananas, oats, eggs, and baking powder, everything goes straight into the blender and onto the griddle. The cleanup is one blender. The result is a soft, fluffy, naturally sweet pancake that keeps you full until lunch. My IHOP-loving husband is the proof of concept.

    This post may contain affiliate links. If you purchase through these links, I may earn a small commission at no extra cost to you. Thank you for supporting Love & Harvest!

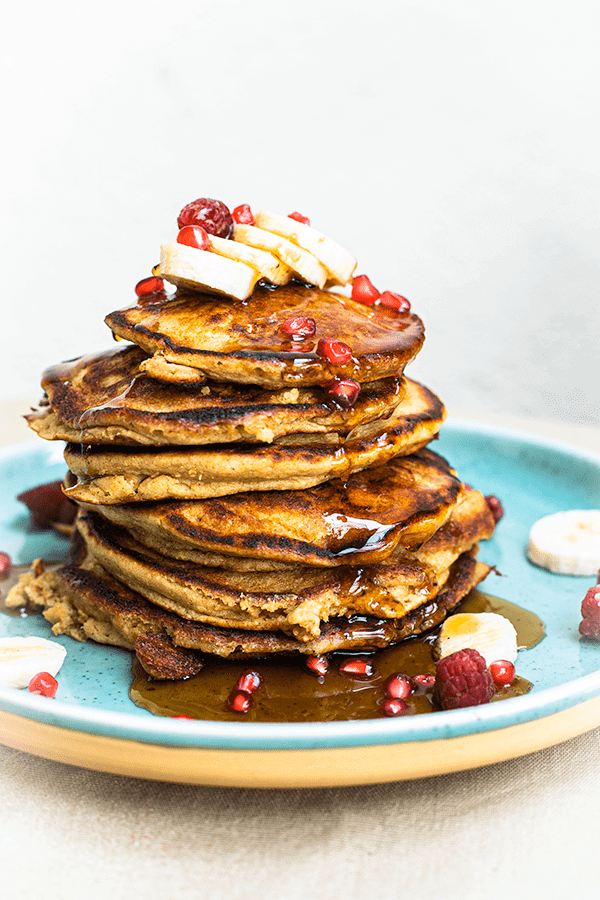
    Stack of oat banana pancakes with syrup, banana slices and pomegranate

    This post features a blender oatmeal pancake recipe using banana, oatmeal, vanilla, and eggs, all blended together.

    Why Make This Recipe?

    Pancakes for breakfast is probably one of the most popular breakfasts around the world. But can you make a version that’s easy and comes together in a blender? Yes. These oatmeal pancakes do. They are packed with whole grains from the oatmeal and natural sweetness from the bananas. Just 2 tablespoons of maple syrup in the whole batch. No flour. No special skills required.

    Mornings can be hectic. This recipe respects that — all the ingredients go into a blender, and cleanup is just the blender. That is it. It has been tested and approved by my IHOP-pancake-loving husband, who is not going back to buttermilk pancakes.

    Tall stack of pancakes topped with banana and pomegranate seeds

    Can These Pancakes Be Gluten-Free?

    I make these with regular oatmeal at home — not certified gluten-free oats — so as written they are not a gluten-free recipe. If you need them gluten-free, use certified gluten-free oats (and know that cross-contact can still happen in some kitchens and facilities). The only added sweetener is 2 tablespoons of maple syrup. They come out soft, fluffy, and full of flavour — perfect with maple syrup or any topping you love.

    Ingredients Deep-Dive

    Ingredients

    Oatmeal

    Either old-fashioned oats or quick-cooked oats both work. The oatmeal is the base of these pancakes — it replaces flour entirely.

    • Why it matters: Oats give these pancakes their hearty texture, no flour needed. I use regular rolled or quick oats. If you need a gluten-free version, choose certified gluten-free rolled oats or oat flour — oats are naturally gluten-free but can pick up wheat in processing, and cross-contact is still possible.

    Bananas

    Use overripe bananas — the riper, the better. The spots on the peel are your best friends here. Riper bananas are sweeter and blend more smoothly.

    • Why it matters: Bananas serve as both the natural sweetener and the binding agent in this recipe. They replace both sugar and part of the fat you would find in a traditional pancake recipe. Overripe bananas have higher natural sugar content and a more intense banana flavour.

    Eggs

    Eggs help the pancake rise and give it a fluffy texture. They are also the primary structural ingredient that binds the oats and banana together.

    • Why it matters: Without eggs, the batter would be too loose to hold together on the griddle. The protein in eggs sets when heated, creating the structure that gives these pancakes their lift.

    Baking Powder

    Baking powder creates the bubbles and air pockets inside the pancake that give it that light and fluffy texture. It is essential in all pancake recipes.

    • Why it matters: Without baking powder, these pancakes will come out flat and dense. The reaction between baking powder and the moisture in the batter produces CO2 bubbles that make the pancakes puff up on the griddle.

    Stack of pancakes with a forkful cut out to show the fluffy inside

    Pro Tips for Perfect Oatmeal Pancakes

    Pro Tip 1 — Use a Griddle

    A cast iron griddle has a larger surface area than regular pans, letting you cook more pancakes at once. It also creates an even surface of heat so every pancake cooks consistently.

    Pro Tip 2 — Cook the Pancakes with Butter

    Always add a thin layer of butter on the griddle before adding the batter. This prevents sticking and adds flavour. Butter tastes better than regular cooking oil for pancakes.

    Pro Tip 3 — When to Flip the Pancakes

    Flip when you see little air pockets forming in the middle of the pancake and the edges stop looking wet — they will have a soft, matte texture. This is the signal that the bottom is set and the pancake is ready to flip without breaking.

    Pancake stack in a pool of syrup with banana slices on a blue plate

    Looking for more breakfast ideas? Try our Mixed Berry Smoothie with Pomegranate and Nopal or our Celery Juice to pair alongside these pancakes for a complete morning meal.

    Tall stack of pancakes topped with banana and pomegranate seeds

    Blender Oatmeal Pancakes

    Delicious pancakes made with oatmeal and banana. All made with just a blender. Gluten-free when made with certified gluten-free oats.
    Prep Time 7 minutes
    Cook Time 15 minutes
    Total Time 22 minutes
    Servings: 4 people
    Course: Breakfast
    Cuisine: American
    Calories: 295

    Ingredients
      

    • 2 cups royal oats or quick oats
    • 1 cup water
    • 1 medium riped banana
    • 2 eggs
    • 2 tbsp melted butter
    • 2 tbsp maple syrup
    • 1 tbsp baking powder
    • ½ tsp baking soda
    • ½ tsp salt
    • ½ tsp ground cinnamon
    • 2 tsp vanilla extract

    Equipment

    • high speed blender

    Method
     

    1. Preheat your griddle on the stovetop and set it on medium low heat.
    2. In the blender put all the ingredients together and blend on high for 30 seconds. Batter should be smooth with no lump.
    3. lightly brush the surface of your griddle with butter.
    4. With your ⅓ measuring cup, scoop the batter with the mesuring cup, and slowly drop the batter on the griddle. Leave enough space between pancakes so they are not touching each other.
    5. Cook until small bubbles start to form in the middle of the pancake the sides have turned into a matte texture. Flip the pancake and cook for another 1-2 minutes.
    6. Serve right away with a small slice of butter on top and maple syrup.

    Frequently Asked Questions

    Do these oatmeal pancakes taste like banana?

    Yes, mildly. The banana flavour is present but not overwhelming. The more overripe your bananas are, the stronger the banana flavour. If you want to reduce it, use one banana instead of two and add a tablespoon of nut butter for binding. The oat flavour balances out the banana very well.

    Can I make this recipe without a blender?

    Yes, but the texture will be coarser. Mash the bananas very well with a fork, then mix in the eggs, and finally stir in the oats and baking powder. For a smoother texture without a blender, use certified gluten-free oat flour instead of whole rolled oats — it blends into the batter without the blender step.

    Are these pancakes suitable for toddlers?

    Yes. They have no refined flour, and the only sweetener is the banana plus 2 tablespoons of maple syrup in the whole batch. They do contain butter and eggs. They are soft, easy to chew, and naturally sweet from the banana. Cut them into small pieces or serve as finger food for younger toddlers. They are also an easy way to serve oats and eggs at a toddler breakfast.

    How do I store leftover oatmeal pancakes?

    Let the pancakes cool completely, then store in an airtight container in the refrigerator for up to 3 days. For longer storage, freeze with parchment paper between each pancake and reheat directly from frozen in a toaster or non-stick pan. They reheat very well and taste just as good the next day.

    Can I add protein powder to this recipe?

    Yes. Add one scoop of plant-based protein powder to the blender along with the other ingredients. The batter may thicken slightly — if it does, add a tablespoon of water to reach the right consistency. A vanilla or unflavored protein powder works best so it does not compete with the banana.

    Why are my pancakes coming out flat?

    The most common reason is old baking powder. Baking powder loses its potency over time — test yours by dropping a teaspoon into hot water. If it bubbles vigorously, it is still good. If not, replace it. Also make sure you are not overmixing the batter after adding the baking powder — stir just until combined to keep the air pockets intact.

  • Spicy Corn Dip With Manzano Pepper

    Spicy Corn Dip With Manzano Pepper

    Sweet, crunchy corn kernels coated in a creamy lime-spiked mayonnaise, studded with charred onion and the distinctive fruity heat of Manzano peppers — this dip disappears from the table faster than you can set it down. It is bold, fresh, and takes less than 30 minutes to make with only five ingredients.

    This post may contain affiliate links. If you purchase through these links, I may earn a small commission at no extra cost to you. Thank you for supporting Love & Harvest!

    Spicy Corn Dip with Manzano Pepper Recipe

    It is corn season and there are more ways to eat corn than BBQ corn on the cob with butter. This delicious spicy corn dip is so easy to make it will take you less than 30 minutes to prepare — and it only asks for five ingredients.

    This is a must-make for your next party or family gathering. Anyone who loves spicy food will fall in love with this recipe. After making it, corn just might become your new favourite seasonal vegetable.

    If you love spicy food, try our Easy Hummus Recipe or our Vegetarian Mango Soy Ceviche for more crowd-pleasing dips and sides.

    Ingredients

    Corn

    • Why use fresh seasonal corn: Summer corn is at peak sweetness and starch content. The kernels have a satisfying crunch and natural juiciness that frozen or canned corn cannot replicate. Any variety works — sweet corn, rainbow corn, or the starchy white corn common in Mexico. Whatever is local and fresh is the right choice.

    Manzano Peppers

    • Why Manzano over jalapeño: Manzano peppers have a unique fruity citrus character with a moderate-to-hot heat level — roughly twice as hot as jalapeños. Their black seeds and thick flesh hold up perfectly in a cooked dip. The flavour does not overwhelm the corn; it accents it. If you cannot find Manzano, jalapeño is an excellent substitute.

    White Onion

    • Why cook it first: Raw onion has a sharp, aggressive flavour that competes with the other ingredients. Sautéing the onion in oil first softens its bite, releases its natural sweetness, and creates a gentle fragrance that blends into the dip instead of fighting it.

    Mayonnaise

    • Why mayo works here: Mayonnaise binds all the flavours together with a creamy, slightly tangy base. For a lower-calorie option, swap it for full-fat or low-fat plain yogurt — the result is tangier and lighter but still delicious.

    Lime

    • Why fresh lime: Lime adds brightness and acidity that cuts through the richness of the mayo. For a stronger lime flavour, zest the skin directly into the dip. Bottled lime juice will work in a pinch but lacks the aromatic oils of fresh.

    Why You Will Love This Recipe

    • Easy recipe — cook the corn, cut the kernels off the cob, mix everything together. Done in under 30 minutes.
    • Crowd-pleaser — sweet corn is universally loved. Skip the Manzano peppers for a kid-friendly version.
    • Goes with everything — a great side dish for backyard BBQs, summer parties, and family gatherings. The best potluck food to bring.
    • Low cost — most ingredients are already in your fridge. Only the corn and Manzano peppers require a special trip.

    Frequently Asked Questions

    Can I use frozen or canned corn instead of fresh?

    Yes. Frozen corn works well — thaw it first and pat it dry so it does not water down the dip. Canned corn also works in a pinch; drain and rinse it thoroughly. Neither will have the same natural sweetness or texture as fresh peak-season corn, but both are perfectly acceptable shortcut options.

    How spicy is this dip?

    With Manzano peppers it has a genuine kick — moderate to hot. Manzano peppers are roughly twice as hot as jalapeños. For a milder dip, use only half a pepper, remove all the seeds carefully, or substitute with a small amount of jalapeño. For a non-spicy version, skip the peppers entirely and add a pinch of sweet smoked paprika for colour instead.

    Can I make this dip ahead of time?

    Yes. You can prepare the corn and the sautéed onion and peppers up to a day ahead and store them separately in the refrigerator. Mix everything together with the mayonnaise and lime just before serving for the freshest result. Once fully assembled, it keeps well for up to two days covered in the fridge.

    Can I serve this dip warm or cold?

    Both work. Served warm right after cooking, the dip is comforting and rich. Served cold after an hour in the refrigerator, it is refreshing and bright. For a summer outdoor party, cold is the way to go. For a cosy winter side dish, serve it warm.

    What is a good substitute for Manzano peppers?

    Jalapeño is the closest in texture and heat profile. For something fruitier and hotter, habanero works but use much less — habaneros are three to five times hotter than Manzano. Serrano peppers are also a good middle-ground option: hotter than jalapeño with a crisp, green flavour.

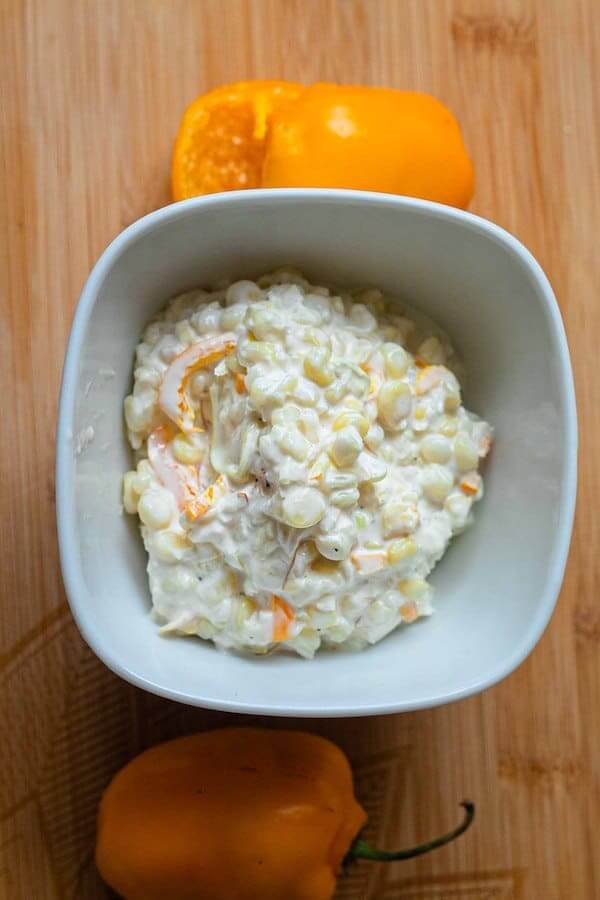
    spicy corn and Manzana Pepper Dip

    Spicy Corn and Manzano Pepper Dip

    Prep Time 15 minutes
    Cook Time 15 minutes
    Total Time 30 minutes
    Servings: 6 people
    Course: Side Dish
    Calories: 170

    Ingredients
      

    • 6 corn or sweet corn
    • 1-2 manzano peppers or jalapeno peppers
    • ¼ white onion
    • ½ cup mayonnaise or yogurt (fat free option)
    • 1 large lime juiced
    • 1 tsp salt to taste
    • black pepper to taste

    Method
     

    1. Wash and tear off the leaf of the corn if it has any. Cook the corn in their hot boiling water or steam it in an Instant Pot.
      Boiling water: Boil the corn for 10 minutes.
      Steam with Instant Pot: 10 minutes.
    2. Meanwhile, sliced the onions in thick slices, and thinly sliced the manzano peppers. In a pan, heat 2 tsp of oil and fry the onion and manzano peppers until soft and fragrance. Place them in a heat proof medium size bowl.
    3. Take out the corn and let it cool until it is ready to be handled. Use a sharp knife and cut the kernel off the corn. Place them in the same bowl with the onion and peppers.
    4. Mix the rest of the ingredient together: mayonnaise, lime juice, salt and pepper. Can be serve hot or cold.
  • Authentic Mapo Tofu Recipe: Generational Family Recipe

    Authentic Mapo Tofu Recipe: Generational Family Recipe

    Mapo tofu is the smell of home. One whiff of doubanjiang frying in hot oil with garlic and black beans and I am instantly transported back to a small cafeteria in Vancouver, eating a hot bowl of spicy tofu over steamed rice while wearing a white and orange ski jacket, completely broke, and completely happy. This is that recipe — the one my mom confirmed, the one a Chinese fast-food chef taught me, and the one that still makes bad days feel better.

    This post may contain affiliate links. If you purchase through these links, I may earn a small commission at no extra cost to you. Thank you for supporting Love & Harvest!

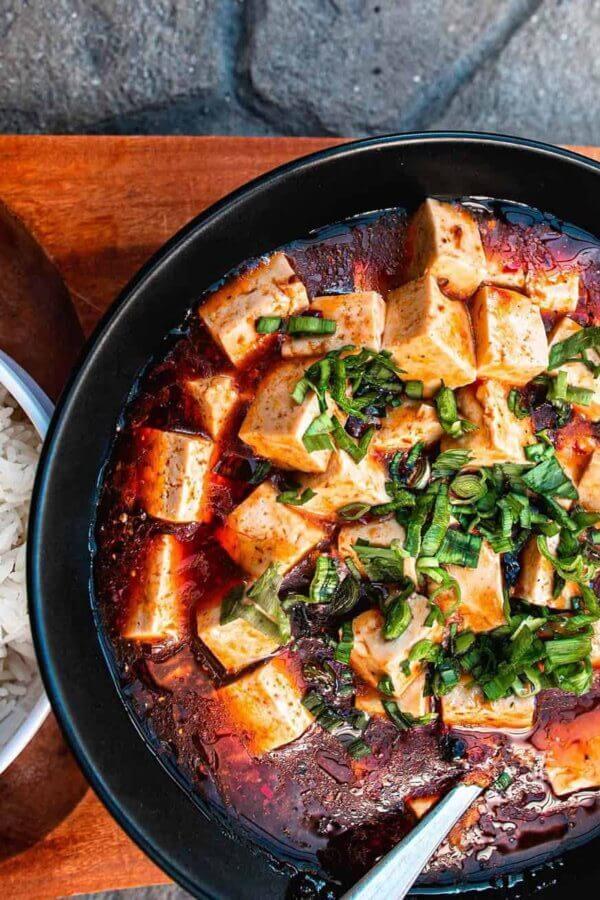
    Vegetarian Mapo Tofu

    This recipe is super versatile. It is already vegetarian as written. For a gluten-free version, use tamari instead of soy sauce, and a doubanjiang, cooking wine and black vinegar labelled gluten-free. You can make it soupier or starchier by adjusting the slurry, and you can dial the spice level up or down by using more or less doubanjiang and chili oil.

    This pairs beautifully with our Steam Preserved Vegetables with Pork or our Traditional Hong Kong Curry Chicken for a full Cantonese-style dinner spread.

    Why You Will Love This Mapo Tofu Recipe

    • Simple with easy instructions — there is a reason mapo tofu appears on every Chinese fast-food menu. It is fast, it is easy, and the results are authentic with only a few key sauces.
    • Reheat-friendly — the flavour is still exceptional after a day in the fridge. It reheats perfectly in the microwave — ideal for days when you need to be out the door quickly.
    • Authentic Cantonese home cooking — if you are looking for genuine Cantonese home-style cooking, mapo tofu is one of the most iconic and comforting recipes in that tradition.

    Ingredients

    Doubanjiang (Chili Bean Paste)

    • Why it is non-negotiable: Doubanjiang is the soul of this dish. It is a fermented paste made from broad beans, chili, and salt — deeply savoury, spicy, and complex. No other ingredient replicates its umami depth. There are spicy and non-spicy varieties; spicy is traditional. The Juan Cheng brand in the red plastic jar is the gold standard for home cooks.

    Doubanjiang Chili Bean Paste

    Dried Fermented Black Beans

    • Why they matter: These small preserved beans add a deeply savoury, earthy, slightly funky flavour that amplifies the doubanjiang without competing with it. They dissolve partially into the sauce and create an irreplaceable base note. Do not skip them or substitute with regular black beans — the fermented flavour is essential.

    Szechuan Peppercorns (optional)

    • Why they create the authentic numbing heat: The legendary “ma la” (numbing-spicy) profile of Mapo Tofu comes from Szechuan peppercorns. They create a unique tingling, almost electric sensation on the tongue that is completely different from regular chili heat. Grind them fresh and sprinkle on top just before serving.

    Szechuan Peppercorns

    Silken or Soft Tofu

    • Why texture matters here: Silken or soft tofu has a creamy, delicate texture that absorbs the sauce beautifully. Medium-firm tofu is the maximum firmness to use — anything firmer will not have the characteristic melt-in-your-mouth quality. Cut into 3/4-inch cubes and handle gently throughout cooking.

    Pro Tips

    Do Not Over-Stir

    Over-stirring will break the tofu and turn a beautiful cubed tofu stew into a murky mash. Use a slotted spoon and do slow, gentle circular stirs. Never use a fork or anything sharp.

    The Slurry Is Your Friend

    The cornstarch slurry (1 tsp cornstarch dissolved in 1/2 cup room-temperature water) thickens the sauce and coats every cube of tofu. Add it after the tofu and stir gently only once or twice — the sauce will tighten beautifully as it simmers.

    Also note: step 3 in the instructions should read “In a hot wok or pan” — “I’m a hot wok” in the original is a typo.

    Frequently Asked Questions

    Is this recipe actually Cantonese or Sichuan?

    Mapo Tofu originates from Sichuan province and is traditionally made with ground pork and Sichuan peppercorns. This version is a Cantonese adaptation — the way it has been cooked in Hong Kong-style homes and restaurants for generations. It is vegetarian, slightly less numbing, and uses a thicker sauce. Both are delicious and authentic within their respective traditions.

    Can I add ground pork to this recipe?

    Yes. Brown 100–150g of ground pork in the wok before adding the doubanjiang and black beans. The pork adds richness and protein and is how the traditional Sichuan version is made. Cook the pork until no longer pink, then proceed with the sauce as written.

    Why is my sauce not thickening?

    The slurry needs to reach boiling temperature to activate the cornstarch. Make sure the heat is turned up high enough for the pan to bubble after you add the slurry. If the sauce is still thin after 2 minutes of gentle simmering, mix another 1/2 tsp cornstarch with a tablespoon of cold water and add it to the pan.

    Can I make mapo tofu ahead of time?

    Yes. The sauce can be made up to 2 days ahead and stored in the refrigerator. Add freshly cut tofu when you reheat, as previously cooked tofu tends to become spongy. Reheat over medium-low heat and stir very gently.

    What is a good substitute for Chinese cooking wine?

    Dry sherry is the closest substitute and works very well. Mirin (Japanese rice wine) can also work but is sweeter — use a little less. If you want a non-alcoholic option, replace with chicken broth or vegetable stock plus a few drops of rice vinegar for acidity.

    How do I know when the tofu is heated through?

    When the sauce begins to bubble gently around the edges of the tofu, the tofu is heated through. At this point, turn the heat to low, cover with a lid, and cook for 10 minutes. The tofu will absorb the sauce and the flavours will deepen significantly.

    Authentic Mapo Tofu: The Way My Mom Made It

    Ma Po tofu is probably the easiest introduction to Chinese home cooking. It’s a delicious dish that will tickle all your taste buds, and my version is meat-free (the traditional one uses pork). It’s a warm, cozy dish for those colder days, like a warm tofu blanket that wraps your soul. Always served with a warm bowl of jasmine rice, it’s the kind of dish that makes you feel like you’re winning again in life, even on a bad day.
    Prep Time 10 minutes
    Cook Time 25 minutes
    Total Time 35 minutes
    Servings: 4 people
    Calories: 220

    Ingredients
      

    SLURRY
    • 1 TSP cornstarch
    • ½ cup room temperature water
    SAUCE
    • 3 TBSP canola or vegetable oil
    • 2-2.5 TBSP tablespoons doubanjiang link
    • 1 TBSP dried fermented black bean link
    • 2 TBSP garlic minced
    • 1 TBSP favourite chili oil (optional)
    • 1.5 TBSP soy sauce link
    • 1 TBSP Chinese cooking wine link
    • 2 TSP black vinegar link
    • ½ TSP brown sugar
    • 1 pound soft tofu 1 package
    • 1 stalk of green onions chopped
    • ½ TSP sesame oil link

    Method
     

    1. Prepare your tofu by slicing them into small cubes – 3/4-inch cubes. Set aside. 
    2. Prepare your slurry by mixing all the ingredients together. Set aside. 
    3. I’m a hot wok or pan, add oil. Fry the doubanjiang, black beans, garlic and ginger together until fragrant – 3 minutes.
    4. Slowly add the chili oil, soy sauce,  honest wine, black vinegar and sugar. Let it cook for another 5 minutes.
    5. Turn the heat to medium low and carefully add the tofu. Stir in the slurry and slowly with a spoon and try not to break the tofu.
    6. When the pan starts to bubble, turn the heat to low and put a lid on it and cook for 10 minutes.
    7. Serve with scallion on top and drizzle sesame oil on top. Serve with warm steamed rice.