Category: soup recipes

  • West Coast Jambalaya – No Pork

    West Coast Jambalaya – No Pork

    A hearty, soul-warming jambalaya inspired by a rainy day in Tofino, British Columbia — made without pork or sausage but packed with all the smoky, spicy depth you expect. One pot, big flavour, ready in 45 minutes.

    This post may contain affiliate links. If you purchase through these links, I may earn a small commission at no extra cost to you. Thank you for supporting Love & Harvest!

    Fresh seafood crab dish with vibrant vegetables in a rich, flavorful sauce.

    West Coast Best Coast

    It was a cold and rainy day in Tofino, British Columbia, where the Pacific Rim’s rugged coastline meets the endless stretch of ocean. I had just finished a morning of surfing, shivering and soaked, when I stumbled upon a small food stand with steam rising into the misty air. Their special of the day? Jambalaya.

    As I wrapped my hands around the steaming bowl, the first bite hit me like a warm hug. It was savoury, spicy, and jam-packed with flavour. Each spoonful was a revelation — the perfect blend of tender chicken, shrimp, and spices nestled in a bed of rice, all swimming in a deeply seasoned broth.

    Replicate Time

    I went back to that food stand three more times during my trip, determined to savour every detail and unlock its secrets. Back home, I worked tirelessly to recreate that magical experience. This recipe is my replica of their soulful jambalaya. It’s rich and hearty, perfect for those who can’t eat pork. Instead of using chorizo sausages, I’ve added all the spices that give chorizo its distinctive flavour directly into the soup.

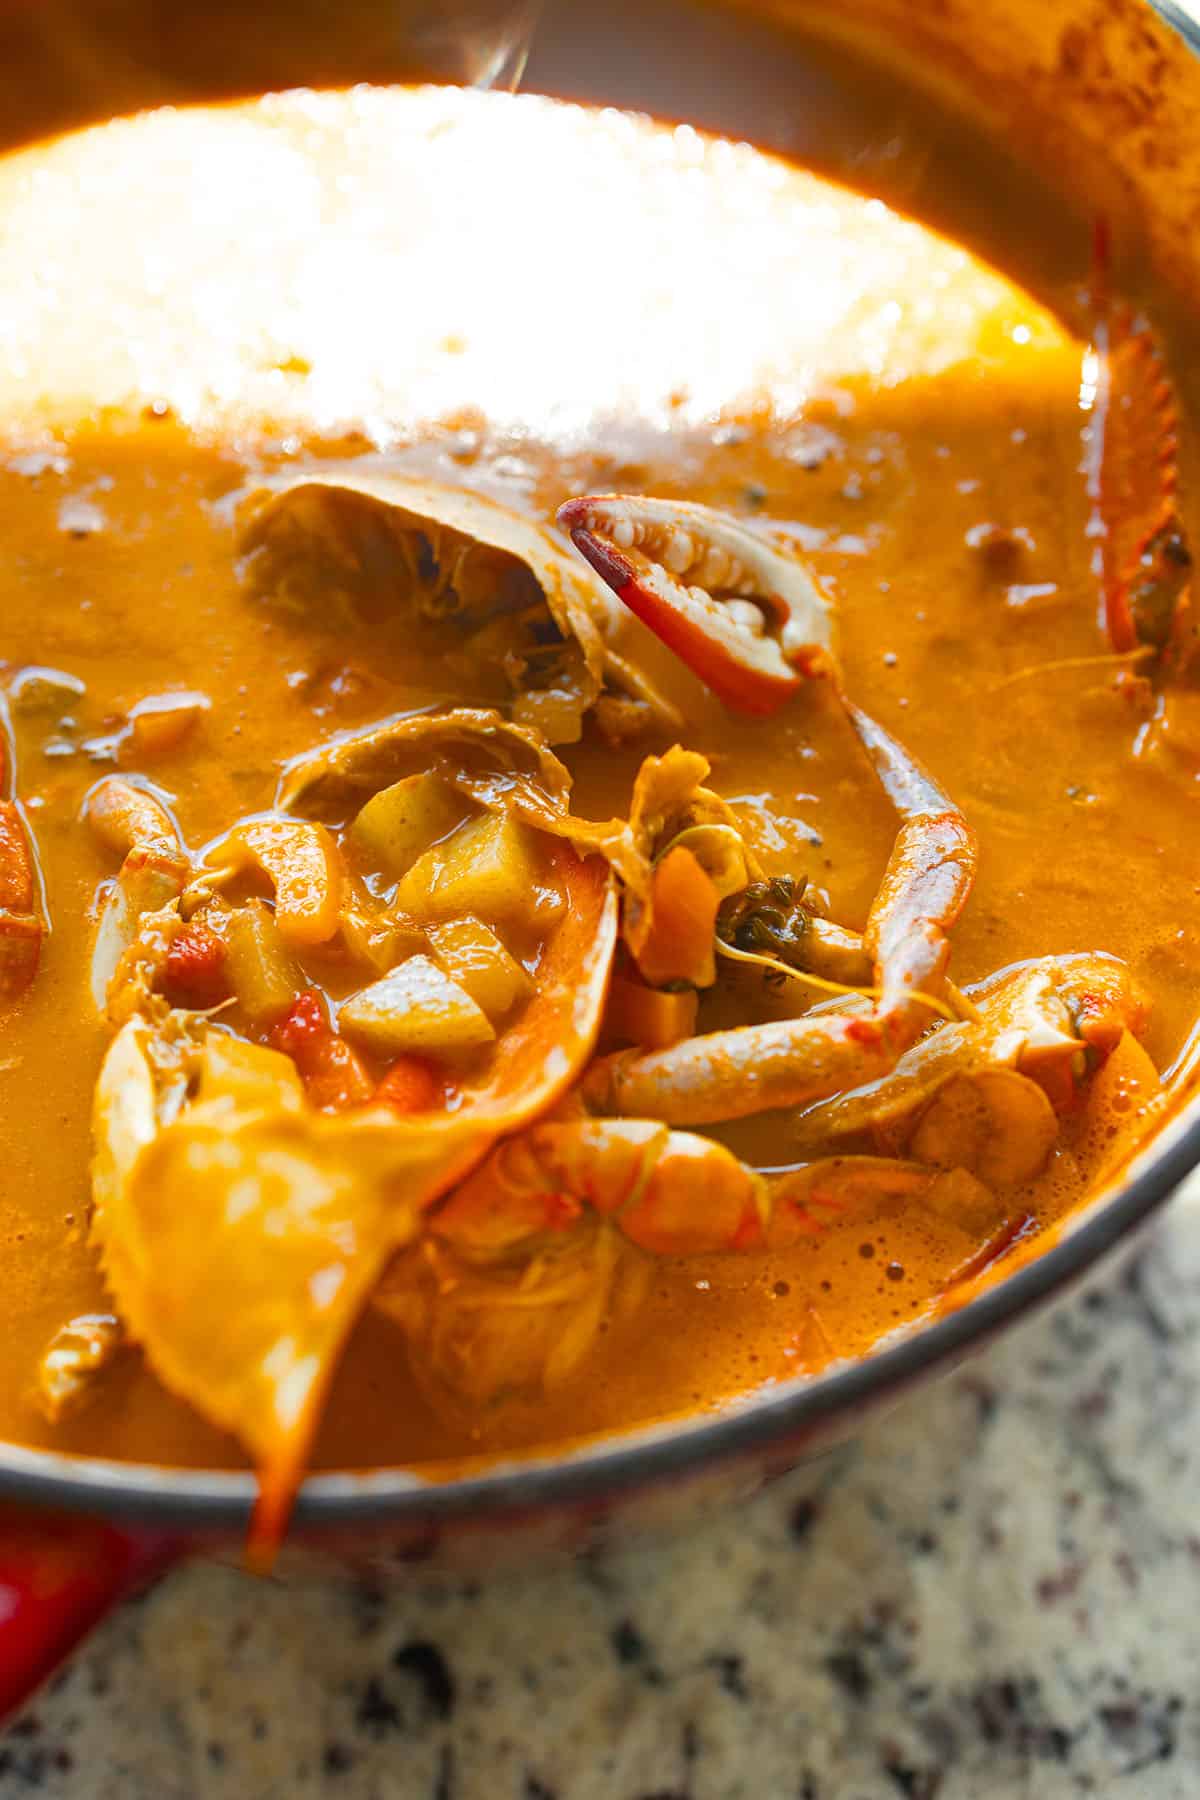
    Crab pieces in an orange, tomato-based jambalaya sauce

    Why You Should Try This Recipe

    If you love hearty, one-pot meals that explode with flavour, this easy jambalaya is for you. It’s a crowd-pleaser, perfect for feeding a hungry family or impressing friends at a casual dinner. The mix of smoked paprika, fresh herbs, and a kick of cayenne brings the Louisiana bayou straight to your kitchen. Best of all, it’s ready in about 45 minutes.

    Ingredients

    Smoked Paprika

    • The backbone of the jambalaya spice blend — adds a deep, woody smokiness that mimics the complexity of pork sausage without any meat. Use a good-quality Carbon Steel Wok to toast it briefly and amplify the flavour.

    The Holy Trinity (Onion, Celery, Bell Pepper)

    • The Creole foundation of flavour. These three aromatics build the savoury base that every jambalaya depends on. Chop them uniform so they cook evenly and melt into the broth.

    Crab & Shrimp

    • West Coast proteins that replace pork completely. Crab adds sweet briny depth while shrimp cooks quickly and stays tender. Add shrimp in the final 5 minutes to avoid overcooking.

    Long-Grain Rice

    • Absorbs all the spiced broth as it cooks, making every grain flavour-packed. Do not stir once added — let it steam undisturbed for the best texture.

    Savory crab stew with rich, flavorful broth and tender crab meat. Perfect comfort food from Love & Harvest.

    Flavours of Jambalaya

    Jambalaya is all about balance. The smoky, spicy flavours of the sausage spices set the tone, while tender chicken and shrimp add heartiness. Aromatics like onion, celery, and bell peppers — known as the “Holy Trinity” of Creole cooking — form the flavourful base. Tomato and chicken broth bring richness, while spices like paprika, thyme, and cayenne create layers of complexity. The rice absorbs all these incredible flavours, tying the dish together.

    For a hearty Instant Pot chili with similar bold spices, or our Beer Batter Fish and Chips for another West Coast seafood favourite. You might also love this One Pot Lemon Garlic Chicken for an easy weeknight alternative.

    Grab a good Lodge Dutch Oven 5qt for the best one-pot results, and use a Lodge 12″ Cast Iron Skillet to sear your proteins first for deeper flavour.

    Frequently Asked Questions

    Can I make this jambalaya without seafood?

    Yes! You can substitute chicken thighs for the crab and shrimp. Cut into 1-inch pieces and brown them first before adding your vegetables. The cooking time stays the same.

    What makes this recipe “West Coast” style?

    Traditional Louisiana jambalaya uses pork sausage like andouille as its core protein. This version leans into Pacific Northwest seafood — crab and shrimp — and replaces sausage with a custom spice blend that delivers all the smoky depth without any pork.

    How do I prevent the rice from getting mushy?

    Add the rice after your broth comes to a simmer, reduce the heat to low, and resist stirring. Let it absorb the liquid undisturbed for about 20 minutes. The rice will steam perfectly and stay separate rather than turning starchy.

    Can I freeze leftover jambalaya?

    Yes. Let it cool completely, then freeze in airtight containers for up to 3 months. Reheat on the stovetop with a splash of broth or water to restore the consistency. The seafood may soften slightly after freezing.

    What is Cajun spice and can I make my own?

    Cajun spice is a blend of smoked paprika, garlic powder, onion powder, cayenne, oregano, and thyme. You can absolutely mix your own — combine 2 tsp smoked paprika, 1 tsp garlic powder, 1 tsp onion powder, ½ tsp cayenne, ½ tsp dried thyme, and ½ tsp dried oregano.

    Is this recipe gluten-free?

    Not as written: it uses ½ cup flour. Replace the flour with a 1:1 gluten-free flour blend, and make sure your stock and any sauces you add are labelled gluten-free.

    Crab pieces in an orange, tomato-based jambalaya sauce

    Jambalaya

    Delicous cramy Jambalaya packed with flavours without using pork sausages. Rest
    Prep Time 15 minutes
    Cook Time 1 hour 27 minutes
    Total Time 1 hour 42 minutes
    Servings: 6 people
    Course: Main Course
    Cuisine: American
    Calories: 480

    Ingredients
      

    • 6 tbsp butter
    • 3 small crabs chopped into 4 large pieces
    • 1 large white onion
    • 2 carrots, chopped
    • 2 celery stalk, chopped
    • Jambalaya Spice see "Jambalaya Spice" below
    • 3 clove garlic
    • ½ cup flour
    • 1 cup red whine
    • 1 L stock / water / vegetable stock
    • 5 small potatoes, chopped
    • 1 cup rice
    • 2 fish fillet, cubed into 2"
    • 5 large shrimps head removed and deveined, shells peeled
    • 1 bell pepper, chopped
    • 1 cup heavy cream
    • sea salt
    • black pepper
    Spice
    • 1 tbsp cajan spice
    • dash of ground cinnamon
    • 1 tsp ground Mexican oregano
    • 1 tsp ground cumin
    • 2 tsp ground smoked paprika
    • 5 bay leaf
    • 2 tsp ground bell chile

    Method
     

    1. Heat butter in a large, deep skillet or pot over medium heat. Add the crab pieces and cook until golden on all sides. Remove and set aside.
    2. Add the onion, carrot, and celery to the skillet. Sauté until softened, about 5 minutes. Stir in the jambalaya spice and garlic and cook for another minute.
    3. Add the flour into the skillet and move it around until it clumps and turn brown or it starts to become aromatic. Quickly add the wine and using a whisk, break up the flour clumps. Add the chicken stock.
    4. Return the crabs to the skillet, and add the potatoes and rice. Bring the mixture to a boil, then reduce the heat to low. Cover and simmer for 20-25 minutes, stirring occasionally, until the rice is tender and the liquid is absorbed.
    5. Finally add the shrimp, fish fillet pieces, bell pepper, and heavy cream. Gently mixing them into the rice. Cover and cook for another 15 minutes, or until the shrimp are pink and cooked through. Salt and pepper to your preference.

  • Instant Pot Menudo (My Mother-in-Law’s Recipe from Saltillo)

    Instant Pot Menudo (My Mother-in-Law’s Recipe from Saltillo)

    This is my mother-in-law’s menudo from Saltillo, made in the Instant Pot: beef tripe and beef shank in a guajillo and ancho chile broth, ready in about 1 hour 40 minutes instead of a whole morning.

    Rich beef soup with vegetables and herbs, served in a white bowl on colorful Mexican tablecloth.

    Want more dinners like this? My free PDF has seven easy family dinners for the weeknight table. Send me the free dinners

    Why I make menudo in the Instant Pot

    The traditional way takes hours of slow simmering. I use the Instant Pot because, honestly, that’s the only way menudo happens on a weeknight in my house. Not the traditional method, but hey, we do what we have to do.

    Bowl of Instant Pot menudo with chopped onion, oregano and lime on the side

    My mother-in-law’s menudo from Saltillo

    This menudo recipe comes straight from my mother-in-law, who has been making it for years for our family gatherings.

    Saltillo is in the northern part of Mexico, about 30 minutes from Monterrey.

    Every time we make it, we make a big batch to share with friends and neighbours.

    Rocky mountains under a clear blue sky near Saltillo, in northern Mexico

    What you need

    • Beef tripe: the honeycomb tripe is the best part for menudo. It stays tender with a little chew, and soaks up the broth.
    • Beef shank: a cut from the leg, with marrow in the bone. Under pressure it turns soft and gives the broth its body.
    • Beef feet (optional): add them if you want a thicker broth.
    • Guajillo and ancho chiles: guajillos are dried mirasol chiles, bright red with mild to medium heat. Anchos are dried poblanos, darker, a little sweet and smoky. Together they make the broth red.
    • Mexican oregano: it isn’t the same as Mediterranean oregano. It’s more citrusy, and it goes in the broth and on top.
    • Cumin and garlic: in the chile paste.

    Savory beef stew with tender meat and flavorful broth, served with fresh lime and cheese toppings.

    How to make Instant Pot menudo

    The links below are Amazon affiliate links. As an Amazon Associate I earn from qualifying purchases, at no extra cost to you.

    Recommended tools

    Any medium pot and any full-size blender that can handle warm liquids work.

    1. Prep the chiles: boil the sliced tomatoes with the guajillo and ancho chiles in hot water for 20 minutes, then blend with the garlic, oregano, cumin and a little of the soaking water until smooth.
    2. Cook the meat: add the chile paste, beef shank, beef feet (if using), and the bay leaves to the Instant Pot. Cover with enough water to cover the meat, season with salt to taste, and cook on high pressure for 45 minutes.
    3. Add the tripe: let the pressure release naturally, then open the lid. Stir in the tripe and let it simmer on the soup setting for another 20 minutes.
    4. Serve: with lime juice, diced onion, diced serrano and a pinch of dried oregano, and warm corn tortillas on the side.

    Trust me, don’t skip the lime and raw onion on top.

    Menudo topped with chopped onion and oregano, with limes and dried corn behind

    How we serve it

    In my family, menudo is what we look forward to on Mexican Independence Day and on cold winter mornings.

    It’s also a New Year’s Day tradition, a comforting, traditional bowl many families enjoy the morning after a celebration.

    Love bold Mexican soups? Try our Green Pozole (Pozole Verde) for another classic, or the Easy Mexican Salsa Verde as the perfect fresh topping. Our Mexican Fire Roast Chicken is another family-favourite recipe from the same culinary tradition.

    Savory beef stew with herbs, chopped vegetables, and rich broth in a white bowl.

    Savory beef stew with herbs, chopped vegetables, and rich broth in a white bowl.

    Instant Pot Menudo

    My mother-in-law’s menudo from Saltillo, made in the Instant Pot. Tripe and beef shank in a guajillo and ancho chile broth.
    Prep Time 20 minutes
    Cook Time 1 hour
    Total Time 1 hour 40 minutes
    Servings: 6 people
    Course: Soup
    Cuisine: Mexican
    Calories: 320

    Ingredients
      

    • 1 kg beef tripe cut into bite-sized pieces
    • 1 kg beef shank
    • 2 beef feet (optional, for a thicker broth)
    • 1 litre water or beef broth
    • 6 guajillo peppers
    • 4 ancho peppers
    • 4 garlic cloves
    • 7 bay leaf
    • salt to taste
    • 1 tbsp dried oregano
    • 1 tbsp cumin powder
    • 5 medium tomatoes
    • white onion, diced garnish
    • 2 serrano peppers, diced garnish
    • dried oregano garnish
    • 6 limes garnish

    Equipment

    • Instant Pot

    Method
     

    1. Prep the Chiles:
      In a medium pot, combine the sliced tomatoes, guajillo chiles, and ancho chiles. Boil them in hot water for 20 minutes until softened. Transfer the softened ingredients to a blender, add the garlic, oregano, cumin, and 1 cup of the soaking water. Blend until smooth and set aside.
    2. Cook the Meat:
      In the Instant Pot, add the blended chile paste, the beef shank, the beef feet (if using), and the bay leaves. Pour in enough water to fully cover the meat and season with salt to taste. Seal the lid and cook on high pressure for 45 minutes.
      (The beef tripe goes in later, not now.)
    3. Add the Tripe:
      Let the pressure release naturally, then open the lid. Add the beef tripe to the pot. Switch to the soup setting and simmer for another 20 minutes.
    4. Serve:
      Ladle the menudo into bowls and garnish with a squeeze of fresh lime juice, diced onion, diced serrano, and a sprinkle of dried oregano. Serve with warm corn tortillas on the side.

    Cooking this one this week? Get my free PDF with seven easy family dinners, so the rest of the week is planned too. Get the free dinners

  • Green Pozole ‘Pozole Verde’

    Green Pozole ‘Pozole Verde’

    Green pozole is Mexico’s cozy, emerald-green bowl of comfort — tender pork simmered with tomatillos, poblano, epazote, and pepitas, then served with a spread of garnishes that make every bite your own. It is beloved in the southern states of Guerrero and Oaxaca, but once you make it at home you will understand why every region in Mexico has claimed it as their own.

    This post may contain affiliate links. If you purchase through these links, I may earn a small commission at no extra cost to you. Thank you for supporting Love & Harvest!

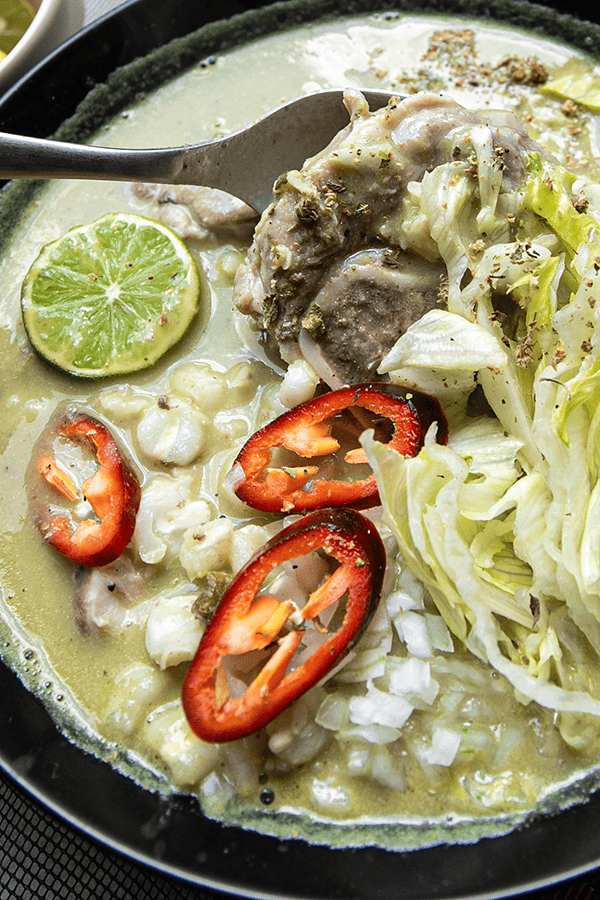
    Bowl of green pozole with radish, chile slices, cabbage and lime

    What Is Pozole?

    Pozole is a traditional Mexican soup made with hominy (dried maize treated with lime), meat (usually pork), and a deeply seasoned broth. It is a celebration dish — found at birthdays, national holidays, and family gatherings — and in many Mexican cities you will find dedicated pozolerias that serve nothing else. Three varieties exist: red (rojo), green (verde), and white (blanco), each tied to a different region and flavor profile.

    pozole verde bowls

    Red vs. Green vs. White Pozole

    Red Pozole (Pozole Rojo)

    • Region: Central and western Mexico — Jalisco, Guanajuato, Michoacán. Guadalajara is famous for its red pozole.
    • Flavor: Deep, earthy, slightly spicy. Built on dried guajillo and ancho chiles.

    Green Pozole (Pozole Verde)

    • Region: Southern Mexico — Guerrero and Oaxaca, with strong presence in central Mexico.
    • Flavor: Fresh, tangy, herbaceous. Tomatillos and green chiles give the broth its color and acidity.

    White Pozole (Pozole Blanco)

    • Region: Northern and central Mexico — Sonora, Sinaloa.
    • Flavor: Neutral, mild broth. The garnishes do the heavy lifting.

    ingredients for green pozole

    History of Pozole

    Pozole is deeply rooted in pre-Columbian Mesoamerica, where hominy held sacred significance. It was used in religious ceremonies, and historical accounts describe it as a ritual dish during certain sacrificial rites. When the Spanish conquistadors arrived in the 16th century, they introduced pork, beef, and European spices, transforming pozole into the dish we recognize today — a fusion of indigenous and colonial culinary traditions. Today it is one of Mexico’s most beloved and iconic dishes, celebrated in homes and restaurants from Tijuana to Oaxaca.

    Ingredients for Green Pozole

    Ingredients

    Tomatillos

    • Why they matter: Tomatillos are what turn the broth green and give it its signature tang. My mother-in-law insists on smaller tomatillos — they are more acidic and aromatic than large ones. Canned tomatillos (B07B17ZDQZ) work in a pinch, but fresh are far superior for this dish.

    Hominy

    • Why it matters: Hominy is the soul of pozole. These are dried maize kernels treated with lime water (nixtamalization), which transforms them into large, chewy, spongy pieces that absorb the green broth beautifully. Do not substitute regular corn — the texture will not be the same. Use dried hominy (B0008J3I9U) for the best result, or drained canned hominy if short on time.

    Poblano Peppers

    • Why they matter: Charring the poblano directly on a flame is essential — it adds a smoky depth and softens the pepper so it blends smoothly into the sauce. When dried, poblanos are called ancho chiles (B00TQVHXNO) — worth keeping in your pantry for red pozole or mole.

    Epazote

    • Why it matters: Epazote is an aromatic Mexican herb with a bold, slightly resinous flavor — described as a mix of mint, citrus, and earthiness. It is a staple in southern Mexican cooking and completely transforms the broth. If you cannot find it fresh, dried works but use less (it intensifies when dried).

    Mexican Oregano

    • Why it matters: Mexican oregano (B07D62QY2F) is botanically different from Mediterranean oregano — it has a more citrusy, robust profile that holds up to the rich green broth. Do not substitute Mediterranean oregano if you can avoid it.

    green pozole with garnishes

    Professional Tips

    1. Pressure-Cook the Meat First

    Pork knuckle and other tough cuts contain collagen and connective tissue that require prolonged cooking to become tender. Pressure cooking converts tough fibers into gelatin in 40 minutes instead of 3+ hours on the stovetop. It also infuses the meat with the aromatics in the pot (bay leaf, garlic, onion) and keeps it moist. We love our Instant Pot Duo 7-in-1 for this — it also makes rice, stews, and slow-cooked dishes.

    2. Pan-Char All the Salsa Ingredients

    Do not blend raw tomatillos, onion, and garlic into the sauce. Charring in a dry hot skillet caramelizes the natural sugars, removes excess moisture, and adds a smoky complexity that distinguishes a restaurant-quality pozole from a flat one. The Maillard reaction at work — same principle as searing meat. See also our Instant Pot Mexican menudo for another recipe that uses this charring technique.

    3. Garnish Generously

    The garnishes are not optional — they complete the dish. Standard pozole verde accompaniments: thinly sliced radish, shredded lettuce or cabbage, diced white onion, sliced serrano, avocado, lime wedges, tostadas with sour cream, and a sprinkle of Mexican oregano. For crunch, add chicharron (pork cracklings).

    finished bowl of green pozole

    Frequently Asked Questions

    Can I use chicken instead of pork for green pozole?

    Yes — chicken thighs are the most common substitute. Skip the pressure cooker and simmer bone-in thighs directly in the green sauce for 30–40 minutes until tender. The result is lighter but equally delicious.

    Where do I find hominy?

    Most Latin grocery stores carry both canned and dried hominy. In the US, you can order dried hominy (B0008J3I9U) on Amazon. If using dried, soak overnight and simmer for 2–3 hours before adding to the pozole.

    How thick should the green sauce be?

    After blending, the sauce should be thick enough to coat a spoon but still pourable. If it is too thick after cooking, add reserved pork cooking water — I recommend starting with 2 cups and adjusting. The final pozole should be a rich, coating broth rather than a thin soup.

    Can I make green pozole ahead of time?

    Absolutely. In fact it tastes better the next day as the flavors deepen. Store broth and meat separately in the refrigerator for up to 4 days. The garnishes must always be prepared fresh.

    What is the difference between pozole verde and menudo?

    Both are Mexican hominy soups, but menudo uses beef tripe rather than pork and has a completely different flavor profile. See our Instant Pot Mexican menudo if you want to explore both.

    Pozole verde topped with shredded cabbage, red chile and lime

    Green Pozole “Pozole Verde”

    A hearty stew, a celebration of hominy, tender chunks of pork, and fresh green herbs – that's green pozole. It's a rich, lush creation, teeming with the earthy essence of tomatillos, cilantro, and jalapeños, all meticulously pureed into a velvety, emerald-green elixir that clings to your spoon like a cherished secret.
    Print Recipe
    Pin Recipe
    Prep Time:20 minutes
    Cook Time:30 minutes
    Pressure Cook:40 minutes
    Course: Soup
    Cuisine: Mexican
    Keyword: green pozole, northern pozole, pozole verde

    Equipment

    • pressure cooker
    • blender

    Ingredients

    Pressure Cook Meat

    • 1½ kg pork knuckle, 1 inch sliced, frozen or fresh
    • 2 cloves
    • 3 bay leaves
    • ½ white onion, sliced in half
    • 3 garlic cloves
    • 2 quarts water (or 8 cups)

    Pozole Soup

    • 1 poblano pepper
    • 1 kg tomatillos, sliced ½ inch
    • 4 tbsp pumpkin seeds (pepitas)
    • 2–3 serrano peppers, deseeded and cut in half
    • 1 white onion, sliced in half
    • 2 garlic cloves
    • 1 cup epazote
    • 1 tsp dried Mexican oregano
    • 2 allspice (pimento gorda), crushed, or 1 tsp ground allspice
    • sea salt to taste
    • 3 cups hominy, drained

    Instructions

    Pressure Cook Pork

    • Take the pork knuckles and place them in a large bowl. Rinse several times in cold water, then soak in cold water with 2 tsp of salt for 15–30 minutes.
    • Rinse the pork in cold water again and place in your pressure cooker with the remaining ingredients. Pressure cook on high for 40 minutes.
    • Once done, release the valve. Open the lid when safe, remove the spices, and reserve both the meat and the cooking liquid.

    Green Pozole

    • Gas stove: In a large frying pan, heat 2 tsp of oil over medium-high. Add tomatillos, pumpkin seeds, serrano, onion, and garlic. Char each ingredient until browned (pumpkin seeds toast first — watch carefully). Add more oil as needed to brown the tomatillos. On a separate burner, char the poblano pepper directly on the flame, turning with tongs until all sides are completely blackened. Set aside to cool, then peel off the skin and remove seeds.
    • Electric stove: In a large frying pan, heat 2 tsp of oil over high. Add all ingredients including the poblano pepper. Char each until browned, pumpkin seeds first. For the poblano, keep flipping with tongs until completely charred on all sides. Set aside, peel, and deseed.
    • Once everything is charred, add all ingredients to a blender with epazote, oregano, and allspice. Blend on high until smooth.
    • Heat a large pot with 2 tbsp of oil over medium-high. Add the green sauce and cook for 10 minutes. Add the pork and hominy, then cook for 30 minutes. Add reserved pork cooking water (2–4 cups) to reach your preferred consistency. Salt to taste.
    • Serve with radish, shredded lettuce, diced onion, serrano slices, avocado, lime wedges, tostadas with sour cream, oregano, and chicharron on the side.
  • 3 Minutes Easy Ramen Noodles Made At Home

    3 Minutes Easy Ramen Noodles Made At Home

    If you crave restaurant-quality ramen but dread the hour-long boil, you are about to have your world rocked. These homemade ramen noodles come together in 3 minutes flat using the Philips Pasta and Noodle Maker — springy, chewy, and completely preservative-free. Pair them with a rich broth and you have a bowl that puts the instant stuff to shame.

    This post may contain affiliate links. If you purchase through these links, I may earn a small commission at no extra cost to you. Thank you for supporting Love & Harvest!

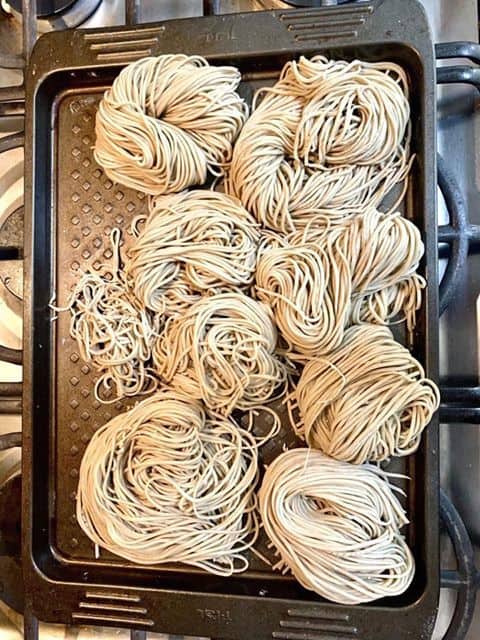
    easy ramen noodles

    Why Make Homemade Ramen Noodles

    • No preservatives — store-bought dried noodles sit on a shelf for months. Fresh noodles go straight from machine to bowl.
    • Unbeatable chew — the bread flour protein gives you that springy bite no dried packet can replicate.
    • Freezer-friendly — shape into nests, freeze, bag, and pull out on demand.
    • Endlessly customizable — swap water for carrot, spinach, or beet juice and get naturally coloured noodles.

    Ingredients Deep-Dive

    All-Purpose Flour + Bread Flour

    • Why this combo: All-purpose gives structure while bread flour — high in gluten protein — delivers the signature chewy ramen bite. Do not swap the type; you can try different brands, but keep the ratio.

    For an even chewier result, replace the bread flour with Anthony’s Vital Wheat Gluten.

    Baking Soda (in the cooking water)

    • Why it matters: Adding baking soda to the boiling water raises the pH, giving the noodles their characteristic springiness and glossy sheen — the same reaction used in traditional alkaline noodle-making.

    Water Weight vs. Volume

    • Why you must weigh: Flour absorbs water differently depending on humidity and brand. A kitchen scale eliminates guesswork and gives you consistent noodles every single time. For the Philips machine, the newer model weighs automatically; older models need an external scale.

    A reliable option: AmazonBasics Digital Kitchen Scale.

    Equipment

    The real hero here is the Philips Pasta and Noodle Maker. It mixes, kneads, and extrudes in one sealed unit. Set the spaghetti disc and press start — the machine does everything in 3 minutes.

    Some Examples of Easy Ramen Noodles I’ve Made

    ramen noodles recipe
    homemade ramen noodles recipe
    how to make easy ramen noodles
    so yummy easy ramen noodles

    Pro Tips for Perfect Ramen Noodles

    Pro Tip 1 — The Type of Flour Matters

    Do not substitute the flour type for something else. You can try different brands of bread flour, but the protein level must stay high. That protein is what creates the gluten network responsible for the chew.

    Pro Tip 2 — Weigh Every Ingredient

    This is critical. Volume measurements for flour are notoriously inconsistent. A food scale is not optional for this recipe — it is what separates great noodles from dense, unpleasant ones.

    How to Serve Your Homemade Ramen Noodles

    Once you have the noodles ready, the natural next step is building a bowl. The best pairing is this 7-ingredient homemade ramen broth — a creamy, blended chicken and pork base you can pull together in two hours. For a lighter option, try them in Chinese fish noodle soup.

    Frequently Asked Questions

    Do I need a pasta machine to make ramen noodles at home?

    For this 3-minute method, yes — the Philips Pasta and Noodle Maker is integral. Without it, you would need to hand-knead a stiff dough for 15–20 minutes and roll it manually. The machine takes all of that effort out of the equation.

    Can I make ramen noodles without bread flour?

    You can, but the texture will be noticeably less chewy. If you want to increase elasticity without bread flour, add a small amount of vital wheat gluten to all-purpose flour. The goal is high protein content in the dough.

    Why add baking soda to the cooking water?

    Baking soda raises the water’s pH to alkaline, which causes the noodle proteins to firm up differently than in plain water. The result is the springy, slightly yellow noodle you know from ramen shops.

    Can I freeze homemade ramen noodles?

    Yes — freeze them uncooked. Shape the raw noodles into individual-serving nests, freeze on a tray until solid, then transfer to a zip-lock bag. Cook directly from frozen; add 30–60 seconds to the cook time.

    How long do fresh ramen noodles last in the fridge?

    Fresh uncooked noodles will keep for 2–3 days in the refrigerator in an airtight container. Dust lightly with flour to prevent sticking. For longer storage, freeze them.

    What dishes can I use these ramen noodles in besides ramen soup?

    These noodles work well in stir-fries, cold noodle salads, and brothy soups of all kinds. Their firm bite holds up well to high heat in a wok.

    easy ramen noodle made with Phillips pasta and noodle machine

    Easy Ramen Noodle Recipe

    Prep Time 5 minutes
    Cook Time 5 minutes
    Total Time 10 minutes
    Servings: 6 people
    Cuisine: Japanese
    Calories: 195

    Ingredients
      

    • 200 g all purpose flour
    • 350 g bread flour
    • 4 g salt
    • 216 g water
    • 4 g baking soda for cooking the pasta

    Equipment

    • food scale
    • Phillips Pasta and Noodle Maker

    Method
     

    1. Plug in the Philips Pasta and Noodle Machine. Place the spaghetti disk into the machine. Have a baking tray ready to lay the pasta on top.
    2. Weight all the ingredients precisely and in the hopper, add the flours first and the salt. Close the lid. Start the machine and set the timer to 3 minutes.
    3. While the machine is running, add the water at the top of the lid where there are holes. Slowly pour the liquid in and let the machine knead the dough for three minutes.
    4. Meanwhile, bring a large pot of water to boil. add 1 tsp of salt in the water.
    5. When 3 minutes are up, the machine will start to extrude the pasta out. Cut the noodle at your desire length. Let it rest on the baking tray.
    6. Cook the noodles for 2 minutes and watch the water. It can over boil when there's starch in the water.
    7. Meanwhile, fill up a large bowl with cold tap water.
    8. Place the hot noodles in the bowl of cold water, and use chopsticks to swirl the noodle around to cool it.
    9. Immediately strain the water, and repeat the rinse. Place the noodle on another baking tray. Try not to add or put too much pressure on top of the noodle or it will stick together.

    Notes

    • If you want to freeze the noodles – place UNCOOKED noodles in the freezer. I recommend to swirl it into a small circular shape in the desire proportion. After it completely freezes, I place the circular portion into a zip lock bag and seal it until I need to use it.

    More Noodle Recipes You Will Love

  • 7 Simple Ingredients To Make The Most Flavourful Homemade Ramen

    7 Simple Ingredients To Make The Most Flavourful Homemade Ramen

    Most homemade ramen recipes demand a full day of simmering. This one breaks all the rules: just 7 ingredients, two hours on the stove, and a blender trick that gives you the same creamy, silky broth a ramen shop achieves in 16. Once you taste it, you will never reach for an instant packet again.

    This post may contain affiliate links. If you purchase through these links, I may earn a small commission at no extra cost to you. Thank you for supporting Love & Harvest!

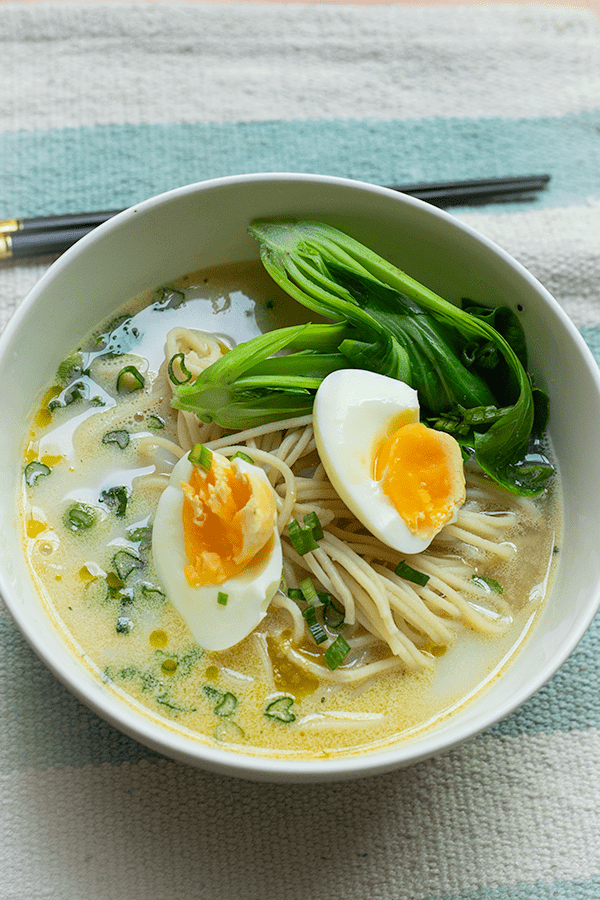
    homemade ramen

    The Secret to Quick Homemade Ramen

    Traditionally, ramen broth takes hours — sometimes days — of slow simmering. The shortcut here is a rapid two-hour hard boil followed by blending a portion of the cooked meat directly into the strained broth. This forces the collagen and fat from the bones into the soup in a fraction of the time, giving you that thick, creamy texture without waiting overnight.

    Ingredients Deep-Dive

    Whole Chicken + Pork Leg

    • Why both meats: Chicken provides a cleaner, lighter broth base while pork adds depth and richness. Using both creates a more layered flavour than either alone. A rotisserie chicken can replace the raw chicken for an even more intense flavour.

    Onion, Garlic, and Ginger

    • Why this aromatic trio: These three form the flavour backbone of most East Asian broths. Onion adds sweetness, garlic adds pungency, and ginger cuts through the richness of the pork fat. Do not char them here — you want a clean, clear-coloured broth.

    Kombu (Dried Kelp)

    • Why kombu: Kombu is loaded with glutamates — the natural compound responsible for umami. Adding it to the broth gives you a rounded, deeply savoury taste without MSG or artificial flavour powders. It is a cornerstone of Japanese and Korean cooking for good reason.

    Sake

    • Why sake matters: Sake adds a subtle sweetness and a layer of complexity that lifts the chicken and pork flavours. It also helps neutralise any remaining gamey odour from the meat. If sake is unavailable, a dry white wine works as a substitute.

    A good option to order online: Gekkeikan Sake.

    The Blending Technique

    • Why blend the meat into the broth: This is the single most important technique in this recipe. Blending 300g of cooked chicken and pork back into the strained soup emulsifies the proteins and fat directly into the liquid, creating the creamy, milky consistency of a tonkotsu-style broth — no 16-hour boil required.

    easy homemade ramen

    Pro Tips for the Best Homemade Ramen

    Pro Tip 1 — Clean the Pot and the Meat

    After the first 10-minute boil, pour out the grey scum-filled water, rinse the pot, and scrub the meat clean under running water. This step removes the residue that clouds and bitters the broth. Do not skip it — the colour and clarity of your final soup depends on it.

    homemade ramen seasoning

    Pro Tip 2 — Boil Hard, Not Low and Slow

    Set the stove to medium-high heat and keep the lid on for the full two hours. A hard boil — not a gentle simmer — is what forces the flavour out of the bones and creates the creamy emulsification in the broth. Do not keep opening the lid; trust the process.

    Pro Tip 3 — Blend the Soup and Meat Together

    After straining, blend 300g of the cooked chicken and pork back into a portion of the hot broth using a high-speed blender. Strain again through a fine mesh. This is the technique that produces the silk-white, creamy broth in the photos below.

    homemade ramen broth
    homemade ramen broth blended

    Noodle Options

    Fresh homemade noodles are ideal — try the 3-minute homemade ramen noodles recipe made with the Philips Pasta Maker. For a quicker option, Hime Japanese Dried Ramen Noodles are a reliable store-bought choice.

    Why make ramen at home?

    Because you control the salt and fat. Here, the kombu and sake provide natural umami depth, and you decide exactly how much salt goes in. You can also skim the fat layer off the top if you prefer a lighter bowl.

    Frequently Asked Questions

    Can I make this ramen broth in an Instant Pot?

    Yes. Use the pressure cooker function on high for 45–60 minutes instead of the stovetop two-hour boil. The result is a slightly different but still very good broth. You will still want to do the blending step afterward to get the creamy texture.

    What can I use instead of sake?

    Dry white wine or dry sherry are the closest substitutes. Both add a similar depth and acidity. If you prefer non-alcoholic, a splash of rice vinegar diluted with water will add brightness, though without the same flavour complexity.

    Can I make this broth ahead of time?

    Absolutely. The broth keeps well in the fridge for up to 5 days and freezes beautifully for up to 3 months. Make a large batch on the weekend and pull portions throughout the week.

    What is kombu and where do I buy it?

    Kombu is dried sea kelp used as a flavour base in East Asian cooking. You can find it at Asian grocery stores or order it online. It looks like dark, thick dried seaweed sheets. A small amount goes a long way.

    Can I make this a spicy homemade ramen?

    Yes — the recipe as written is a clean, mild base. Add a tablespoon of chili oil, gochujang paste, or homemade spicy hot sauce directly into the bowl before pouring the broth for a vibrant red kick.

    What toppings go well with homemade ramen?

    The classics: soft-boiled egg, green onions, sliced mushrooms, bamboo shoots, nori, and the reserved shredded chicken and pork from the broth. Drizzle a teaspoon of the reserved chicken fat on top for restaurant-level richness.

    homemade ramen

    7 simple ingredients to make the most flavourful homemade ramen

    With just 7 ingredients you can make the most flavourful homemade ramen right at home.
    Prep Time 30 minutes
    Cook Time 2 hours
    Soak 1 hour
    Total Time 3 hours 30 minutes
    Servings: 6 people
    Course: Soup
    Cuisine: Japanese
    Calories: 420

    Ingredients
      

    • 1 whole chicken 1.5 pounds
    • ½ kg pork leg chopped
    • 1½ oz ginger sliced
    • 2 bulbs garlic smashed
    • 1 large white onion halved
    • 1½ oz kombu
    • 1 cup sake
    • 5½ Litre cold water
    • 2 tbsp chicken powder optional
    • 300g chicken and pork meat from broth shredded
    • ½ cup non sweet soy milk optional
    • salt to taste
    Noodles
    • 1 portion fresh / frozen / dried noodles
    Garnish
    • 2 green onion sliced
    • 1 soft boiled egg
    • 1 portion veggies
    • 1 portion chicken and/or pork shredded meat
    • 1 garlic clove minced

    Equipment

    • strainer
    • high speed blender

    Method
     

    1. In a large bowl, put the pork leg in cold water with some salt. Let it sit for 1 hour. Also wash the chicken in cold water, and chop the chicken into smaller pieces: separate the legs, wings, and breasts.
    2. Fill a stock pot with water (doesn't matter how much as long as it covers the chicken and pork legs) and bring it to boil. Add the meat and let it boil for 10 minutes in high heat. Scum will rise to the top, but don't worry about it as long as it doesn't boil over.
    3. Carefully take the stock pot with the meat and pour it in a clean sink. With the tap running, clean the chicken and pork until there's no scum stuck on the meat. Also wash the stock pot as well with no scum to the side.
    4. Refill the stock pot with 5.5 Litres of water, and add the cleaned meat back in. Wait for the water to boil and watch to see if any scum rises to the top. If it does, clear it out with a strainer. Once the water has no more scum or you see it is clear, add in the rest of the ingredients: ginger, garlic, onion, and kombu. Now close the lid and DO NOT open it until one hour pass.
    5. After one hour, take a potato masher and mash the stock up to break the bone and meat. This is how we can extract more flavour from the meat. Close the lid and let it boil for the last one hour.
    6. Turn the heat off and take the lid off to cool. Meanwhile set up a pot and strainer in the sink. Carefully strain the soup. Put the pot of soup back on the stove and stir in the sake. Give it a taste and add the amount of salt suited to your taste.
      OPTIONAL: Add in the chicken stock if you desire.
    7. In a blender, add the strained broth to the blender with the 300g of chicken and pork. Blend until silky smooth. strain again to get the creamy thick soup.
    8. In another pot, cook the noodles to the package instructions.
    9. Once the noodles are finished cooking, add the cooked noodles into a bowl.
    10. First add in the hot broth into the bowl.
      OPTIONAL: add ¼-½ cup of non sweeten soy milk.
    11. Garnish the soup with veggies, boiled eggs, green onion, and finely minced garlic. Serve immediately.

    More Soup and Noodle Recipes