Category: dessert recipes

  • Best Triple Chocolate Fudgy Brownies

    Best Triple Chocolate Fudgy Brownies

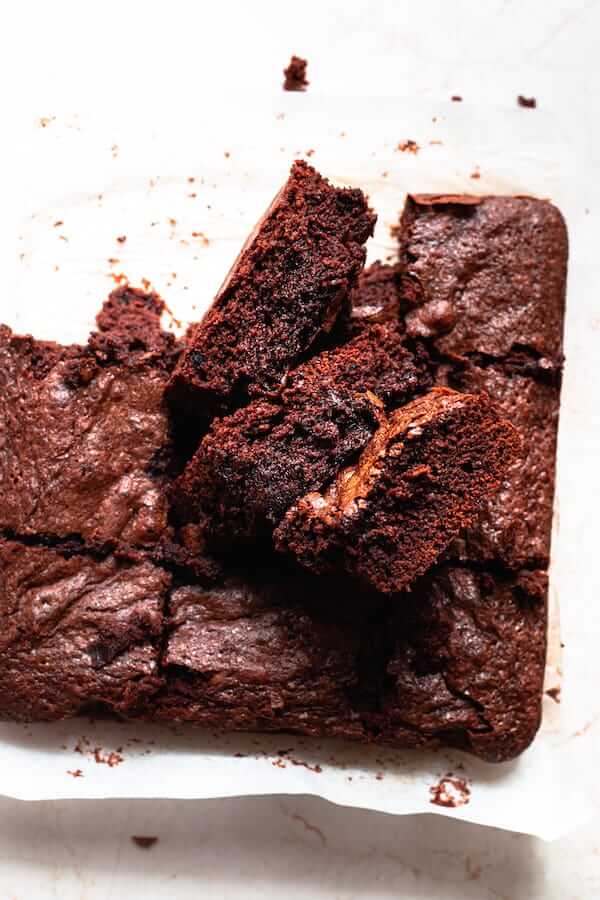
    These triple chocolate fudgy brownies were born out of a pregnancy craving that refused to be ignored — and they have been a household staple ever since. One pot, no stand mixer, and a batter that comes together in under ten minutes. The result is dense, gooey, and deeply chocolatey in a way that box mix can never touch.

    This post may contain affiliate links. If you purchase through these links, I may earn a small commission at no extra cost to you. Thank you for supporting Love & Harvest!

    triple chocolate brownies

    Why These Brownies Work

    • Triple chocolate: Butter (fat carrier), cocoa powder (intense flavour), and semi-sweet chocolate chips (pockets of melt) hit three different chocolate registers in every bite.
    • One-pot cleanup: Everything comes together in a single saucepan — no stand mixer, no multiple bowls.
    • Gluten-free option included: Tested with both regular flour and gluten-free flour blends. Both versions came out excellent.
    • Freezer-friendly: Cut into squares, wrap individually, freeze for up to 3 months.

    Ingredients Deep-Dive

    Eggs (Cold, 3 Whole Eggs)

    • Why cold eggs: Adding cold eggs to the warm butter-sugar mixture slows the cooking of the egg protein, which keeps the batter from over-setting too early. It also contributes to the characteristically flat, fudgy brownie top rather than a cakey dome.

    Cocoa Powder

    • Why 70% dutch-process cocoa: Dutch-process cocoa has been treated to neutralise acidity, giving it a smoother, deeper chocolate flavour compared to natural cocoa. Using 70% means you are getting pure cocoa solids with minimal added sugar — all chocolate, no filler.

    A reliable option: Ghirardelli 72% Cacao Chocolate Chips work great added into the batter.

    Chocolate Chips (Semi-Sweet)

    • Why semi-sweet, not dark: Semi-sweet chips melt into pockets of sweetness that balance the bitter cocoa powder. Full dark chocolate chips can tip the flavour too far into bitter territory unless you reduce the cocoa powder accordingly.

    Espresso Powder

    • Why add coffee to chocolate brownies: Espresso powder amplifies the cocoa flavour without making the brownies taste like coffee. It acts as a flavour enhancer, deepening the chocolate notes the same way salt deepens sweetness. You will not taste coffee — you will just notice the chocolate is more intense.

    Flour (Regular or Gluten-Free)

    • Why either works: Brownies require very little structural flour compared to cakes. The low ratio means a gluten-free blend can substitute 1:1 with impressive results. Almond flour also works for a denser, richer bite.

    For gluten-free baking: USA Pan 8×8 Brownie Baking Pan gives even heat distribution for consistent results.

    best triple chocolate brownies

    The Gluten-Free Version

    The gluten-free version of these brownies is not a consolation prize. It is genuinely delicious — arguably better than the regular flour version because gluten-free flour blends tend to produce a denser, fudgier texture. I once served these to a group of friends without telling them, and they were shocked to learn they were gluten-free.

    triple chocolate fudgy brownies

    Optional Mix-Ins

    To add texture, try folding in chopped pecans, walnuts, chia seeds, or sunflower seeds. Nuts add crunch and a toasty flavour that plays well against the fudgy base.

    Frequently Asked Questions

    Why do my brownies come out cakey instead of fudgy?

    Three common causes: too much flour, over-mixing after adding the flour, or overbaking. For fudgy brownies, measure flour precisely, stir only until no dry flour is visible, and pull the pan at 30 minutes — the centre should still look slightly underdone when it comes out of the oven. It continues cooking as it cools.

    Can I make these brownies without espresso powder?

    Yes. The espresso powder is optional. The brownies will still taste great without it — you will just get slightly less chocolate depth. You can also substitute instant coffee granules if you do not have espresso powder on hand.

    How do I know when brownies are done baking?

    Insert a toothpick into the centre at the 30-minute mark. If it comes out with a few moist crumbs (not wet batter), the brownies are done. A clean toothpick means they are overbaked. Remove from the oven when there are still crumbs attached.

    Can I use salted butter instead of unsalted?

    Yes, but omit the added sea salt in the recipe or reduce it to a pinch. The recipe already uses a small amount of salt to enhance the chocolate flavour — you do not want it to tip salty.

    How should I store these brownies?

    Room temperature in an airtight container for up to 4 days. Refrigerating them extends shelf life to a week but firms them up significantly — bring to room temperature before eating. For longer storage, freeze individually wrapped squares for up to 3 months.

    Can I double this recipe?

    Yes. Double all ingredients and bake in a 9×13 inch pan. Start checking at 35 minutes — the larger pan may need up to 40–45 minutes total.

    Stack of triple chocolate fudgy brownies

    Triple Chocolate Fudgy Brownies

    Easy delicious brownies made with butter, cocoa powder, and chocolate chips. This gooey soft brownie will make you sing all sorts of high chocolate notes after each bite.
    Prep Time 10 minutes
    Cook Time 35 minutes
    Course: Dessert
    Cuisine: American
    Calories: 200

    Ingredients
      

    • 1 cup sugar
    • 8 tbsp butter
    • ½ tsp sea salt
    • 1 tsp vanilla
    • 1 tsp espresso / coffee powder
    • ¾ cup cocoa powder
    • 3 tsp hot water
    • 3 eggs cold
    • ¾ cup flour / gluten-free flour
    • 1 tsp baking powder
    • ¼ cup chopped pecan optional
    • 1 tsp chia seed optional
    • 1 cup semi sweet chocolate chips

    Method
     

    1. Preheat oven to 350°F, and line your 9 inch brownie baking dish with parchment paper. Set aside.
    2. In a medium size pot or sauce pan, combine the sugar, butter, and salt on the stove on medium low heat. Once the butter is almost almost melted (you still see small solid pieces of butter) turn off the heat and keep stirring to completely melt the rest of the butter.
    3. Add vanilla, cocoa powder, and hot water. Whisk to combine.
    4. Next add the eggs once at a time and whisk it into the batter.
    5. Carefully add in your dry ingredients: flour, baking powder, pecan nuts (optional), chia seed (optional), and chocolate chips. Whisk until you see no more dry flour. Do not over stir!
    6. Pour the batter into the baking dish and bake for 30-35 minutes. Remove from oven and let it cool completely before cutting in.
    More Chocolate and Dessert Recipes

  • Authentic Strawberry and Nutella Mexican Bolis Recipe

    Authentic Strawberry and Nutella Mexican Bolis Recipe

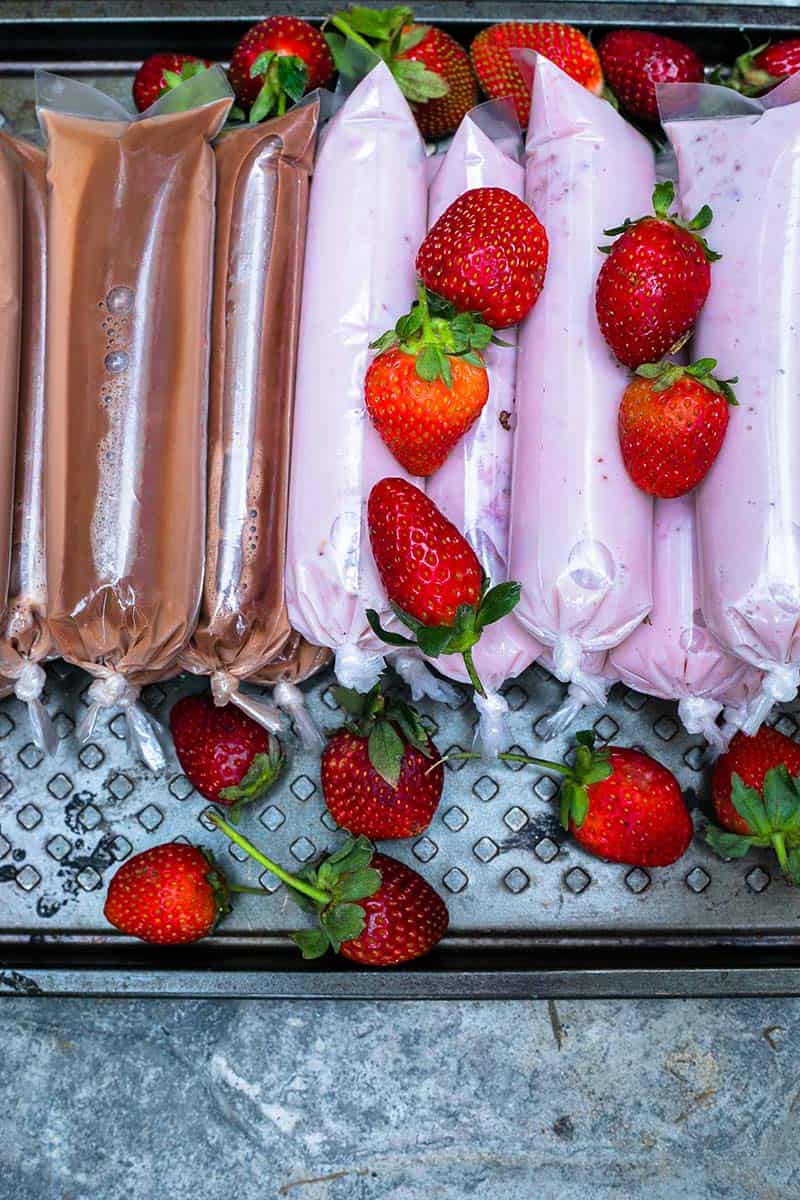
    If you grew up in Mexico or married into a Mexican family, you know bolis. These frozen tubes of creamy, flavoured milk are a summertime ritual — pulled from the freezer at family gatherings, argued over, and eaten before dinner. This recipe comes straight from the hands of a family matriarch who has been making them for decades. Strawberry and Nutella side by side in one batch.

    This post may contain affiliate links. If you purchase through these links, I may earn a small commission at no extra cost to you. Thank you for supporting Love & Harvest!

    mexican bolis recipe

    Planning dinner too? My free PDF has seven easy family dinners for the weeknight table. Send me the free dinners

    What Are Mexican Bolis?

    Bolis are homemade Mexican ice pops frozen inside small plastic bags and tied at the top. Unlike a popsicle on a stick, you bite the corner off the bag and squeeze the frozen treat out as you eat. The base is a creamy milk mixture — dried milk, evaporated milk, and condensed milk — that stays smooth and creamy even fully frozen. They are popular at family gatherings, school events, and weekend markets across Mexico.

    mexican bolis in english

    Ingredients Deep-Dive

    The Triple-Milk Base

    • Why three types of milk: Each milk plays a specific role. Dried milk adds body and richness without adding liquid. Evaporated milk contributes concentrated dairy flavour and a creamy, slightly caramelised note. Condensed milk provides sweetness and a thick, smooth texture that prevents iciness when frozen. Together they create a base that is far creamier than any single-milk version.

    Use Carnation Dried Milk, Carnation Evaporated Milk, and Nestle La Lechera Condensed Milk for the most authentic Mexican flavour profile.

    Strawberry Pulp (Cooked, Not Raw)

    • Why cook the strawberries first: Cooking concentrates the strawberry flavour, breaks down the pectin for a smoother texture after blending, and reduces the water content so the frozen boli does not develop large ice crystals. Raw strawberry puree freezes icier and with a weaker flavour.

    Nesquik Chocolate Milk Powder

    • Why Nesquik for the Nutella version: The Nesquik powder dissolves smoothly into the cold milk base without seizing, giving the chocolate boli a mild, sweet cocoa flavour that complements the Nutella without overpowering it.

    Find it here: Nesquik Chocolate Milk Powder.

    The Boli Bags

    • Why specific bag size: The 8x26cm bags are the traditional size used across Mexico. They give you the right volume per serving and enough room at the top to tie a secure knot. Fill only to 3/4 capacity — the liquid expands slightly as it freezes, and you need room to tie the top without making a mess.

    If you are making bolis in the US, popsicle mold bags are a good alternative if the traditional bags are unavailable.

    The links below are Amazon affiliate links. If you buy through them, I may earn a small commission at no extra cost to you.

    Recommended tools

    Any comparable funnel, strainer and blender work.

    Other Flavour Ideas

    Once you have the base down, the flavour possibilities are unlimited. Some combinations worth trying:

    • Mamey and banana
    • Purple yam and shredded coconut
    • Coconut milk with rice (dairy-free)
    • Mango with sago tapioca
    • Horchata with rice pudding
    • Almond extract with cinnamon

    Frequently Asked Questions

    What is the difference between Mexican bolis and paletas?

    Paletas are Mexican ice pops frozen on a stick, typically made with fruit puree or cream. Bolis are frozen in a plastic bag with no stick — you squeeze the contents up as you eat. Bolis tend to have a creamier, milkier base while paletas can be either fruit or cream-based. Both are beloved, but bolis have a distinctly homemade, family-gathering quality to them.

    How long do bolis take to freeze completely?

    Allow a minimum of 6–8 hours, but overnight is best. The thicker the milk mixture, the longer it takes to freeze solid. Do not rush it — a partially frozen boli is a soggy mess.

    Can I make bolis without popsicle bags?

    Yes — popsicle molds work. Small zip-top bags also work if sealed tightly. The traditional bag format is part of the experience, but the recipe itself works in any freezer-safe container. Silicone ice pop molds will give you a cleaner presentation.

    Can I make dairy-free bolis?

    Yes. Replace the dried milk, evaporated milk, and condensed milk with full-fat coconut milk and coconut condensed milk. The base will be slightly less thick but still creamy and delicious. Coconut milk with mango is a particularly good combination.

    How long do Mexican bolis keep in the freezer?

    Up to 2 months in the freezer. After that, the milk fats can start to separate and the texture becomes less smooth. They are best eaten within the first 2–3 weeks for optimal creaminess.

    Why do my bolis taste icy instead of creamy?

    The most common cause is too much water in the mixture. Make sure your strawberry pulp is fully reduced before adding it to the milk base. Also ensure you are using condensed milk, not regular sweetened milk — the condensed milk’s lower water content is what prevents iciness.

    For more frozen dessert ideas, try the easy blueberry ice cream or homemade strawberry ice cream recipes.

    Frozen Strawberry and Nutella Bolis

    Strawberry and Nutella Frozen Mexican Bolis

    Prep Time 45 minutes
    Servings: 12 bolis (approximately)
    Course: Dessert
    Cuisine: Mexican
    Calories: 280

    Ingredients
      

    • 340g dried milk
    • 2L warm water
    • 1 can evaporated milk
    • 2 can condense milk
    • 4 tbsp Nesquik chocolate milk powder
    • ¼ cup Nutella
    Strawberry Pulp
    • 2.5 cups frozen or fresh strawberries reserve half cup on the side
    • 1 cup sugar
    • 1 tsp vanilla
    • 1 tsp lemon juice
    • 3-5 drops red food colouring optional

    Equipment

    • Basic Food Scale

    Method
     

    Strawberry Pulp
    1. In a pan, add 2 cups of strawberry (reserve ½ cup of strawberries for later), sugar, vanilla, and lemon juice. Bring the pan to a medium boil and reduce the water by half. Approximately 10 minutes.
    2. Let the mixture cool to room temperature. Puree the strawberry mixture in the blender until smooth.
    3. Use a strainer to take out chunks and seed. Reserve the strawberry pulp.
    Bolis Milk Mixture
    1. In a very large plastic bowl, combine the milk powder and warm water. Use a whisk to dissolve the powder into the water.
    2. One can at a time, use the whisk and stir in the evaporated milk and condense milk together in the milk mixture. The. base for the milk mixture is done. After here is where you add in your flavours. Split this mixture into two separate bowls.
    Nutella Bolis
    1. In one bowl of the milk mixture, add the Nutella and Nesquik powder together in the bowl with a whisk. Set aside.
    Strawberry Bolis
    1. In the other bowl, add the strawberry pulp and the milk mixture together with a whisk.
    2. Chop the remaining half cup of fresh or frozen strawberries and stir it into the mixture. Set aside.
    Assembling the Bolis
    1. Place a funnel on top of the bag and pour enough liquid to fill 3/4 of the bag. Remember to stir the liquid before placing it into the bags, for some fillings settle to the bottom.
    2. Tie the top of the bag. Repeat
    3. Place the Bolis in the freezer until completely frozen before eating. Enjoy!

    More Mexican and Frozen Dessert Recipes

    Need dinner ideas for this week? Get my free PDF with seven easy family dinners. Get the free dinners

  • BEST cinnamon rolls recipe with Rompope Frosting

    BEST cinnamon rolls recipe with Rompope Frosting

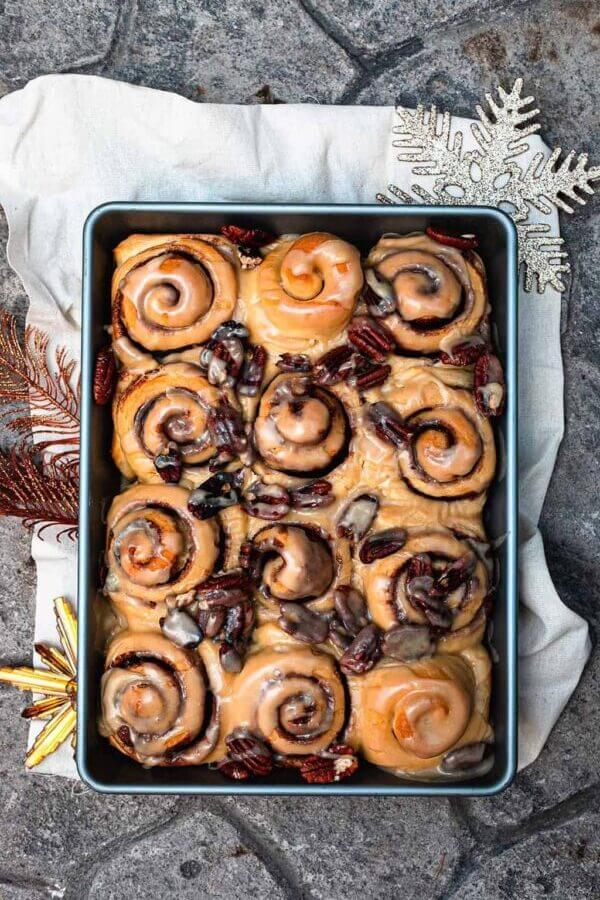
    Every Christmas, these cinnamon rolls become the gravitational centre of the house. Before they are even out of the oven, the whole family is already hovering in the kitchen. The rolls are soft, pull-apart fluffy, layered with Muscovado sugar and Christmas spices — and then slathered with a Rompope and white chocolate frosting that stops people mid-bite and makes them ask, “Wait, what IS that frosting?” Every. Single. Year.

    This post may contain affiliate links. If you purchase through these links, I may earn a small commission at no extra cost to you. Thank you for supporting Love & Harvest!

    If you’re baking for kids or anyone avoiding alcohol, use the non-alcoholic frosting below. These are the kind of rolls that make you feel like everything is right with the world on a cold winter morning.

    Why This Frosting Changes Everything

    Instead of the standard cream cheese frosting, this recipe uses Rompope — a Mexican creamy liquor made with egg yolks, vanilla, milk, sugar, and alcohol. Imagine eggnog from the liquor store. The Rompope is melted on the stovetop with white chocolate and vanilla, then whisked with powdered sugar into a glossy, pourable frosting. It smells amazing, and it’s unlike any cinnamon roll frosting you’ve had before.

    Heads up, this one has alcohol! The frosting is only warmed to melt the chocolate. It isn’t cooked, so it keeps the rompope’s alcohol. Serve these to adults, or use the non-alcoholic version below.

    Non-Alcoholic Frosting

    I haven’t tested this version as many times as the original yet, so start with these amounts and adjust.

    • 1/4 cup heavy cream (instead of the Rompope)
    • 2 oz white chocolate chips
    • 2 tsp alcohol-free vanilla flavouring
    • 1/4 to 1/2 tsp alcohol-free rum flavouring (brands vary a lot in strength, so start small and taste)
    • a pinch of ground cinnamon
    • 1 1/2 cups powdered sugar

    Warm the cream, white chocolate and vanilla on the lowest heat. When the chocolate is almost melted, take it off the heat and whisk until smooth. Whisk in the rum flavouring, cinnamon and powdered sugar. Too thick? Add more cream, 1 teaspoon at a time. Too thin? Add a little more powdered sugar. Check your labels! Regular vanilla and rum extracts are made with alcohol, so look for ones that say alcohol-free.

    These pair beautifully with our Best Triple Chocolate Fudgy Brownies for a complete holiday dessert spread, or serve alongside our Birthday Rainbow Sugar Cookies for a festive table.

    Ingredients

    Muscovado (Mascabado) Sugar

    • Why Muscovado over brown sugar: Muscovado is less refined and retains a high percentage of natural molasses — giving it a deeply rich, complex caramel and toffee flavour that regular brown sugar simply cannot match. Brown sugar is white sugar with molasses added back; Muscovado never had it removed in the first place. In a recipe where sugar is the star, this difference is unmistakable. It also retains moisture, resulting in softer, denser rolls.

    KitchenAid Stand Mixer

    Rompope

    • Why Rompope and not eggnog: Rompope is Mexico’s answer to eggnog — spiced, creamy, and made right here in Puebla since colonial times by the nuns of the Santa Clara Convent. It has a more concentrated, aromatic flavour than commercial eggnog. Outside Mexico, you can find it in Latin specialty stores or online. If unavailable, substitute with store-bought eggnog — the result is still delicious.

    Instant Yeast

    • Why instant yeast, not active dry: Instant yeast does not need to be proofed in warm liquid first — it goes directly into the flour. This makes the process faster and more reliable for home bakers. The dough needs at least 1 hour to double in size; in a cooler kitchen, allow up to 2 hours. A trick: place the covered bowl in the oven with just the oven light on for a warm, draft-free environment.

    Dough Scraper

    White Chocolate

    • Why white chocolate in the frosting: White chocolate adds a creamy, sweet richness that thickens and stabilises the Rompope frosting as it cools. It also amplifies the vanilla notes in the Rompope. Use good-quality white chocolate chips or a chopped white chocolate bar — not white baking chips, which contain less cocoa butter and will not melt as smoothly.

    Tested and Compared

    We tried grocery store cinnamon rolls — dry, with an over-sweet artificial frosting. We tried Cinnabon® rolls: perfect texture, but the frosting was too sweet for us. This recipe gives you light, pull-apart rolls with controlled sweetness and a frosting that is genuinely interesting. The Muscovado filling gives a depth of flavour no regular brown sugar roll can match.

    Love & Harvest is not affiliated with or endorsed by Cinnabon; Cinnabon® is a trademark of its owner.

    A Note on Sugar

    I kept the sweetness where we like it: sweet, but not overwhelming. If you want more filling sweetness, add an extra 1/4 cup Muscovado to the filling as noted in the recipe. At the end of the day, all sugars are nutritionally similar — the difference here is purely in flavour and baking performance. For a balanced diet, save these for celebrations and enjoy every single bite.

    Where to Find Rompope

    In Mexico, the most popular brands are Santa Clara and Holandesa — both available in most grocery stores. The Santa Clara brand has a particularly rich history: it was originally created by the Clarisa Nuns of the Santa Clara Convent right here in Puebla during colonial times. Outside Mexico, check Latin specialty stores, liquor stores, or online retailers. If all else fails, substitute with store-bought eggnog from the holiday section of your grocery store.

    Frequently Asked Questions

    Can I make these cinnamon rolls the night before?

    Yes. After cutting and placing the rolls in the baking dish, cover tightly with plastic wrap and refrigerate overnight instead of letting them do the second rise at room temperature. The next morning, remove from the refrigerator and let them come to room temperature and finish rising for 45–60 minutes before baking. This cold fermentation actually deepens the flavour.

    Why did my dough not rise?

    The most common cause is yeast that has been killed by liquid that was too hot. The warm milk should feel comfortable on your wrist — around 110°F (43°C). Anything hotter will kill the yeast. Also check that your instant yeast is still within its expiry date. If your kitchen is cold (below 70°F), the dough may need up to 2 hours to double in size.

    Can I substitute Rompope with something else?

    Yes. Store-bought eggnog is the closest substitute and works beautifully. Most grocery store eggnog has no alcohol, but check the label. For a frosting without alcohol, use the Non-Alcoholic Frosting above: heavy cream with alcohol-free vanilla and rum flavouring. Regular extracts contain alcohol.

    How do I get perfectly even rolls?

    Use a sharp knife or unflavoured dental floss to cut the rolls. Dental floss gives the cleanest cut — slide it under the log, cross the ends on top, and pull through without compressing the spiral. This keeps the layers intact and gives you bakery-quality rounds every time.

    Can I freeze these cinnamon rolls?

    Yes — both before and after baking. To freeze unbaked rolls, place the cut rounds on a baking sheet, freeze until solid, then transfer to a freezer bag. Bake from frozen at 350°F for 35–40 minutes. To freeze baked rolls, wrap individually without frosting and freeze for up to 2 months. Thaw, warm in the oven, and add frosting fresh.

    Why do my rolls come out dry?

    The most common cause is over-baking. The rolls are done when the tops are just lightly golden — not deep brown. They will continue to cook slightly from residual heat after leaving the oven. The internal temperature should be around 190°F. If the outside looks golden, pull them out — erring on the side of slightly under-baked produces softer, gooier rolls.

    Cinnamon Rolls with Rompope Frosting

    Soft, light cinnamon rolls with a Muscovado sugar filling, slathered with a Rompope and white chocolate frosting. The frosting isn’t cooked, so it contains alcohol; a non-alcoholic option is in the notes. A must for the holidays!
    Prep Time 15 minutes
    Cook Time 25 minutes
    Total Time 1 hour 55 minutes
    Servings: 12 rolls
    Course: Dessert
    Cuisine: American, Mexican
    Calories: 420

    Ingredients
      

    • 4 cups all purpose flour
    • 2 TSP instant yeast
    • 2 TBSP brown sugar
    • ¼ TSP sea salt
    • ¾ cup whole milk slightly warm
    • 3 large eggs room temperature
    • 1 TSP vanilla extract
    • ½ cup butter melted
    Sugar Filling
    • ½ cup mascabado sugar add 1/4 cup if you want more sugar taste
    • 2 TBSP ground cinnamon
    • 1 TSP ground clove
    • ½ cup butter soft
    Rompope Frosting
    • ¼ cup Rompope liquor
    • 2 ounce white chocolate chips
    • 2 TSP vanilla extract
    • 1 ½ cups powdered sugar
    • 1 cup toasted pecans

    Method
     

    Cinnamon Dough
    1. In a stand mixer attach the hook attachment. Add the flour, yeast, brown sugar, and salt. Give it a good stir. While the hook is running in slow, slowly add the milk, eggs, vanilla and butter. Mix for 5 minutes. Cover with film and let it sit for 1 hour or more at a warm area in the house. Let it double or triple in size. If your house is on the colder side, you might need to let it rest for 2 hours. Alternatively you can put the resting dough in the oven with the lights on.
    Sugar Filling
    1. Add the sugar and spice together. Line a 9×13 inch baking dish with parchment paper.
    2. Dust your work surface with some flower and roll the dough out. Punch out the air and roll out a rectangle about 10×16 inches. Spread the soft butter evenly over the dough. Spring the sugar filling evenly and make sure the edges are also sprinkled. Starting at the edge closest to you, roll tightly away from you, and form a long log. At the end, pinch the edges to incorporate into the log. Give it a couple gentle roll so it mends together well. Using a sharp knife, cut 12 -15 rolls and place it in the baking dish. Put a towel on top and let it rest for another 30 minutes.
    3. Preheat oven to 350F. Take out the towel and bake for 25-30 minutes, until you see the top is slightly golden brown (not too much!).
    4. Meanwhile make the frosting by using a pot in the lowest heat setting, whisk together the Rompope, white chocolate, and vanilla. When you see the chocolate has almost fully melted, take it off the heat and whisk wildly until it is all melted. Add in the powder sugar.
    5. Spread the frosting on the warm rolls and garnish with pecan nuts

    Notes

    Heads up, this one has alcohol! The frosting is only warmed to melt the chocolate. It isn’t cooked, so it keeps the rompope’s alcohol. Serve these to adults, or use the non-alcoholic frosting.
    Non-Alcoholic Frosting: I haven’t tested this version as many times as the original yet, so start with these amounts and adjust. Swap the 1/4 cup Rompope for 1/4 cup heavy cream and the 2 tsp vanilla extract for 2 tsp alcohol-free vanilla flavouring, then add 1/4 to 1/2 tsp alcohol-free rum flavouring (brands vary a lot in strength, so start small and taste) and a pinch of ground cinnamon. Keep the 2 oz white chocolate and 1 1/2 cups powdered sugar. Same method. Too thick? Add more cream, 1 teaspoon at a time. Regular vanilla and rum extracts contain alcohol, so check your labels.