Tag: easy recipe

  • Carlota de Limon – Mexican No-bake Lime Dessert

    Carlota de Limon – Mexican No-bake Lime Dessert

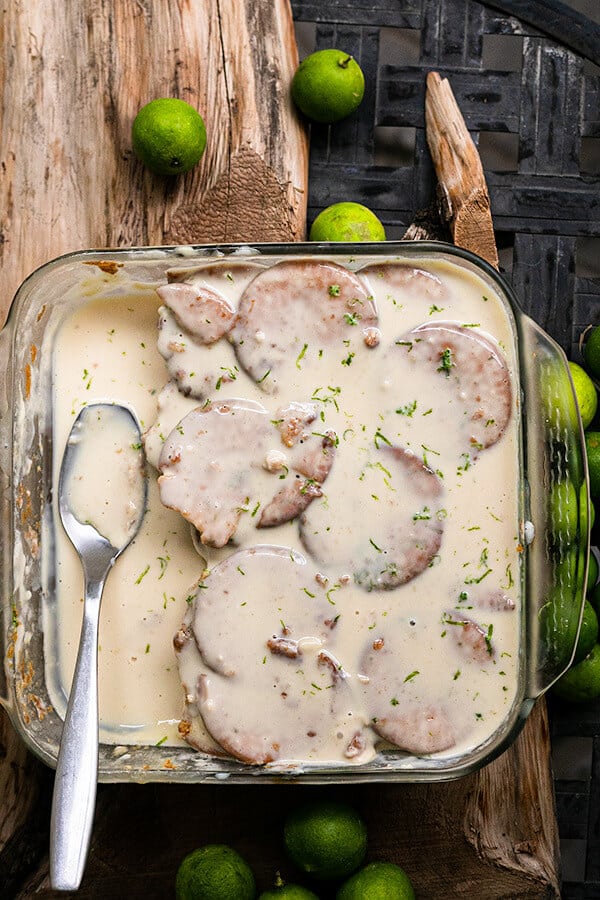
    This simple four-ingredient no-bake cake, known as Carlota de Limón, is one of the most beloved desserts in Mexican households — and once you taste it, you will understand why. Layers of crunchy Maria cookies soaked in condensed milk, evaporated milk, and fresh lime juice come together in the refrigerator into a zesty, creamy, irresistibly refreshing icebox cake. My mother-in-law has made this for years, and now our whole family asks for it every time.

    This post may contain affiliate links. If you purchase through these links, I may earn a small commission at no extra cost to you. Thank you for supporting Love & Harvest!

    no bake cake

    Why You Will Love This Recipe

    • Super easy recipe — no baking and no special equipment needed. Only 4 ingredients and a refrigerator.
    • Authentic Mexican flavour — a classic Mexican housewife recipe. Follow the recommended brands and you will taste the real thing.
    • No special grocery store trip — this cake uses pantry staples you likely already have at home.

    A Perfect No-Bake Dessert for Every Occasion

    Kid-Friendly

    There is no hot stove, no electrical equipment, and no complex techniques involved. Just stacking cookies and whisking ingredients. Even a young child can assemble this dessert — try it once and your kids will beg to help every time.

    Picnic-Friendly

    Carlota de Limón stays together firmly and travels well. Made in a glass baking dish, you do not need to worry about it falling apart in the car. The perfect portable dessert for any outdoor event.

    Camping-Friendly

    This is the ideal camping dessert. Bring all 4 ingredients to the campsite, assemble it there, let it sit for at least 2 hours in a cooler, and you will have an impressive cake that nobody will believe you made from scratch at a campsite.

    Potluck-Friendly

    Looking for a crowd-pleasing dessert that requires minimal effort? This is it. At the end of the party, you will be bringing home an empty container.

    no bake desserts

    Ingredients Deep-Dive

    Maria Cookies

    Just as popular as the name suggests, Maria cookies are a beloved everyday cookie across Mexico — a plain, slightly crispy biscuit with gentle hints of vanilla and ginger. Some people in Mexico recommend them when you have an upset stomach, which speaks to how mild and comforting they are. They absorb the milk mixture beautifully, becoming soft like cake on the outside while the center stays slightly crunchy.

    • Why it matters: Maria cookies are the structural base of this dessert. Their absorbency is precisely calibrated for this type of no-bake cake — they soften without falling apart. You can find them at any Latin grocery store or on Amazon.

    Condensed Milk

    This is where the sweetness of the cake comes from. Condensed milk is thick, very sweet, and acts as a natural thickener that helps bind the layers together. The most authentic brand to use in Mexico is La Lechera.

    • Why it matters: The right amount of condensed milk gives the cake its signature rich sweetness. Too much and it becomes cloyingly sweet; too little and the texture turns watery.

    Evaporated Milk

    Evaporated milk adds richness and creaminess without additional sugar. It gives the liquid mixture that fresh milk taste and a lighter, pourable consistency that soaks into the cookies evenly.

    • Why it matters: The combination of condensed milk (sweet and thick) and evaporated milk (fresh and creamy) is what creates the balanced flavour of this dessert. Using only one or the other throws off the texture.

    Fresh Lime

    Lime is where all the flavour lives. Fresh lime juice is essential — a bottled product simply does not deliver the same brightness. The acidity of fresh lime also slightly thickens the milk mixture as it sits, helping the cake set. Add lime zest on top before serving for an extra burst of citrus aroma.

    • Why it matters: This is called Carlota de Limón for a reason. The lime is the star ingredient. A lime juicer makes squeezing multiple limes effortless.

    Professional Tips for No-Fail Carlota de Limón

    Pro Tip 1: Use Fresh Lime Always

    Fresh lime juice and zest make an extraordinary difference in this dessert. All the flavour comes from lime — this is not the place to use bottled juice.

    Pro Tip 2: The Cookies Will Float at First

    When you begin assembling the cake, the cookies will float in the milk mixture. This is normal. As they soak and absorb the liquid, they will settle. Halfway through the sitting phase, gently press the cookies down with a spoon and they will stay in place.

    Pro Tip 3: Refrigerate for At Least 2 Hours

    Do not cut into this cake too early. The cookies need at least 2 hours (preferably 4 or overnight) to fully absorb the milk mixture and transform into a cohesive cake. Cutting it before this time will result in a runny, unset dessert. Patience is the only technique this recipe requires.

    More Mexican Dessert Recipes

    If you love this Carlota de Limón, you will also enjoy our easy Mexican salsa verde for a savoury contrast, or explore more refreshing desserts like our fresh mango sorbet.

    Frequently Asked Questions

    What are Maria cookies and where can I find them?

    Maria cookies (galletas Marias) are a classic Mexican plain biscuit with mild vanilla and ginger flavour. They are available at any Latin or Mexican grocery store, and also online. The Gamesa brand is the most authentic. Graham crackers can work as a substitute but will give a slightly different flavour.

    Can I add cream cheese to this recipe?

    Yes — many Mexican families add cream cheese for a richer, thicker texture. Blend 4 oz of cream cheese into the milk mixture before assembling. It makes the cake denser and more indulgent.

    How long does Carlota de Limón keep in the fridge?

    Covered with plastic wrap, this cake keeps well for up to 3 days in the refrigerator. The texture actually improves after the first few hours as the cookies continue to soften.

    Can I use lemon instead of lime?

    You can, but the result will be different. Mexican limes (Key limes) have a more floral, intense flavour than standard lemons. Lime is the traditional and most recommended choice. If using lemons, you may want to add slightly more juice to achieve the same brightness.

    Why is my Carlota too runny?

    Either it was not refrigerated long enough, or the ratio of condensed to evaporated milk was off. Give it at least 4 hours in the fridge, or ideally overnight. If it is still runny, there may be too much liquid — try reducing the evaporated milk by 1/4 cup next time.

    Can I make this the night before a party?

    Absolutely — and it is actually better when made ahead. The overnight rest in the fridge gives the cookies maximum time to absorb and the cake to fully set. Simply cover and refrigerate, then slice and serve directly from the dish.

    A hand holding a plate with a slice of carlota de limón

    Mexican Lime Icebox Cake “Carlota de Limón”

    Mexican Lime Icebox Cake is an explosion of flavour and texture! You get the big tasty hit of condensed milk and lime. Around the end of the cake, you get a soft cake-like texture, while the inside remains crumbly and crunchy like the cookie. 
    Prep Time 10 minutes
    Total Time 2 hours 10 minutes
    Servings: 8 people
    Course: Dessert
    Cuisine: Mexican
    Calories: 360

    Ingredients
      

    • 2-3 package of Marias Cookies
    • ¾ cup lime juice 6 Mexican Limes
    • 375 g condensed milk 1 can
    • 360 g evaporated milk 1 can
    • lime zest

    Equipment

    • 8 x 8 glass baking dish

    Method
     

    1. Juice the lime and filter it through a strainer.
    2. Add the lime juice to the blender along with the condensed milk and evaporated milk. Give it a good blend for 10 seconds. Alternatively, you can add everything to a large jug and whisk vigerously for 30 seconds.
    3. In a 8×8 glass baking dish, place your first layer of Marias cookies. Pour a small layer of the milk mixture until the cookies are slightly coated. Add another layer of cookie. If you need, use a spoon or a fork to press the cookies down. It might float up a bit.
      Repeat until you've stacked to the top with ¼" of space. By now you should have used up all the milk mixture. Break the cookies up if you like to fill in the gaps between the cookies.
    4. Top layer should be the milk mixture. Use a spoon the smooth out the surface. Tap the dish on the table to get rid of any bubbles that maybe be trapped between the layers. Zest the lime on top of the cake.
    5. Cover the top of the dish with foil or plastic, and let it refrigerate for 2 hours.
      Usually, I prefer to leave my cake overnight so it settles better and more solid.
      Halfway through, you can take it out and gently push the cookies down with a spoon if the cookies are still floating. Giving it one hour in the fridge, the cookies are denser so a quick push to the bottom of the pan will make it settle better.
    6. Serve with lime slices to garnish.

    Notes

    This Carlota de Limón will keep in the fridge for up to a week but preferably consume in 2 days or the cookies become too soft and soggy. 
  • The best savoury Easy Rosemary Beer Bread

    The best savoury Easy Rosemary Beer Bread

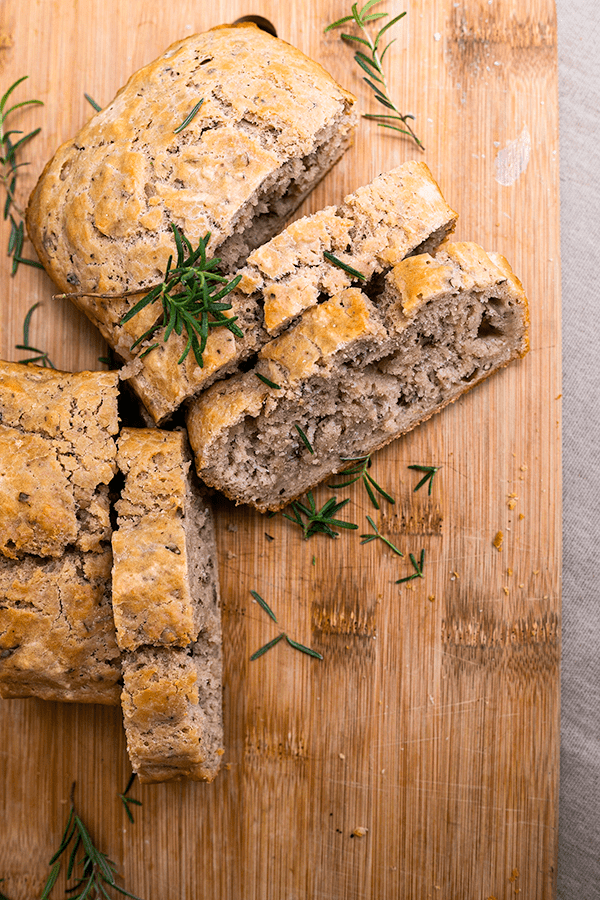
    This Easy Rosemary Beer Bread is the one recipe people always ask me about after they try it. No yeast, no kneading, no overnight fermentation — just one loaf pan and about an hour. The combination of rosemary, beer, and toasted walnuts gives it a depth of flavour that most people do not expect from such a fast bread. Slather it with fresh butter and a pinch of sea salt and you will understand why my aunt requests this every single time she visits.

    This post may contain affiliate links. If you purchase through these links, I may earn a small commission at no extra cost to you. Thank you for supporting Love & Harvest!

    easy rosemary bread no yeast

    This post is all about no-knead bread with rosemary and beer — the best savoury bread that is super easy to make.

    My Story

    A few years ago when I was visiting an aunt from Texas, she showed me her large rosemary bush at the front of her house. She was very proud it grew so large on its own. She asked me to make something with it because she had so much. This artisan bread always brings me back to that day. She loves this bread so much that every time she visits me in Mexico she asks if I have time to make it — and now I just always show up with a loaf without her ever needing to ask.

    Easy Rosemary Beer Bread

    Ingredients Deep-Dive

    Ingredients

    Flour

    The recipe calls for all-purpose white flour. You can substitute whole wheat, but do not go 100% whole wheat — it will make the bread dense and heavy. A 50/50 blend of all-purpose and whole wheat gives you a slightly nuttier loaf without sacrificing the texture.

    • Why it matters: All-purpose flour has the right protein content to give the bread structure without making it tough. Since there is no kneading here, the flour does all the structural work on its own.

    Beer

    One 12oz can or bottle of beer. Any beer works — lager, ale, stout. Each will give a slightly different flavour. A light lager gives a mild, slightly hoppy note. A dark stout gives a richer, almost caramel-like depth.

    • Why it matters: The carbonation in beer acts as a natural leavening agent, working alongside the baking powder to give the bread lift. The sugars in the beer also contribute to the golden crust. Without the beer, you do not have this recipe.

    Rosemary

    Fresh chopped rosemary is preferred — 1 tablespoon. If using dried, reduce to 1 teaspoon. The recipe also works with dried dried rosemary if you do not have fresh on hand.

    • Why it matters: Rosemary’s piney, woodsy aroma is the signature of this bread. It pairs perfectly with the malt from the beer and the butter on top. Fresh rosemary is more fragrant, but dried is perfectly fine in this recipe.

    Walnuts

    A quarter cup of chopped walnuts adds texture and a pleasant bitterness that rounds out the sweetness from the sugar.

    • Why it matters: The walnuts give this bread a rustic, artisan quality. They create little pockets of crunch that contrast beautifully with the dense, tender crumb. Do not skip them.

    Baking Powder

    Three teaspoons. This is the primary leavening agent — no yeast required.

    • Why it matters: Baking powder reacts with liquid and heat to produce CO2 bubbles that make the bread rise. Because we are not using yeast, the oven does all the heavy lifting. This is why the recipe does not need fermentation time — the chemistry is instant.

    Loaf Pan

    A nonstick bread loaf pan is all you need. I love mine from this nonstick loaf pan set — it comes in two identical pans, which is great for making double batches. The consistent size ensures even baking every time.

    • Why it matters: This recipe is so hydrated that it needs to be contained in a loaf pan to hold its shape during baking. Unlike yeasted breads that can be shaped and hold themselves, this batter is more like a thick cake batter than a classic dough.

    rosemary bread recipes

    Stand Mixer and Baking Tips

    For this recipe you will need a stand mixer with a dough hook. It makes the dough come together much faster. I personally use the KitchenAid 7 Quart Stand Mixer — it doubles as an assistant for pies, cookies, cakes, pasta, and more.

    Oven Temperature

    The oven needs to reach 350°F. Most breads require 400–450°F, but because we are using baking powder instead of yeast, the bread does not need that intense pull of heat. Lower and slower is the right approach here — it is closer to cake baking than bread baking.

    Cut the Bread Only After It Is Completely Cooled

    This is the hardest part. When the bread comes out of the oven, it is still cooking on the inside as it cools. Cutting into it too soon causes the inside to be undercooked and gummy, and releases all the moisture into the open air. Wait until it is fully cool — your patience will be rewarded.

    rustic rosemary bread

    If you love baking bread, try our Sourdough Bread, our Easy Homemade Focaccia, or our Fluffy Naan Bread.

    A hand holding two halves of rosemary beer bread showing the crumb

    Easy No-Knead Rosemary Beer Artisan Bread

    Print Recipe
    Pin Recipe
    Prep Time:10 minsCook Time:50 minsTotal Time:60 mins

    Ingredients

    • 3 cups all purpose flour sifted
    • 3 tsp baking powder
    • 1 tsp salt
    • ¼ cup sugar
    • ¼ cup chopped walnut
    • 1 tbsp fresh chopped rosemary or 1 tsp dried rosemary
    • 1 12oz beer
    • ⅓ cup melted butter for top of bread before baking

    Instructions

    • Preheat oven to 350°F and place the rack at the middle of the oven.
    • Grease a large loaf pan with spray or butter. Set aside.
    • Using a stand mixer with the dough hook attachment, place all the dry ingredients together. Mix for 1 minute.
    • With the machine running on medium-low, slowly pour the can of beer into the batter.
    • Place the batter into the greased pan and drizzle the melted butter on top. Run a knife along the edges so the butter touches all the sides.
    • Place the pan on the middle rack and bake for 50 minutes until the top is slightly golden brown.
    • Allow the bread to cool completely before cutting.

    Frequently Asked Questions

    Can I make this rosemary bread without beer?

    Technically yes, but the result will be quite different. The beer contributes both leavening (from carbonation) and flavour (malt and hops). If you want to substitute, use sparkling water or club soda for the leavening effect, though the bread will be more neutral in flavour. Ginger ale can work as a semi-sweet alternative.

    Does the bread taste like beer?

    Not strongly. The beer flavour mellows significantly during baking — what remains is a subtle, slightly malty background note that pairs beautifully with the rosemary. If you use a very dark beer like a stout, you will taste it more. If you use a light lager, it is barely detectable.

    Can I substitute the all-purpose flour for whole wheat?

    Partially, yes. A 50/50 blend of all-purpose and whole wheat flour works well and adds a nuttier flavour. Going 100% whole wheat will make the bread very dense. If you want a lighter whole grain option, spelt flour at a 1:1 substitution produces a better texture than whole wheat.

    Why does my bread come out gummy in the middle?

    Almost always this is because the bread was cut before it was fully cooled. The interior continues to cook and set as the loaf cools on the counter. Cutting it hot releases the steam and moisture prematurely, leaving the crumb gummy. Wait at least 45 minutes after taking it out of the oven before slicing.

    Can I add other herbs or mix-ins?

    Yes. Thyme, sage, or a combination of herbs all work well. You can also add grated Parmesan or sharp cheddar into the batter for a cheesy herb bread. Sun-dried tomatoes and olives are another great combination. Keep add-ins to about 1/3 cup total to not overwhelm the structure.

    How do I store this rosemary beer bread?

    Wrap the cooled loaf in a clean kitchen towel or beeswax wrap and store at room temperature for up to 2 days. For longer storage, slice the loaf, freeze the slices in a zip-lock bag, and toast directly from frozen. Avoid storing in plastic wrap at room temperature — it traps moisture and makes the crust go soft.

  • Easy Homemade Focaccia Bread

    Easy Homemade Focaccia Bread

    There is something deeply satisfying about making your own focaccia. The moment you poke those dimples in the dough, drizzle on the olive oil, and pull that golden, crackling sheet from the oven — it is an experience that no store-bought bread can replicate. This easy focaccia recipe is soft, airy, gloriously fluffy, and requires almost no skill. If you have a stand mixer and a little patience, you can make this tonight.

    This post may contain affiliate links. If you purchase through these links, I may earn a small commission at no extra cost to you. Thank you for supporting Love & Harvest!

    easy homemade focaccia bread golden crust

    Bread making has been part of human civilization for thousands of years. There is a reason it feels so deeply satisfying to bake your own loaf — it connects you to something ancestral and primal. I find real solace in baking bread for my family. The aroma fills the house, the kids want to help poke the dough, and the act of breaking into a fresh loaf together is a small ritual worth protecting.

    Why You Will Love This Focaccia

    • Easiest bread recipe — soft, easy to cut, with a crunchy salt-and-rosemary top that delivers incredible texture and flavor.
    • Flexible schedule — prepare the dough in the morning and bake at night, or let it ferment overnight and bake fresh the next day.
    • Fully customizable toppings — the sea salt blend is my favorite, but you can go savory with olives and sun-dried tomatoes, or keep it simple with just olive oil and herbs.
    • Kids love making it — poking the dimples in the dough before it bakes is genuinely fun for children of any age.

    focaccia bread dimples olive oil

    Topping Options

    The standard sea salt blend (salt, black pepper, rosemary, chili flakes) is my go-to and the base recipe below. But focaccia is one of the most creative-friendly breads you can make. Other options that work beautifully:

    • Olives, sun-dried tomatoes, rosemary, and olive oil
    • Capers, red onions, and olive oil
    • Oregano, thyme, cherry tomatoes, and olive oil
    • Fresh rosemary and flaky sea salt only (classic and elegant)

    focaccia bread topping options

    Ingredients

    Flour (All-Purpose and Whole Wheat Blend)

    • Why the blend works: All-purpose flour creates the open, airy structure while whole wheat adds fiber, density, and a nutty flavor complexity that plain white focaccia lacks. The higher protein in whole wheat also contributes to a slightly chewier, more satisfying bite. The ratio (815g white to 160g whole wheat) keeps the bread accessible without making it heavy.

    A kitchen scale is essential for this recipe — weighing your flour removes all the variability from cup measurements and ensures a consistent dough every time.

    Olive Oil

    • Why only olive oil: Focaccia is an Italian bread built on olive oil — both inside the dough and generously drizzled on top before baking. Olive oil contributes a distinctive fruity, slightly peppery flavor that is irreplaceable. Do not substitute canola, sunflower, or any neutral oil. The olive oil on top also creates the crispy, golden crust that defines great focaccia.

    Sea Salt

    • Why quality matters: The salt inside the dough controls fermentation and develops gluten. The salt on top — preferably a flaky, crunchy sea salt — creates the addictive textural contrast that makes you tear off just one more piece. The Celtic Sea Salt ground variety is excellent inside the dough; use a flaky finishing salt on top if you have one.

    Instant Yeast

    • Why instant yeast: Instant yeast activates immediately when it contacts the water and flour — no pre-dissolving required. It works reliably across a wide temperature range and gives you a predictable, consistent rise. The small amount (7g) in this recipe is intentional — less yeast means a slower, longer fermentation that builds far more complex flavor.

    focaccia bread sandwich made at home

    Professional Tips for a No-Fail Focaccia

    Pro Tip 1 — Patience Is Everything

    This recipe rewards patience above all else. There is almost no active work — the stand mixer kneads, the yeast rises, time does the fermentation. The more time you give the dough (especially the overnight fridge fermentation), the more complex and flavorful the final bread will be.

    Pro Tip 2 — Use a Stand Mixer

    The dough hook does all the kneading. This is what makes the recipe truly hands-off. Use the hook attachment only — not the paddle, not the whisk. Mix on medium speed: first 10 minutes with water and yeast, then 5 minutes after adding salt, then 5 more minutes after adding olive oil. A KitchenAid 7 Qt Pro Line stand mixer is a good option.

    Pro Tip 3 — Fermentation Container

    For the full-day counter fermentation, leave the dough in the stand mixer bowl covered with plastic wrap. For overnight fridge fermentation, transfer to a large clear container with a lid so you can monitor the rise without disturbing the dough. A 6 qt clear storage container works perfectly.

    Frequently Asked Questions

    Can I make this focaccia without a stand mixer?

    Yes, but be prepared for a workout. The dough is quite wet and sticky — that high hydration is what makes the bread so airy. If mixing by hand, work the dough for at least 15–20 minutes until smooth and elastic. Wet hands help prevent sticking.

    How do I know the focaccia is fully baked?

    The top should be deep golden brown and the edges should be pulling away from the pan slightly. The bottom (lift a corner with a spatula) should also be golden, not pale. The internal temperature should reach 200–210°F (93–99°C).

    Why does my focaccia come out dense instead of airy?

    The most common causes are: not giving the dough enough time to rise, using water that is too hot (kills the yeast), not measuring ingredients precisely (use a scale), or pressing the dough too hard when dimpling (be gentle — you want to preserve the gas bubbles).

    Can I freeze focaccia?

    Yes. Cool completely, slice, wrap individual pieces in parchment, then freeze in a zip-lock bag for up to 2 months. Reheat directly from frozen in a 375°F oven for 8–10 minutes.

    What is the best way to serve focaccia?

    Tear it and dip it into extra virgin olive oil mixed with balsamic vinegar. Use it as sandwich bread for picnics. Serve alongside soups and stews for dipping. It is also excellent with fresh mozzarella and roasted tomatoes.

    Can I make this recipe with sourdough starter?

    Absolutely. Replace the instant yeast with 150g active sourdough starter, reduce water slightly, and extend the bulk fermentation to 6–8 hours at room temperature or 12–16 hours in the fridge. See the sourdough bread guide for reference on starter ratios and timing.

    Golden homemade focaccia bread with herbs on a baking tray

    Easy Focaccia Bread

    Easy homemade focaccia bread that is soft, airy, and delicious with every bite. Great to use as a dipping bread with your favourite sauce or to make your favourite sandwich. It’s perfectly soft and fluffy and satisfyingly chewy. It’s sprinkled with lots of flaky sea salt herbs, and spice. Drizzled with extra olive oil, and soaks perfectly into all of those little classic holes that you have poked in the bread.
    Prep Time 15 minutes
    Cook Time 25 minutes
    Total Time 5 hours 40 minutes
    Course: Bread
    Cuisine: Italian
    Calories: 210

    Ingredients
      

    • 815 g white flour
    • 160 g whole wheat flour
    • 830 g warm water
    • 5 g sugar
    • 7 g instant dry yeast
    • 20 g sea salt blend (see below)
    • 20 g olive oil
    Sea Salt Blend (1 serving)
    • 1 tbsp sea salt
    • 1 tsp black pepper
    • 1 tbsp dried rosemary
    • 1 tbsp dried chili flakes
    Sea Salt Blend (small jar)
    • ¼ cup sea salt
    • 1 tbsp black pepper
    • 3 tbsp dried rosemary
    • 3 tbsp dried chili flakes

    Equipment

    • stand mixer
    • large 13 x 18" baking sheet

    Method
     

    1. in a stand mixer, add the flour and whole wheat flour together.
    2. Using a dough hook attachment, slowly add the warm water, yeast, and sugar together with the flour. Mix on medium speed for 10 minutes. Occasionally use a scraper and scrape down the sides so all the flour is well incorporated in the dough.
    3. Add the salt and mix for another 5 minutes.
    4. Add the olive oil and mix for another 5 minutes.
    5. In a large container, put the dough inside and drizzle some oil on top and on the side. Close the lid or wrap the top with plastic.
    To bake at night on the same day
    1. Start your process at 10am. Leave the dough on the counter top and let it rise for 3 hours. After punch the gas out of the dough and fold the dough. Let it rise again for another 2 hours.
    2. After the last rise, spray the baking sheet with oil, and fold the dough inside. stretch the dough until it is even and has stretch to all sides of the baking sheet. Wrap it in plastic and let it ferment on it's last rise for 2 hours.
    To bake in the morning for the next day
    1. Start your process anytime at night: In a 3-4qt container, generously spray with oil along with a drizzle of olive oil. Toss the dough and cover with a greased lid.
    2. Place in the fridge for 8-12 hours
    3. Spray oil in the large baking tray and fold the dough into the baking sheet. Stretch the dough until its even at the top and stretch the dough to all sides of the baking sheet. Wrap it in plastic and let it ferment on it's last rise for 3 hours.
    Baking
    1. Once the dough has finished the last rise. Preheat oven 500-550F.
    2. Once ready to go in the oven, drizzle generously with 20g of olive oil at the top and sprinkle the sea salt blend. Poke some holes using your fingers on the top of the bread evenly.
    3. Bake for 20-25 minutes.

    If you love baking your own bread, try the Crusty Artisan Purple Yam Bread or the Savoury Rosemary Beer Bread — two more recipes where simple ingredients and a little patience produce extraordinary results.

  • Traditional Hong Kong Curry Chicken

    Traditional Hong Kong Curry Chicken

    If you have ever craved a curry that is creamy, lightly spiced, and packed with the comforting flavours of lemongrass and coconut, this Traditional Hong Kong Curry Chicken is exactly what your table needs. Passed down through Cantonese kitchens and perfected in Hong Kong cafes, this is the dish that turns a regular weeknight into something memorable.

    This post may contain affiliate links. If you purchase through these links, I may earn a small commission at no extra cost to you. Thank you for supporting Love & Harvest!

    Hong Kong curry chicken

    Hong Kong Style

    In Hong Kong, curry is called 港式咖喱雞 (Cantonese: gong sik ga lay gai). From all the different versions of curry I’ve tasted, Hong Kong curry is on the mild side.

    Though Hong Kong curry is mild, it is still super tasty with hints of lemongrass and coconut cream. I would say it’s the tropical getaway in the curry world. The lemongrass gives a citrus lift, and the island flavour of the coconut cream adds a tropical creaminess to the crowd of flavour. It’s no wonder curry plays a strong role in Cantonese cuisine.

    Even though you’ve never visited Hong Kong or lived there, you can still find Hong Kong style curry anywhere with a large Chinese community — at Asian cafeterias, fast food stores, restaurants, and especially at Hong Kong cafe restaurants. Besides the variety of curry you can find, you can also find a variety of meats like chicken or beef (called 港式咖哩牛腩). Vegetarian is also an option.

    Like all the different versions of curry you can find in the world, the difference is in the spice blend. If you’re in the Hong Kong area, I’ve heard Choi Hop Lee 財合利 in Hong Kong (Wanchai) is the place to find authentic Hong Kong flavour — they make their own Hong Kong curry powder and paste.

    History of Hong Kong and Curry

    When you travel to Hong Kong, you will find people from all parts of the world. Once upon a time, Hong Kong was renowned as the financial hub of Asia. During the colonial years, the British government mobilized many Indian and Nepalese soldiers to Hong Kong. They brought over their food and spices and began the curry expansion in the city. It became popular to serve curry in restaurants to cater to the new community of people.

    Though the traditional curry brought over by Indians was strong in flavour, Hong Kong mellowed it down and made it sweeter to fit the local palate. They used coconut cream to help cut the spice, and incorporated Malaysian curry paste — more adaptable and favoured by the local population.

    Why You’ll Love This Recipe

    • Irresistibly delicious — this curry has lemongrass, turmeric, onion, and coconut milk. It has all the tropical sweet and savoury taste that is mouthwatering. The smell of the curry is not strong, but soft and tropical.
    • Easy to make — sauté the onion, add the marinated chicken, and let it simmer in chicken stock. The last 5 minutes of cooking, add in the coconut milk. Sounds easy? Because it is!
    • Still tastes great the next day — some food is best served fresh, but this curry is great the next day. Reheat and serve.

    Ingredients

    Curry Powder

    There are many different kinds of curry powder out there. Each country in Asia has their own flavour and heat level. For this recipe, I like to use Madras Curry Powder — the flavour leans more Chinese than Indian and it’s perfect for this dish.

    • Why it matters: Curry powder is the backbone of the entire dish. Using a quality powder with turmeric, cumin, and coriander makes all the difference in depth of flavour.

    Lemongrass

    Using lemongrass in curry is a Malaysian style that Hong Kongers love. Lemongrass gives off a tropical, vibrant taste and really brightens the entire dish.

    • Why it matters: Lemongrass is what separates Hong Kong curry from other regional curries. It adds a citrus, almost floral lift that balances the richness of the coconut cream.

    Coconut Milk

    The thickness of coconut cream makes the sauce less watery. The flavour of coconut adds sweetness that counteracts the strong spices in the curry, creating a balanced palate. Always add coconut cream when the dish is almost done — never boil it.

    • Why it matters: Coconut milk is the finishing touch. It rounds out the spice, adds body, and delivers that creamy tropical colour. Use a quality brand like Chaokoh Coconut Milk for best results.

    Evaporated Milk

    This is a secret weapon ingredient. Many Cantonese cooks (my grandfather included) add evaporated milk into the curry for a subtle dairy sweetness. Not too much — just enough to balance the spice and salt and give the curry more depth.

    • Why it matters: This is the ingredient that distinguishes Hong Kong curry from other Asian curries. It adds a creamy richness that is different from coconut milk alone.

    Professional Tips to Get Your Curry Tasting Like a Real Hong Kong Style Cafe

    Pro Tip #1 — Fry the Potatoes First

    I love frying the potatoes before adding them to the curry. All Hong Kong curry has potatoes — it’s a must. Frying the potatoes helps them hold together in the stew and prevents them from breaking up into starchy clumps.

    Pro Tip #2 — Make the Roux

    Roux is a cooked mixture of flour and fat. It is how we thicken the soup base. In classic French cooking the fat is butter, but in Hong Kong cooking oil is typically used. Do not walk away from this step — the roux burns fast.

    Pro Tip #3 — Do Not Boil the Evaporated Milk and Coconut Cream

    Evaporated milk and coconut cream should never reach boiling point. That is why these two ingredients are added at the very end. They are meant to offset the strong spice flavour and balance the dish.

    If you love Cantonese chicken recipes, also check out my Classic Hainanese Chicken and Soy Sauce Chicken (Cantonese Style) — two dishes that pair beautifully alongside this curry.

    Hong Kong curry chicken

    Frequently Asked Questions

    What makes Hong Kong curry different from Indian or Thai curry?

    Hong Kong curry is much milder than Indian or Thai curry. It uses a blend of Madras-style curry powder, lemongrass (borrowed from Malaysian cooking), and coconut cream or evaporated milk to create a sweeter, creamier result. The heat is gentle enough for children, making it a true family dish.

    Can I use boneless chicken thighs instead of a whole chicken?

    Yes. Boneless thighs work very well and cut down on cooking time. Bone-in pieces are traditional and add more flavour to the sauce, but boneless thighs are a great weeknight shortcut. Cook until the internal temperature reaches 165°F (74°C).

    Can I make this recipe without potatoes?

    You can, but potatoes are a defining feature of Hong Kong curry. They absorb the sauce and add body to the dish. If you leave them out, the sauce will be thinner. You could substitute with sweet potato, taro, or butternut squash for a similar effect.

    What should I serve with Hong Kong curry chicken?

    Jasmine rice is the classic pairing — it soaks up the sauce beautifully. You can also serve it over rice noodles, or with a side of steamed bok choy or Chinese broccoli to round out the meal.

    Can I make this curry ahead of time?

    Yes — this curry is even better the next day once the flavours have had time to meld. Store in an airtight container in the refrigerator for up to 3 days. Reheat gently on the stovetop and do not let it boil once you reheat, to preserve the coconut cream.

    Can I freeze Hong Kong curry chicken?

    Yes, though the potatoes can become slightly mealy after freezing. Freeze the curry without the potatoes if you plan to make a large batch, then add freshly cooked potatoes when reheating. The curry base freezes well for up to 2 months.

    Hong Kong Style Curry

    Delicious traditional Hong Kong style cafe curry chicken. Subtle flavour in spice, but still tons of flavour to leave an impactful meal. Also light and citrusy from lemongrass to fit any picky eater. It the perfect family meal option that keeps the dinner table warm and cozy. Print Recipe Pin RecipePrep Time:20 minsCook Time:30 minsCourse: Main CourseCuisine: ChineseKeyword: Cantonese CuisineServings: 4 people

    Ingredients

    Chicken Marinate

    • 1 whole chicken organic, free ranged
    • 2 tbsp turmeric powder
    • 1 tbsp salt

    Curry

    • ½ cup oil
    • 4-5 medium sized potatoes cut into medium size knobs
    • ½ white onion diced
    • 3 garlic cloves grated
    • 5 shallots chopped
    • 1 thumb-sized ginger sliced into thick slices
    • 3 red eye chili / red chili sliced
    • 2 tbsp Hong Kong curry powder / curry powder
    • 3 tbsp reserved oil
    • 2 tbsp flour
    • 2 lemongrass stalks
    • ½ cup water / chicken stock
    • ½ cup coconut cream
    • ½ cup evaporated milk
    • 2 TSP sea salt

    Instructions

    • Clean the inside and outside of the chicken. Pat dry. Cut the chicken into pieces. Separate the wings, legs, and breast. I like to debone the chicken and freeze the carcass for chicken soup later. Marinate the chicken in salt. Let it sit in the fridge.
    • In a large wok, add the 1/2 cup oil. When the wok is hot, add the potatoes and fry for about 5-8 minutes, or until you see the edges slightly brown. Place them on a plate with a paper towel.
    • With the same oil in the wok, use only 3 tbsp of oil and reserve the rest. Add the onion, garlic and shallots. When the onion is softened, add the ginger, chili, curry powder and turmeric. Fry until aromatic (3-5 minutes).
    • Add the chicken pieces and fry until the skin has color. Remember to stir constantly so it doesn’t stick to the bottom.
    • Once all the chicken is slightly browned, remove everything to a plate.
    • On the same pan, add in 3 tbsp of the reserved oil. Add the flour into the pan and fry until fragrant. Do not walk away from this step.
    • Once the flour is brown, take out your whisk and start to stir the flour around. Add the chicken stock while whisking the flour. Try to break up the flour in the chicken stock. You should not see any flour clumps at this point.
    • Add the chicken back to the pan, along with the lemongrass. Simmer on medium heat for 20-25 minutes.
    • For the last 5 minutes, add the evaporated milk, coconut cream, and salt to taste. Let it simmer on low for 5 minutes. Do not let it boil.
    • Serve with warm jasmine rice.