Tag: bread making

  • Crusty Artisan Purple Yam Bread Recipe

    Crusty Artisan Purple Yam Bread Recipe

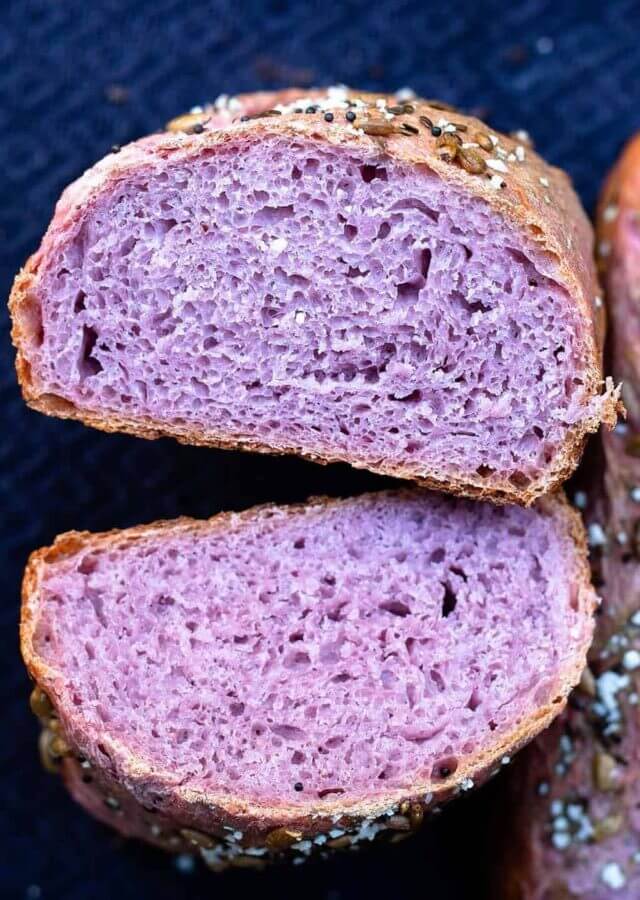
    There is something almost magical about pulling a purple loaf out of the oven — the color alone stops people in their tracks. This no-knead artisan purple yam bread is strikingly beautiful, but the flavor is what keeps you coming back: a subtle floral sweetness from the yam, a shattering crispy crust, and a cloud-soft interior. And the whole thing comes together with five ingredients and zero elbow grease.

    This post may contain affiliate links. If you purchase through these links, I may earn a small commission at no extra cost to you. Thank you for supporting Love & Harvest!

    fresh baked purple yam bread

    In its most essential form, bread is just flour, water, salt, and yeast. But why go basic when you can jazz it up? This purple yam bread recipe is a perfect beginner project. The results are so impressive you will want to make it again and again.

    A Note to First-Time Bakers

    Have you been browsing Pinterest dreaming about no-knead artisan loaves? That day is today. This recipe is so easy that no one will believe it is your first time. The technique requires almost no active work — just some stretch-and-fold, an overnight fridge rest, and a hot Dutch oven. When you break this loaf open, the colors and textures will genuinely delight you.

    Why You Will Love This Recipe

    • No-knead, easy technique — simple stretch and fold, then the fridge does the rest overnight.
    • Only 5 ingredients — you likely have most of them in your pantry right now.
    • Gorgeous to look at — the natural purple color makes this the most impressive bread at any table.
    • Unique flavor — the yam adds a subtle floral taste you have to experience to understand.
    • Soft and chewy texture — crispy crust, moist interior — the dream loaf.

    purple yam bread sliced

    Ingredients

    All-Purpose Flour

    • Why it works: All-purpose flour is accessible and forgiving — proof that you do not need specialty ingredients for outstanding results. If you have bread flour, use it; the higher protein content produces a chewier, slightly more structured crumb. King Arthur’s organic bread flour is a good option. The quality difference is noticeable.

    Purple Yam (Ube)

    • Why it works: Purple yam is a starchy root vegetable with a subtle floral, vanilla-like flavor. It adds moisture that clings to the gluten network, so the crumb stays soft long after baking. It also provides the stunning violet color — no food coloring needed. Find it fresh at Asian grocery stores or as purple yam powder (ube) online for convenience.

    Steam the yam for 15–20 minutes, let it cool on a plate to release extra moisture, then peel and mash smooth with a fork before adding to the dough.

    Instant Yeast

    • Why it works: Instant yeast activates without pre-dissolving and works reliably even in slightly cooler water. It is what gives the dough its lift and those beautiful air bubbles in the crumb. Anthony’s instant dry yeast packets come in 42 individual pouches — perfect for keeping freshness across multiple bakes.

    Sea Salt

    • Why it matters: Salt controls fermentation speed, strengthens gluten, and is the single biggest contributor to flavor in a lean dough. Use sea salt, not table salt — iodized table salt can slightly inhibit yeast activity. Celtic Sea Salt’s gourmet kosher grain is a great choice for both inside the dough and as a finishing sprinkle.

    Lukewarm Water

    • Why temperature matters: Warmer water (around 80–90°F / 27–32°C) activates yeast faster and speeds the initial rise. Too hot and you kill the yeast; too cold and the dough takes much longer to develop. Slightly warmer than your wrist is the right feel.

    purple yam bread dough fermented

    Professional Tips for a No-Fail Loaf

    Pro Tip 1 — Read the Full Recipe Before You Begin

    This bread is a two-day affair. Prepare the dough before bed, let it ferment in the fridge overnight, then bake the next morning. It requires very little active time but rewards readers who plan ahead.

    Pro Tip 2 — Use a Stand Mixer

    The stand mixer does all the mixing work so you truly do not need to knead. Use the dough hook at medium-low for 20 minutes. A KitchenAid stand mixer is a long-term kitchen investment that pays for itself across hundreds of bakes.

    Pro Tip 3 — Measure by Weight, Not Volume

    Bread baking is precise. Cup measurements vary widely depending on how loosely or tightly you pack the flour. A kitchen scale eliminates guesswork and guarantees consistent results every time. All measurements in this recipe are given in grams — follow them.

    Pro Tip 4 — Use a Dutch Oven

    A home oven cannot inject steam the way a professional bread oven can. A Dutch oven solves this by trapping the moisture released from the dough during the first 20 minutes of baking, which is what creates that shattering crust. The Lodge 5 qt cast iron Dutch oven is the one I recommend — it holds heat evenly and lasts a lifetime.

    Pro Tip 5 — Bake at Full Temperature

    Preheat to 475°F (245°C) with the Dutch oven inside. Bake covered for 20 minutes, then uncover for 30 minutes. The high heat is non-negotiable for a proper crust. Do not lower the temperature.

    Pro Tip 6 — Master the Stretch and Fold

    After the 3-hour bulk rise, gently deflate the dough and fold it: pull the two sides out and fold to center (like folding a letter), then pull the top and bottom and fold to center. Flip seam-side down and rotate the ball on the counter under your palms to build surface tension. Repeat three times total. This is what creates structure and the open crumb.

    purple yam artisan bread baked

    Frequently Asked Questions

    Can I use purple yam powder instead of fresh yam?

    Yes. Use about 2–3 tablespoons of ube powder mixed into the water before adding to the dough. The flavor will be slightly more intense and the color equally vivid.

    What if I do not have a Dutch oven?

    You can bake in a deep oven-safe pot with a lid, or place a metal bowl over the loaf for the first 20 minutes to trap steam. The crust will not be quite as dramatic but the bread will still be delicious.

    How do I know when the dough has proofed enough?

    After the 3-hour bulk rise at room temperature, the dough should have tripled in size and look bubbly. After the overnight fridge proof, it should have grown noticeably and feel cold and slightly domed in the container.

    Can I add seeds or grains to this loaf?

    Absolutely. Sprinkle seeds (sesame, poppy, sunflower) into the proofing basket before adding the dough. They will adhere to the crust during baking and add texture and flavor.

    Why did my bread come out flat?

    The most common causes are dead yeast (check the expiry date and water temperature), insufficient proofing time, or over-handling the dough during shaping (which pops the gas bubbles). Weigh your ingredients and follow the timing carefully.

    Can I make this with sourdough starter instead of instant yeast?

    Yes — this recipe adapts well to a sourdough approach. Check the how to make sourdough bread and how to make sourdough starter guides for reference. You will need to extend the fermentation time and adjust hydration slightly.

    Purple yam bread loaf cut in half to show the purple crumb

    Rustic Purple Bread

    Easy and beautiful loaf of bread made with purple yam. Crunchy and chewy on the outside and super moist on the inside. An fairly easy bread to make to impress anyone at the dinner table, and the best bread to wipe and clean off any sauces on the plates.
    Prep Time 30 minutes
    Cook Time 50 minutes
    Total Time 13 hours 20 minutes
    Course: Bread
    Calories: 175

    Ingredients
      

    • 400 g all purpose flour (3 cups of all purpose flour)
    • 310 g Luke warm water (307ml of Luke warm water)
    • 160 g steamed and cooked purple yam (3/4 cup of cooked purple yam)
    • 10 g sea salt (1 1/2 tsp sea salt)
    • 2 g instant yeast (1/2 tsp instant yeast)

    Equipment

    • stand mixer

    Method
     

    1. Wash and peel the purple yam. Put it in your steamer and steam for about 20 minutes until soft. Test it by poking it with a fork. If it goes in without effort it is done. If it requires force, then give it another 5-10 minutes.
    2. In a stand mixer, attach the dough hook. Add the flour and water together and combine until a light crumble appears. Put a towel or plastic wrap over the top and let it rest for 30 minutes. This allow the flour to fully hydrate.
    3. Meanwhile, put the fork in another bowl and mash it. Make sure all the big clumps are broken into smaller pieces. Don't worry if its not smooth, once it is in the stand mixer, it will break and smooth everything together. I sometimes like small chunks showing and are in the dough, so when it is baked, you can also see the purple yam pieces in the bread.
    4. Remove the towel or plastic wrap from the bowl, and add the mashed purple yam, sea salt, and instant yeast. Adjust speed to medium low for 20 minutes. The dough afterwards will look sticky and very elastic like. Let it sit for 3 hours until it has tripled in size.
    5. Dust the clean counter top with some flour, and carefully remove the dough on to the table. Gently deflate the dough, and give the dough the fold and stretch method. You're going to take the sides of the dough (imagine the dough is a face and you're going to pull the two ears of the face) stretch it out, and fold it where the nose is (the centre of the dough). Don't over stretch where you see the dough is tearing. Now you're going to take the top and bottom (top of the head and the chin of the face) and fold it again to the centre of the dough (the nose). Do this 3 times. Now flip it outside down (now the face is slapped onto the counter top) seaside down, and roll the dough around. You need to put some pressure at the bottom of the dough and pull the dough at the centre. You're going to feel some pressure and stretching of the dough (its honestly the best feeling when I do this part), and you're going to do this a few times until the dough becomes a beautiful ball. Do this 3 times.
    6. Now you need to find a vessel to put the dough in the fridge. If you have a bread proofing basket – use it. If not, just a regular bowl but find one that fits the dough but also some space for it to grow slightly. Add a piece of parchment paper and pat it down to the shape of the bowl. Gently flour the bowl and place the dough seaside down (wrinkly face down). Put plastic wrap at the top of the bowl and let it sit in the fridge overnight: at least 12 hours.
    7. When you're ready to bake, preheat oven to 475F/245C with the rack at the lower third. Insert the dutch oven with the lid on while it preheats. When the oven reaches the desire temperature, let the dutch oven sit there for an additional 20 minutes.
    8. Gently lift the dough out of the bowl by lifting on the sides of the parchment paper, and place it on the counter top. Place another new parchment paper beside the dough, and gently flip the dough on to the new parchment paper. The seaside should be facing up now.
      The goal here is to preserve and not disturb the air gas that can been developing in the fridge for 12 hours. the Less movement we can create when we place the dough into the oven, the better gas bubbles you'll get when you bake the bread. When the dough has been sitting in the fridge, all the gas built up is at the bottom of the dough which is the seaside is located. When we flip the bread upside down, the gas is invertiley at the top, so when we bake it at a high temperature, it will expand and get the beautiful air bubbles in the bread.
    9. Carefully take the dutch oven out, and carefully by lifting the parchment paper place the dough inside the oven with the lid on top. Bake for 20 minutes.
    10. After the first 20 minutes finished, lift the lid off and bake for an additional 30 minutes.
    11. Lift the bread out and let it cool completely on a drying rack. You need complete air circulation around the bread, including the bottom. Let the bread cool off completely before indulging.

    Notes

    You can easily add seeds and grains to the top of the bread easily by placing the desire seed and grain to the proofing basket before you add the dough inside.

    Love baking with fermentation? Try the Easy Homemade Focaccia Bread or the Savoury Rosemary Beer Bread next.

  • Easy Homemade Focaccia Bread

    Easy Homemade Focaccia Bread

    There is something deeply satisfying about making your own focaccia. The moment you poke those dimples in the dough, drizzle on the olive oil, and pull that golden, crackling sheet from the oven — it is an experience that no store-bought bread can replicate. This easy focaccia recipe is soft, airy, gloriously fluffy, and requires almost no skill. If you have a stand mixer and a little patience, you can make this tonight.

    This post may contain affiliate links. If you purchase through these links, I may earn a small commission at no extra cost to you. Thank you for supporting Love & Harvest!

    easy homemade focaccia bread golden crust

    Bread making has been part of human civilization for thousands of years. There is a reason it feels so deeply satisfying to bake your own loaf — it connects you to something ancestral and primal. I find real solace in baking bread for my family. The aroma fills the house, the kids want to help poke the dough, and the act of breaking into a fresh loaf together is a small ritual worth protecting.

    Why You Will Love This Focaccia

    • Easiest bread recipe — soft, easy to cut, with a crunchy salt-and-rosemary top that delivers incredible texture and flavor.
    • Flexible schedule — prepare the dough in the morning and bake at night, or let it ferment overnight and bake fresh the next day.
    • Fully customizable toppings — the sea salt blend is my favorite, but you can go savory with olives and sun-dried tomatoes, or keep it simple with just olive oil and herbs.
    • Kids love making it — poking the dimples in the dough before it bakes is genuinely fun for children of any age.

    focaccia bread dimples olive oil

    Topping Options

    The standard sea salt blend (salt, black pepper, rosemary, chili flakes) is my go-to and the base recipe below. But focaccia is one of the most creative-friendly breads you can make. Other options that work beautifully:

    • Olives, sun-dried tomatoes, rosemary, and olive oil
    • Capers, red onions, and olive oil
    • Oregano, thyme, cherry tomatoes, and olive oil
    • Fresh rosemary and flaky sea salt only (classic and elegant)

    focaccia bread topping options

    Ingredients

    Flour (All-Purpose and Whole Wheat Blend)

    • Why the blend works: All-purpose flour creates the open, airy structure while whole wheat adds fiber, density, and a nutty flavor complexity that plain white focaccia lacks. The higher protein in whole wheat also contributes to a slightly chewier, more satisfying bite. The ratio (815g white to 160g whole wheat) keeps the bread accessible without making it heavy.

    A kitchen scale is essential for this recipe — weighing your flour removes all the variability from cup measurements and ensures a consistent dough every time.

    Olive Oil

    • Why only olive oil: Focaccia is an Italian bread built on olive oil — both inside the dough and generously drizzled on top before baking. Olive oil contributes a distinctive fruity, slightly peppery flavor that is irreplaceable. Do not substitute canola, sunflower, or any neutral oil. The olive oil on top also creates the crispy, golden crust that defines great focaccia.

    Sea Salt

    • Why quality matters: The salt inside the dough controls fermentation and develops gluten. The salt on top — preferably a flaky, crunchy sea salt — creates the addictive textural contrast that makes you tear off just one more piece. The Celtic Sea Salt ground variety is excellent inside the dough; use a flaky finishing salt on top if you have one.

    Instant Yeast

    • Why instant yeast: Instant yeast activates immediately when it contacts the water and flour — no pre-dissolving required. It works reliably across a wide temperature range and gives you a predictable, consistent rise. The small amount (7g) in this recipe is intentional — less yeast means a slower, longer fermentation that builds far more complex flavor.

    focaccia bread sandwich made at home

    Professional Tips for a No-Fail Focaccia

    Pro Tip 1 — Patience Is Everything

    This recipe rewards patience above all else. There is almost no active work — the stand mixer kneads, the yeast rises, time does the fermentation. The more time you give the dough (especially the overnight fridge fermentation), the more complex and flavorful the final bread will be.

    Pro Tip 2 — Use a Stand Mixer

    The dough hook does all the kneading. This is what makes the recipe truly hands-off. Use the hook attachment only — not the paddle, not the whisk. Mix on medium speed: first 10 minutes with water and yeast, then 5 minutes after adding salt, then 5 more minutes after adding olive oil. A KitchenAid 7 Qt Pro Line stand mixer is a good option.

    Pro Tip 3 — Fermentation Container

    For the full-day counter fermentation, leave the dough in the stand mixer bowl covered with plastic wrap. For overnight fridge fermentation, transfer to a large clear container with a lid so you can monitor the rise without disturbing the dough. A 6 qt clear storage container works perfectly.

    Frequently Asked Questions

    Can I make this focaccia without a stand mixer?

    Yes, but be prepared for a workout. The dough is quite wet and sticky — that high hydration is what makes the bread so airy. If mixing by hand, work the dough for at least 15–20 minutes until smooth and elastic. Wet hands help prevent sticking.

    How do I know the focaccia is fully baked?

    The top should be deep golden brown and the edges should be pulling away from the pan slightly. The bottom (lift a corner with a spatula) should also be golden, not pale. The internal temperature should reach 200–210°F (93–99°C).

    Why does my focaccia come out dense instead of airy?

    The most common causes are: not giving the dough enough time to rise, using water that is too hot (kills the yeast), not measuring ingredients precisely (use a scale), or pressing the dough too hard when dimpling (be gentle — you want to preserve the gas bubbles).

    Can I freeze focaccia?

    Yes. Cool completely, slice, wrap individual pieces in parchment, then freeze in a zip-lock bag for up to 2 months. Reheat directly from frozen in a 375°F oven for 8–10 minutes.

    What is the best way to serve focaccia?

    Tear it and dip it into extra virgin olive oil mixed with balsamic vinegar. Use it as sandwich bread for picnics. Serve alongside soups and stews for dipping. It is also excellent with fresh mozzarella and roasted tomatoes.

    Can I make this recipe with sourdough starter?

    Absolutely. Replace the instant yeast with 150g active sourdough starter, reduce water slightly, and extend the bulk fermentation to 6–8 hours at room temperature or 12–16 hours in the fridge. See the sourdough bread guide for reference on starter ratios and timing.

    Golden homemade focaccia bread with herbs on a baking tray

    Easy Focaccia Bread

    Easy homemade focaccia bread that is soft, airy, and delicious with every bite. Great to use as a dipping bread with your favourite sauce or to make your favourite sandwich. It’s perfectly soft and fluffy and satisfyingly chewy. It’s sprinkled with lots of flaky sea salt herbs, and spice. Drizzled with extra olive oil, and soaks perfectly into all of those little classic holes that you have poked in the bread.
    Prep Time 15 minutes
    Cook Time 25 minutes
    Total Time 5 hours 40 minutes
    Course: Bread
    Cuisine: Italian
    Calories: 210

    Ingredients
      

    • 815 g white flour
    • 160 g whole wheat flour
    • 830 g warm water
    • 5 g sugar
    • 7 g instant dry yeast
    • 20 g sea salt blend (see below)
    • 20 g olive oil
    Sea Salt Blend (1 serving)
    • 1 tbsp sea salt
    • 1 tsp black pepper
    • 1 tbsp dried rosemary
    • 1 tbsp dried chili flakes
    Sea Salt Blend (small jar)
    • ¼ cup sea salt
    • 1 tbsp black pepper
    • 3 tbsp dried rosemary
    • 3 tbsp dried chili flakes

    Equipment

    • stand mixer
    • large 13 x 18" baking sheet

    Method
     

    1. in a stand mixer, add the flour and whole wheat flour together.
    2. Using a dough hook attachment, slowly add the warm water, yeast, and sugar together with the flour. Mix on medium speed for 10 minutes. Occasionally use a scraper and scrape down the sides so all the flour is well incorporated in the dough.
    3. Add the salt and mix for another 5 minutes.
    4. Add the olive oil and mix for another 5 minutes.
    5. In a large container, put the dough inside and drizzle some oil on top and on the side. Close the lid or wrap the top with plastic.
    To bake at night on the same day
    1. Start your process at 10am. Leave the dough on the counter top and let it rise for 3 hours. After punch the gas out of the dough and fold the dough. Let it rise again for another 2 hours.
    2. After the last rise, spray the baking sheet with oil, and fold the dough inside. stretch the dough until it is even and has stretch to all sides of the baking sheet. Wrap it in plastic and let it ferment on it's last rise for 2 hours.
    To bake in the morning for the next day
    1. Start your process anytime at night: In a 3-4qt container, generously spray with oil along with a drizzle of olive oil. Toss the dough and cover with a greased lid.
    2. Place in the fridge for 8-12 hours
    3. Spray oil in the large baking tray and fold the dough into the baking sheet. Stretch the dough until its even at the top and stretch the dough to all sides of the baking sheet. Wrap it in plastic and let it ferment on it's last rise for 3 hours.
    Baking
    1. Once the dough has finished the last rise. Preheat oven 500-550F.
    2. Once ready to go in the oven, drizzle generously with 20g of olive oil at the top and sprinkle the sea salt blend. Poke some holes using your fingers on the top of the bread evenly.
    3. Bake for 20-25 minutes.

    If you love baking your own bread, try the Crusty Artisan Purple Yam Bread or the Savoury Rosemary Beer Bread — two more recipes where simple ingredients and a little patience produce extraordinary results.